B
Operation
B I Brlef
instructions for
inittaL operatlon
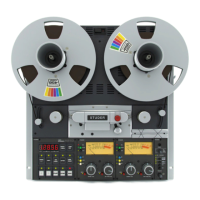
Unpack
the machine
and
the
accessories carefully and check against advice note.
Lift
the motor-deck by depressing the
recessed
push-buttons
on the front end of
the
ieft
and right
hand
side
of the top-plate, while exerting
a slight
downward
pressure
with the
palms
of both hands
on the
front
corners of the
machine.
This
releases
the Iatches,
allowing
the
deck to be lifted. Lock
the deck in the open
position
by
pressing
the brace on the right hand
side ln.
Unfolding
the sync-playback
amplifiers :
Simultaneously
press
the
sync-playback amplifiers
towards
the deck
mechanism
and
depress the
two
push-buttons
on the
inslde of the
frame.
Brlng sync-playback
amplifiers
forrn'ard
on their
hlnges. Check that
all
contact-strips, valves,
plugs,
relays
and cables are
properly
seated and
that the
fuses
are
firmlv
ln
posltlon.
Attention:
Make sure that the voltage
and
frequency of the mains corresponds with that
of the
recorder.
(
Check deslgnatlon
plate
below the mains
socket
on the recorder.
)
In case of a different mains
voltage,
a
transformer
should be
used.
Connect the
malns
by
means
of the lnstrument mains
con-
nector.
In small installatlons, the
recorder
may be earthed to the mains-earth,
often the use of
a
special earth connectlon may be deslrable.
The audio input and output connections
are
made via the Cannon
plugs
XLR
-
3
-
11 C and
XLR
-
3
-
12 C, Pin I
goes
to chassis,
pins
2 and 3 are the balanced
input
or output
con-
nections.
The chassis is also connected to the negatlve end of the HT-Iine
and
to
earth, In spe-
clal cases, the HT-minus may be isolated from chassis by breaking
a
llnk
in the stabilised
power
suPPIY.
Because of their excellent screening
properties,
we
recommend
the
use
of the
appropriate EMT
cables for the
audlo connectlons and
power
supply
Ilne,
Further details
about
the varlous
types
and
their
construction can be
found
ln
paragraph
H and in the enclosed Ieaflets.
To switch the recorder on
Depress
the
appropriate speed-selector button 7
l/2
lps or
15
lps.
To
check the
fuses
Ascertain
that none of the fuse
pllot
lamps are
llghtlng
up.
To close the recorder
The sync-playback
amplifiers
Should be lifted up
and
pressed
against
the frame. Now
press
both
push-buttons.
B
 Loading...