Do you have a question about the Style Craft GN2735 and is the answer not in the manual?
This document describes the "Wind Catcher" (Model #: GN2735), an outdoor decorative item designed to spin in the wind. It is intended for domestic use only and not for commercial applications.
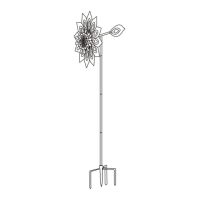
The Wind Catcher is an outdoor decorative device featuring two spinning blades (a large blade and a small blade) mounted on a T-Bar, which is then supported by a multi-section stake assembly. The primary function of the device is to provide visual interest in an outdoor setting as its blades rotate with the wind. The two blades (B & E) are specifically designed to spin in opposite directions, creating a dynamic visual effect.
The assembly process is divided into three main steps:
Step 1: Assemble the Blades: This involves attaching the spinning components to the T-Bar (A). The threaded end of the T-Bar (A) is first inserted through the middle hole of the Large Blade (B). Following this, a Washer (C), a Sleeve (D), the Small Blade (E), and a Ring (F) are applied in sequence. The entire blade assembly is then secured by fastening a Cap Nut (G). It is crucial during assembly to ensure the blades are correctly oriented: the front side of the blades (where the ball bearing is visible) should face outside, and the backside (where the ball bearing is covered) should face inside. Incorrect orientation may prevent the blades from spinning.
Step 2: Assemble the Bars: This step focuses on constructing the support stake for the wind catcher. It begins by threading the Stake Bar (H) through the ring on the Two-Prong Stake (I). The stake on the Stake Bar must be aligned with the Notch on the ring to create a stable three-prong stake configuration. Next, the Middle Bar (J) is connected to the Stake Bar assembly (which includes the Two-Prong Stake). Finally, the Top Bar (K) is connected to the assembled bar structure, completing the main support pole.
Step 3: Connect the Bar Assembly with the Blade Assembly: The final assembly step involves joining the two main components. The top of the Top Bar (K) from the bar assembly (completed in Step 2) is inserted into the end of the T-Bar (A) from the blade assembly (completed in Step 1).
Once assembled, the Wind Catcher is designed for outdoor placement. To install the unit into the ground, users should select a suitable outdoor area. The installation method involves placing a foot on the horizontal bar of the Two-Prong Stake (I) for leverage and hands on the Top Bar (K). Simultaneously, using both hands and foot, the unit should be gently pushed into the ground until it is stable.
If the blades do not spin, the primary troubleshooting step is to verify the correct assembly of the two blades. As mentioned in the assembly instructions, the front side of the blades (where the ball bearing is visible) must face outside, and the backside (where the ball bearing is covered) must face inside.
For cleaning the Wind Catcher, a soft cloth or sponge is recommended. To avoid damaging the finish of the product, abrasive cleaners or steel wool should not be used.
The Wind Catcher comprises the following components:
For assistance with assembly, installation, parts, or customer service, users can call toll-free at 1-855-766-1880 (US, Canada / English and Spanish only) Monday - Friday, 8:00 am - 5:00 pm (Central Time), or email customerservice@stylecraft-us.com. It is important to unpack all parts upon receipt to ensure no missing or damaged components. If any parts are missing or damaged, assembly should not be attempted, and customer service should be contacted for replacement. The manual emphasizes retaining the document for future reference.
| Brand | Style Craft |
|---|---|
| Model | GN2735 |
| Category | Outdoor Furnishing |
| Language | English |