11 Suburban DynaPack H Series Owner's Manual 10/2017 Rev.4
APPENDIX A
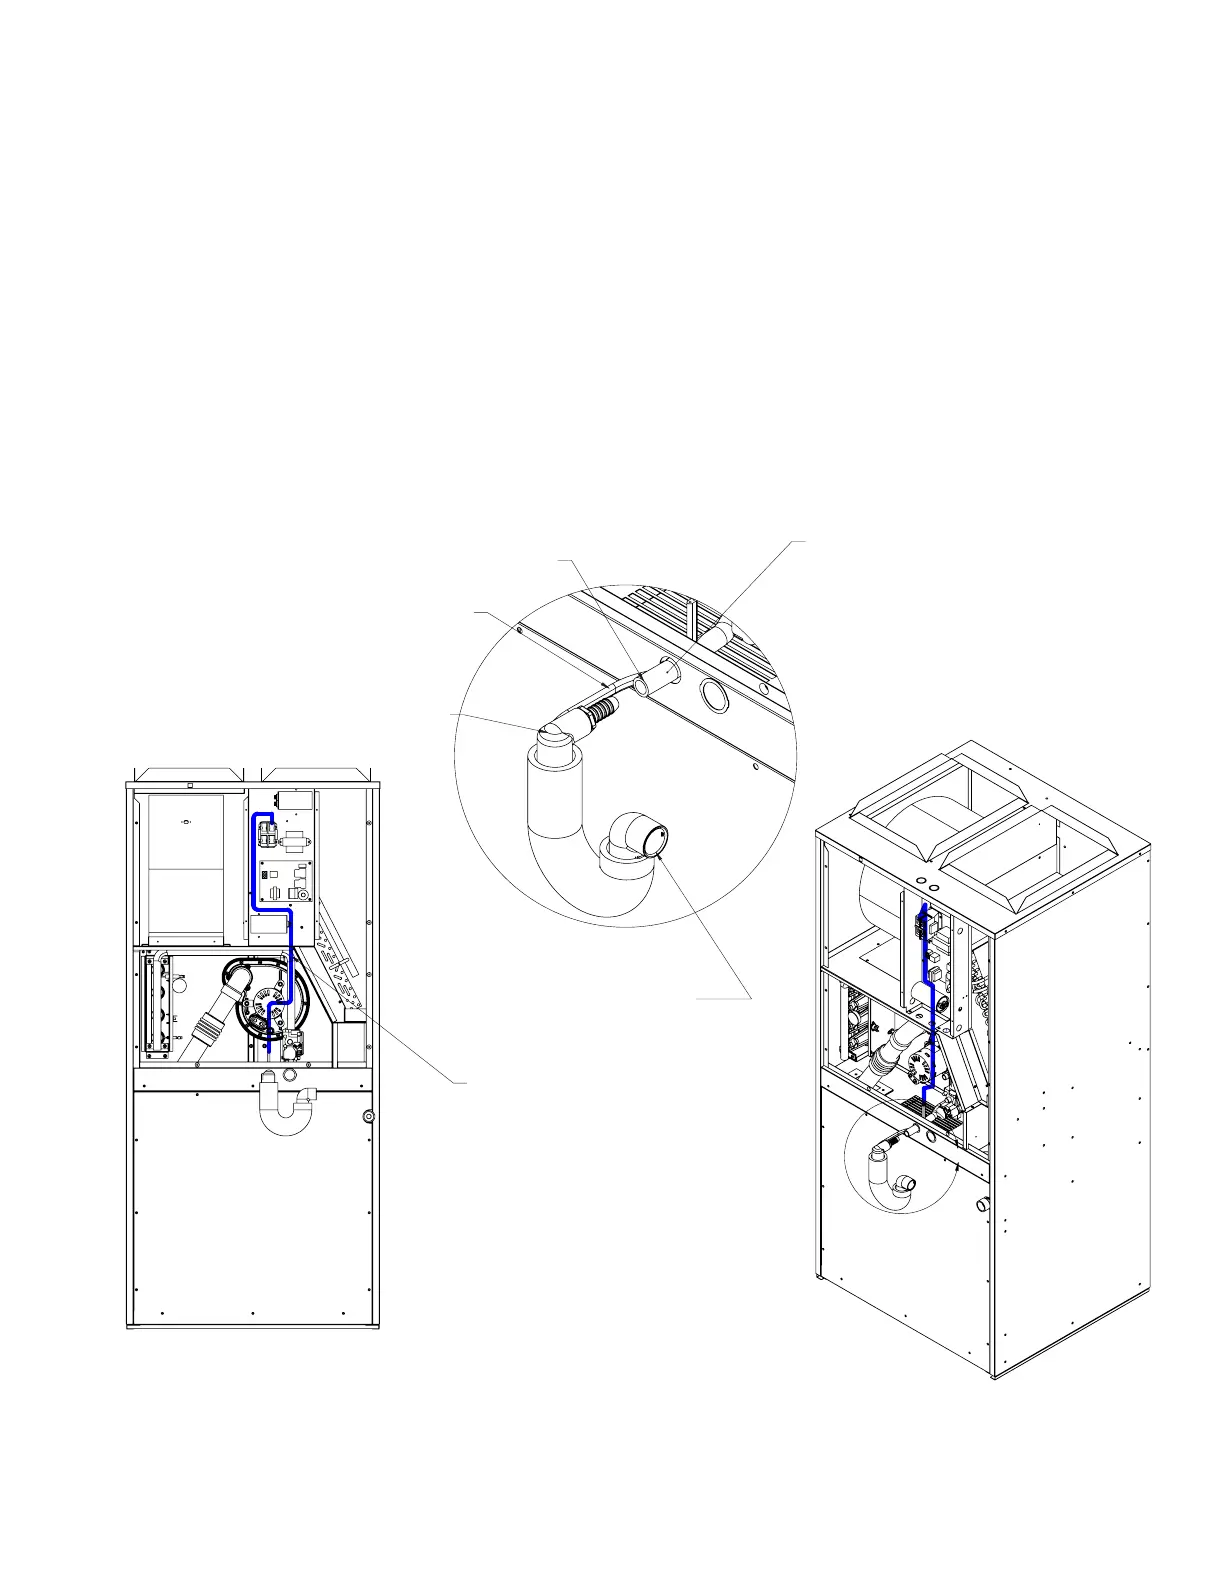
The Dynapack condensate drain system is designed to be installed in a conditioned space. To prevent freezing of the drain condensate in the
P-Trap, the installation location should not be exposed to freezing conditions. In installations where the drain system is exposed to freezing
conditions, we offer an optional heated P-Trap which is available for purchase. The part number for the heated P-Trap installation kit is K/10348.
Instructions for installing heated P-Trap kit:
1. Turn power off from main disconnect.
2. Remove existing P-Trap drain.
3. Remove middle & top doors and the control box cover.
4. Slip extruded (black) rubber drain hose back into the unit.
5. Route wires/heat cable on the supplied drain trap through the
bushing for the rubber drain hose.
6. Route wires along existing wires up to Top/Line side of contactor.
7. Wire as per drawing ES48000 sent with the kit to contactor &
ground lug.
8. Re-insert rubber drain hose through bushing with supplied
Wires/Heat cable.
9. Insert barbed tting on the P-Trap into rubber drain hose (soapy
water can be used for easy installation).
10. Align P-Trap as needed for existing drain plumbing.
11. Use wire ties to secure wires to existing wire/leads.
12. Re-check connections.
13. Replace control box cover, middle & top doors.
14. Unit is ready to be powered on.
APPROX. LOCATION
OF WIRES
B
DETAIL B
SCALE 1 : 2
NOTE: ROUTE HEAT CABLE IN
HOLE/BUSHING WITH RUBBER
DRAIN TUBE (MAY NEED TO
PUSH DRAIN TUBE BACK OUT
OF THE WAY TO RUN CABLE
THROUGH HOLE) SEE STEP 4 & 8
(BLACK) RUBBER DRAIN HOSE
WIRES/HEAT CABLE
HEATED P-TRAP
WITH BARBED FITTING
MAY NEED TO SLIP ELBOW &
BARBED FITTING OFF P-TRAP
TO INSERT INTO RUBBER HOSE
CONNECT TO EXISTING
DRAIN PLUMBING
STEPS FOR INSTALLING HEATED P-TRAP
TURN POWER OFF FROM MAIN DISCONNECT.
1.
REMOVE EXISTING P-TRAP DRAIN.
2.
REMOVE MIDDLE & TOP DOORS AND THE CONTROL BOX COVER.
3.
SLIP EXTRUDING (BLACK) RUBBER DRAIN HOSE BACK INTO THE UNIT.
4.
ROUTE WIRES/HEAT CABLE ON THE SUPPLIED DRAIN TRAP THROUGH
5.
BUSHING FOR RUBBER DRAIN HOSE.
ROUTE WIRE ALONG EXISTING WIRES UP TO TOP/LINE SIDE OF CONTACTOR.
6.
7. WIRE AS PER DRAWING ES48000 TO CONTACTOR & GROUND LUG.
8. RE-INSERT RUBBER DRAIN HOSE THROUGH BUSHING WITH SUPPLIED
WIRES/HEAT CABLE.
9. INSERT BARBED FITTING INTO RUBBER DRAIN HOSE. (SOAPY WATER CAN BE
USED FOR EASY INSTALLATION)
10. ALIGN P-TRAP AS NEEDED FOR EXISTING DRAIN PLUMBING.
11. WIRE TIE WIRES TO EXISTING WIRE/LEADS.
12. RE-CHECK CONNECTIONS. REPLACE CONTROL BOX COVER AND MIDDLE
& TOP DOORS.
UNIT IS READY TO BE POWERED ON.
REVISIONS
ECO#
DATE
REV.
DESCRIPTION
REV BY
CHECKE
DBY
10/3/2014
0
TM
SCALE
DRAWN BY
APPROVED BY
TITLE
DATE
DRAWING NUMBER
TOLERANCES
EXCEPT
AS NOTED
DECIMAL
±
FRACTIONAL
±
ANGULAR
±
REV.
Marvair
Cordele, GA
This drawing contains confidential information of Marvair, a Division of AIRXCEL, Inc. This
information is not to be disclosed or utilized without the expressed written permission of
Marvair, a Division of AIRXCEL, Inc.
Division of AIRXCEL, Inc.
ID01580
TLC
.03"
1
HEATER P-TRAP INSTALLATION INSTRUCTION
DYPA "H"
1/3/17
 Loading...