If soot is observed on the vent, immediately shut the furnace down and contact
a qualied service agency.
Listed below are several safety related items that you should follow during the
heating season to assure continued safe operation of the furnace.
1.Inspect furnace venting. Venting must be free of obstructions, void of soot, and
properly terminated to the atmosphere. (See Installing Vent Assembly.)
WARNING! Do not install screens over the vent for any reason. Screens
will become restricted and cause unsafe furnace operation. Accessories
are being marketed for RV products which we do not recommend.
For your safety, only factory authorized parts are to be used on your
furnace
2. Periodically inspect the vent for obstructions or presence of soot. Soot is
formed whenever combustion is incomplete. This is your visual warning that the
furnace is operating in an unsafe manner. If soot is present, immediately shut
furnace down and contact your dealer or a qualied service person.
3. Keep furnace clean. More frequent cleaning may be required due to excessive
lint from carpeting, bedding material, etc. It is imperative that control compartments,
burners and circulating air passageways of the appliance be kept clean.
4. The motor is permanently lubricated and requires no oiling.
5. Keep the furnace area clear of any combustible materials, gasoline or other
ammable vapor and liquids.
6. Before operating furnace, check the location of the furnace vent to make sure
it will not be blocked by the opening of any door on the trailer. If it can be blocked,
do not operate the furnace with the door open.
7. Do not restrict the ow of combustion air or the warm air circulation to the
furnace. To do so could cause personal injury and/or death.
8. Never operate the furnace if you smell gas. Do not assume that the smell of gas
is normal. Any time you detect the odor of gas, it is to be considered life threatening
and corrected immediately. Extinguish any open ames including cigarettes and
evacuate all persons from the vehicle. Shut off gas supply at LP gas bottle. (See
safety notice on front cover of this manual.)
9. Immediately shut furnace down and call a service agency if furnace cycles
erratically or delays on ignition.
WARNING! Should overheating occur, or the gas supply fail to shut off,
shut off the manual gas valve to the appliance before shutting off the
electrical supply.
10. Never attempt to repair damaged parts. Always have them replaced by a
qualied service agency.
11. Never attempt to repair the furnace yourself. Seek the help of a qualied
service person.
12. Never restrict the ducting installed by your trailer manufacturer. To do so could
cause improper furnace operation.
13. Do not install air boosters in the duct system. Such devices will cause the
furnace to cycle and to have erratic sail switch operation.
14. Clothing or other ammable material should not be placed on or near the
appliance.
15. Always follow the operating instructions. Do not deviate from the step-by-step
procedures.
16. Do not use this appliance if any part has been submerged under water.
Immediately call a qualied service technician to inspect the appliance and
to replace any part of the control system and any gas control that has been
submerged under water.
17. When considering add-on rooms, porch or patio, attention must be given to
the venting of your furnace. For your safety, do not terminate furnace vent inside
add-on rooms, screen porch or onto patios. Doing so will result in products of
combustion being vented into the room or occupied areas.
18. In any installation in which the vent of this appliance can be covered due to the
construction of the RV or some special feature of the RV such as slide out, pop-up,
etc. always insure that the appliance cannot be operated by setting the thermostat
to the positive “OFF” position and shutting off all electrical and gas supply to the
appliance. Never operate furnace with vent covered.
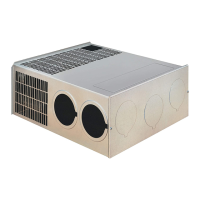
INSTALLATION AND REMOVAL OF UNIT
INSTALLED FROM INSIDE
TO REMOVE
1. Disconnect power supply at furnace.
2. Remove vent cap assembly.
3. Disconnect gas connections.
4. Remove cabinet front (2 screws).
5. Remove tie-down screw from center of unit and remove furnace from cabinet.
TO INSTALL
1. Slide unit into cabinet. NOTE: Care must be taken in routing wiring to back of
cabinet and outside of cabinet.
2. Reinstall tie-down screw.
3. Reinstall cabinet front.
4. Connect gas line.
5. Check gas connections for leaks using a soap and water solution. Correct any
gas leaks immediately.
6. Reinstall vent cap assembly.
INSTALLATION AND REMOVAL OF UNIT
WHEN OPTIONAL BACK IS USED
TO REMOVE
1. Break power to furnace.
2. Remove vent cap assembly.
3. Remove optional back.
4. Disconnect power supply at furnace.
5. Disconnect power supply plug from module board.
6. Disconnect electrode wire from module board.
7. Remove the two (2) screws securing module board and panel assembly to
rewall and pull out assembly. EXERCISE CARE NOT TO DAMAGE BOARD.
NOTE: This will allow more room for making the gas connections at the are
tting. It will be necessary to hold the are tting with a wrench when tightening or
loosening the gas line.
8. Remove gas line.
9. Remove tie-down screw at blower base and remove furnace from cabinet.
TO REINSTALL
1. Slide unit into cabinet and secure with screw at base of blower.
2. Connect gas line.
3. Check gas connections for leaks using a soap and water solution. Correct any
gas leaks immediately.
4. Reinstall module board and panel assembly.
5. Reconnect electrode wire to board
6. Reconnect power supply to board.
7. Reconnect power to furnace. NOTE: If this connection was made inside the
cabinet, care must be exercised to prevent wires from coming in contact with the
room air blower wheel.
8. Reinstall optional back.
9. Reinstall vent cap.
10. Provide power to furnace.
5
 Loading...