IMPORTANT:
If
this furnace is to be connected to a common duct system also
sewing a cooling unit, a manual or automatic damper is required to prevent any
cold conditioned air from circulating back into the furnace. Cold air passing over
the furnacecombustion chamber during the operation of the cooling
unlt can result
in the formation of condensation inside the furnace combustion chamber. This
condensation may promote corrosion and premature failure of the combustion
chamber.
NOTE: These furnaces shall be installed so the electrical components are
protected from water.
These furnaces are design
cert~f~ed for propanelLP gas only. Do not attempt to
convert to natural gas
Gas supply pressure for purposes of input adjustment.
Minimum
-
11" WC
'
Maximum
-
13" W.C.
'
(W.C.'
-
Water Column).
In the
U.S A, the installation of the furnace must be in accordance wtth local
codes and regulations. In the absence of local codes and regulations, refer to the
latest edition of:
I.
Standard for Recreational Vehicles ANSl A-1 19.2lNFPA 501C
2.
National Fuel Gas Code ANSl 2223.1
3.
Furnace must be electrically grounded in accordance with the latest edition of
the National Electrical Code
ANSllNFPA No. 70.
In Canada, the furnace must be installed
In accordance with:
1.
Standard CANICSA-ZZ4O Recreational Vehicles.
2. CSA Standard
CANICSA-Z240.6.2-M86 Electrical Requirements for
Recreational Vehicles.
3.
Standard CANICSA-Z240.4 2-M86 Installation Requirements for Propane
Appliances and Equipment in Recreational Vehicles.
4.
CANICGA-0149 Installation Codes.
5.
Any applicable local codes and
regulations.
This unit is equipped with an electric igniter devlce that has an energy
consumption of
1
amp @ 12 volts D C.
RETURN AIR
There are two (2) methods described below for Installing the furnace. Regardless
of the method you choose. we require that a permanent opening be provided in
the
interiorcabinetry of the coach directly in front of the furnace. The opening must
allow for free, unobstructed removal of the furnace This opening may be used as
a means of providing circulating return air to the furnace. Other openings may be
used as well.
It
is important that adequate return air be provided to assure normal
heating and operation of the furnace. Failure to provide the minimum return
airwill
cause erratic furnace cycling. Refer to the chart shown below for minimum return
air requirements.
'may be reduced to
88
sq
In mln.
if
5
ducts are used
TABLE 1
NOTE: Return alr must be from within the living area of the coach.
Return Air Requirements
Model Minimum Free (unobstructed) Area
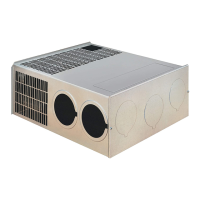
INSTALLING THE FURNACE
SF-42F
NOTE: Before installing the furnace
"X
dimension as illustrated in Figure 2 must
be determined.
1.
Locate the furnace near lengthwise center of the coach.
142 Sq. In.'
2. Choose a location for
installat~on out of the way of wires, pipes, etc.. which
might interfere with the installation. Adhere to the minimum clearances from the
cabinet to combustible construction as listed in Table
2. Refer to Ftgure 3 for
illustration of furnace clearances.
NOTE: Side and top clearances may be "0" for through the wall
installations
up to
a maximum of
3"
wall
thickness.
(See Figure 1
.)
3.
When an appliance is installed directly on carpet~ng, tile or other combustible
material, other than wood flooring, the appliance shall be installed on a metal or
wood panel extending the full width and depth of the appliance. If preferred, the
carpeting, tile or
cornbust~ble materials, other than wood may be cut away the full
length and depth of the appliance plus the appliance minimum clearances to
combustibles. (See Table 2.)
4.
Determine "x" dimension as shown in Figure 2. The tubes supplied
with
the
furnace will accommodate an installation range for "x" from
1-112
-
3".
If "x'
dimension is less than 1-112" or greater tha~
3",
then special vent tubes as
charted in Figure 2 must be ordered.
WARNING! Do not alter, cut or otherwise modify the vent tubes as
supplied by Suburban. Doing so could result in inadequate intake of
combustion air or improper venting of furnace exhaust.
5.
After determining "x" dimension, complete the furnace installation as follows,
A. IF INSTALLED DIRECTLY AGAINST OUTER
SKlN OR
"X"
DIMENSION IS
0
-
1-112"
I.
Vent Kit 520597 must be ordered.
Dn
no! cut or al!er the ven! !sSes supp1ie3
with the furnace.
2. Cut an opening through the inner wall 17.314 x 8". This will allow the rearof the
furnace to be installed against the outer skin of the coach. (See Figure
1.)
3.
Cut two 2-114" diameter holes through the outer skin of the coach, as shown
in Figure
1
4. Put furnace In place, making sure lhat rear of furnace cabinet is as close to
outer skin of coach as possible and still assure proper vent tube overlap. (See
Installing Vent Assembly
)
Secure furnace to cabinet.
5
Uslng the two 10 x 314
stainless
screws provtded fasten furnace to floor of
coach through the two holes
provlded in the front plenum areaof furnace cab~net
(See Ftgure
1
)
6
Install vent assembly (See
instructions
for lnstalllng vent
)
6.
IF NOT INSTALLED AGAINST OUTER SKlN AND
"Xu
DIMENSION
GREATER THAN
1-112"
1. Determine "xu dimension as illustrated in Flgure 2. Tube length for "x"
dlmenslon are charted. Speclal tubes.
if
needed, must be ordered.
2.
Locate center lines for exhaust and intake tubes as shown Figure 1. Cut two
2.314" diameter holes through coach wall for exhaust and intake. (See Figure 2
)
3.
Put furnace in place and secure furnace to cabmet. (See Figure 1
.)
4. Using the two 10 x 314 stainless screws provided, fasten to floor of coach
through two holes provided in front plenum area of furnace cabinet.
5.
Install vent assembly. (See instructions for Installing Vent.)
6.
Reinstall cabinet front
Left Right Exhaust
and
Model Front Side Side Top Bottom Back Intake Tube
SF-42F 1" 2" 2" 1"
0 0
3/13"
-NOTE-
O"
MEANS TO SPACER BUMPS
I
CLEARANCE FROM DUCTS TO
COMBUSTIBLE MATERIAL
-
114" (See Fiqure
3)
I
I
-.
I
TABLE
2
INSTALLING VENT ASSEMBLY
The vent outlet must be installed so it is in the same atmospheric pressure zone
as the combustion air intake. Theexhaust and intake tubes must be installed from
the outside, pass through the RV skin and slide onto the furnace exhaust and
intake.
WARNING! Do not
alterthe vent assembly supplied with this furnace. Any
modifications will
result in improper installation which could cause unsafe
furnace operation.
CAUTION! Combustion air must not be drawnfrom the living area. All air for
combustion must be drawn from the outside atmosphere. All exhaust gases
must be vented to the outside atmosphere
-
never inside the RV. Therefore,
it is essential to insure that the vent cap and tube assemblies are properly
installed.
I.
Apply caulking to RV skin behind vent cap as shown in Figure 1. Apply caulking
generously around perimeter of vent cap and across center as shown.
2. Insert intake tube through RV skin and slide it onto the furnace intake (See
Figure
2.) Mlnimum tube overlap of 112" is required.
3.
Insert vent cap exhaust tube through RV skin and slide it onto the furnace
exhaust (See Figure 2.) Minimum tube overlap of 1
114" is required.
4.
Attach vent cap assembly to outer skin of RV with the six
(6)
screws provided.
Do not install vent assembly
upslde down. The words "Suburban" and "Dayton,
Tenn." must be right side up.
CONNECTING GAS SUPPLY
Connect the gas
slipply to the fui-ace at the manifold, following the suggestions
outl~ned below. It w:il be cecessary to hold the flare fitting on the furnace manifold
when connecting or loosening
gas llne
NOTE: The compound sed
:.:I
threaded joints must be resistant to liquefied
petroleum (LP) gas.
NOTE: The appliance must be disconnected from the gas supply piping system
during any pressure testing of that system at test pressure in excess of 112 PSIG.
The appliance must be isolated from the gas supply piping during any pressure
testing of the gas supply piping system at test pressure equal to or less than 112
PSIG.
I.
Connect gas line to the 318" elbow at the front of the furnace. (See Figure 1
.)
Some standards may requlre the use of a manual shut OK valve in the gas line
external to the furnace cabinet.
2.
In order to maintain a check of gas supplied pressure to the furnace, Suburban
advises the installer to provide the
118" NPT plug tap for test gauge connection
immediately upstream of the gas supply connection to the furnace and that
it
be
readily accesible.
3.
After the furnace has been connected to the gas supply, all joints must be
checked for leaks.
[::YARNING!
Never
check
iorleaks with
arl
oijen ilzrnr.
Tufr!
oic
ii;?
I
apply soapy water to all joints to see if bubbles are formed.
1
 Loading...


