Do you have a question about the Suhr REACTIVE LOAD and is the answer not in the manual?
Summarizes the Suhr Reactive Load's function and its role in capturing amplifier warmth and dynamics without a speaker cabinet.
Cautionary note regarding potential heat buildup on the surface and the importance of unobstructed ventilation.
Adjusts the output level of the balanced and unbalanced DI/Line Out signals.
LED indicates signal flow and output power; fan activates based on input power to maintain temperature.
Important advice on cable selection, amplifier output levels, and connection precautions to prevent damage.
Provides balanced and unbalanced outputs for connecting to recording devices, effects, or amplifiers.
Input connects to amplifier speaker output; Thru output can connect to a speaker cabinet, disabling the internal load.
Illustrates how to connect the amplifier, Reactive Load, speaker cabinet, headphones, and DAW.
Details impedance, output levels, dimensions, weight, and compliance for the Reactive Load.
Outlines the warranty terms for Suhr amplifiers and electronic products, including limitations and procedures.
The Suhr Reactive Load is a passive analog device designed to simulate the electrical characteristics of a speaker cabinet, allowing guitar and bass amplifiers to be used without a physical speaker. It serves as a direct replacement for a speaker cabinet in an amplifier's signal chain, providing a reactive load that mimics the impedance versus frequency response of a typical 8-ohm 4x12 speaker cabinet. This design ensures that the amplifier responds precisely as it would to a real speaker, preserving the amplifier's tone, feel, and dynamics.
The primary function of the Reactive Load is to enable silent recording or practice with tube amplifiers. By connecting the amplifier's speaker output to the Reactive Load's input, users can capture the full warmth and dynamics of their amplifier without the need to mic a loud speaker cabinet. The device produces both balanced and unbalanced line-level signals that can be interfaced with various recording devices, effects processors, or power amplifiers. This makes it an invaluable tool for studio recording, live performance with in-ear monitors, or quiet practice sessions.
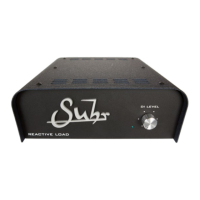
The front panel of the Reactive Load features a "DI LEVEL" knob and an LED indicator.
DI LEVEL Knob: This control adjusts the output level of both the balanced and unbalanced DI/Line Out outputs located on the rear panel. Its purpose is to optimize the signal level delivered from the Reactive Load to connected devices, such as audio interfaces or effects units. It's important to note that the maximum DI signal voltage is approximately 17% of the amplifier's output voltage. When using the Reactive Load without a speaker cabinet, users might be tempted to push their amplifier's output level higher than usual. To prevent potential damage to the amplifier, it is recommended to use familiar settings.
LED Indicator: This LED provides a visual representation of the signal flow from the amplifier to the Reactive Load. Its brightness is directly related to the amplifier's output power; at lower power levels, the LED may appear dim, which is considered normal operation.
The rear panel offers several connection options:
DI / LINE OUT (Unbalanced and Balanced): These outputs provide the line-level signals for connecting to recording devices, effects units, or power amplifiers. The balanced output offers improved noise rejection over longer cable runs, while the unbalanced output is suitable for shorter connections or devices that only accept unbalanced inputs.
INPUT - From Amp (8 Ohm/100 Watts RMS Max.): This is where the speaker output from the amplifier is connected to the Reactive Load. It is crucial to use a dedicated speaker cable for this connection, not an instrument cable, to ensure proper operation and prevent damage. The Reactive Load is designed to handle amplifiers up to 100 watts RMS.
THRU TO SPEAKER (Optional): This output allows the amplifier's signal to pass through the Reactive Load and connect to an external speaker cabinet. When this output is utilized, the internal load of the Reactive Load is disconnected, meaning the amplifier will drive the connected speaker cabinet directly. It is vital to match the impedance of the amplifier to the connected speaker cabinet to optimize performance and prevent damage. This output should never be connected to instrument, mic, or line-level inputs.
The manual illustrates several typical connection scenarios:
Amplifier to Reactive Load for Silent Recording/Practice: The amplifier's speaker out connects to the Reactive Load's input. The DI/Line Out then connects to a Digital Audio Workstation (DAW) or other recording interface. Users can then apply their favorite impulse response or speaker simulator software to process the signal, effectively replicating the sound of a mic'd speaker cabinet. Headphones can be connected to the DAW for monitoring.
Amplifier to Reactive Load with Speaker Cabinet: The amplifier's speaker out connects to the Reactive Load's input. The Reactive Load's "THRU TO SPEAKER" output then connects to a physical speaker cabinet. In this configuration, the Reactive Load allows for simultaneous direct output to a DAW while still driving a traditional speaker cabinet. This setup is useful for live situations where a direct signal is needed for the front-of-house mix, but an on-stage speaker is also desired.
Ventilation: The Reactive Load contains an internal fan designed to maintain the temperature of its external surfaces. The fan is powered by the amplifier's speaker output voltage and automatically activates when the input power exceeds approximately 25 watts. It is crucial not to obstruct the ventilation to ensure proper cooling and prevent overheating.
Surface Temperature: Users are cautioned that the surface of the Reactive Load may get hot during operation, especially when driving high-wattage amplifiers. This is a normal characteristic of passive reactive loads that dissipate significant power as heat.
In summary, the Suhr Reactive Load is a robust and versatile tool that provides a realistic speaker cabinet simulation for tube amplifiers, enabling silent recording, direct-to-PA performance, and flexible studio integration while preserving the amplifier's authentic tone and feel. Its intuitive controls and clear connection options make it accessible for both professional and home studio environments.
| impedance | 8Ω |
|---|---|
| balanced line output impedance | 10KΩ (Maximum) |
| unbalanced line output impedance | 10KΩ (Maximum) |
| di / line out level | +4 dBu at 7 watts input, maximum level setting. |
|---|---|
| maximum recommended input power | 150 Watts RMS |
| dimensions | 8.8" Width x 8.9" Depth x 3.6" Height |
|---|---|
| weight | 6.6 lbs. |