EasyManua.ls Logo

Suncast RTC1000 User Manual

Suncast RTC1000
2 pages
To Next Page IconTo Next Page
Page #1 background imageLoading...
Page #1 background image
OWNER'S
MANUAL
SUNILEST.
RTC1000
GUIDE
DE
MONTAGE
Tool
Rack
with
Wheels
No
Tools
Required
for
assembly
Chariot
pour
outils
Aucun
outil
n’est
nécessaire
pour
le
montage
À
WARNING
+
This
product
is
for
tools.
+
Not
intended
to
be
used
partially
assembled.
+
Not
intended
for
use
in
extreme
temperatures.
+
Not
intended
for
use
as
a
work
surface
for
projects.
+
Not
intended
for
use
when
tools
are
plugged
into
an
electrical
outlet.
+
Intended
for
residential
use.
+
Store
all
heavy
tool
heads
in
the
down
position
to
improve
stability
of
product
in
use.
+
Sharp
or
pointed
edges
should
point
to
the
center
of
the
product.
+
Not
to
exceed
loaded
weight
of
150
Ibs.,
evenly
distributed
on
the
product.
s
|f
part
is
broken,
repair
or
replace
at
once.
À
ATTENTION
+
Ge
produit
est
destiné
aux
outils.
+
Ge
produit
ne
doit
pas
être
utilisé
si
ce
dernier
n'est
pas
complètement
assemblé.
+
Ge
produit
ne
doit
pas
être
utilisé
en
présence
de
températures
extrêmes.
+
Ge
produit
ne
doit
pas
être
utilisé
comme
surface
de
travail.
+
Ce
produit
ne
doit
pas
être
utilisé
lorsque
les
outils
sont
branchés
sur
une
prise
électrique
murale.
+
Ce
produit
est
réservé
à
un
usage
domestique.
+
Ranger
toutes
les
têtes
d'outils
lourds
vers
le
bas
pour
une
meilleure
stabilité.
+
Les
bords
pointus
ou
affilés
doivent
être
orientés
vers
l'intérieur.
+
Ne
pas
dépasser
68
kg
en
veillant
à
ce
que
le
poids
soit
réparti
de
façon
uniforme,
e
Si
une
pièce
s'avère
endommagée,
réparez-la
ou
remplacez-la
immédiatement.
Assembly
Instructions
/
Instructions
de
montage
1.
Remove
tubes
from
underside
of
bottom.
4.
Retirez
les
tubes
situés
sous
le
fond.
2.
Place
bottom
on
flat
surface.
2.
Placez
le
fond
(socle)
sur
une
surface
plane.
* *
BOTTOM
/
SOCLE
3.
Orient
the
tube
so
that
the
upper
part
is
angled
in
towards
the
centerline
shown
in
the
below
illustration.
Line
up
the
slot
on
the
end
of
one
tube
with
the
rib
in
the
bottom
of
one
tube
hole
and
insert.
Repeat
process
for
the
other
three
tubes.
3.
Placez
le
tube
de
façon
à
ce
que
la
partie
supérieure
soit
dirigée
vers
la
ligne
centrale
visible
sur
l'illustration
ci-dessous.
Alignez
la
fente
située
au
bout
d’un
tube
sur
la
petite
côte
située
dans
le
fond
d’un
des
trous
destinés
aux
tubes
et
introdu-
isez
ce
dernier.
Répétez
l'opération
pour
les
trois
autres
tubes.
Tube
angled
towards
center
e ©
Slot
<*
Tube
dirigé
vers
le
centre
®
Fente
°°.
Tube
hole
Trou pour
tube
Quality
Control
No.
Numéro
de
contrôle
de
qualité
©
2011
Suncast
Corporation,
Batavia,
IL
0360831A
Question and Answer IconNeed help?

Do you have a question about the Suncast RTC1000 and is the answer not in the manual?

Suncast RTC1000 Specifications

General IconGeneral
BrandSuncast
ModelRTC1000
CategoryRacks & Stands
LanguageEnglish

Summary

WARNING

General Safety Precautions

Essential safety guidelines for product usage and limitations.

ATTENTION

French Safety Precautions

Important safety instructions in French for product usage and limitations.

Assembly Instructions

Step 1: Remove Tubes

Detach the tubes from the underside of the bottom component.

Step 2: Prepare Bottom Panel

Position the bottom panel on a flat, stable surface.

Step 3: Insert Tubes

Angle and insert tubes into the bottom panel, aligning slots with ribs.

Step 4: Attach Top Panel

Align and insert the four tubes into the top panel and bottom panel.

Step 5: Install Casters

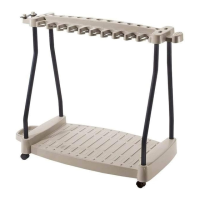
Securely press casters into the designated holes on the bottom panel.

Use Instructions

Tool Storage Guidelines

Best practices for storing tools for stability and safety.

Replacement Parts and Support

Ordering Suncast Parts

How to purchase replacement parts and contact Suncast for support.