EasyManua.ls Logo

Suncast ST700 User Manual

Suncast ST700
12 pages
To Next Page IconTo Next Page
Page #1 background imageLoading...
Page #1 background image
© 2021 Suncast Corporation, Batavia, IL
0361640
ST700 Storage Table
ASSEMBLY INSTRUCTIONS
Table de rangement ST700
INSTRUCTIONS D’ASSEMBLAGE
Mesa para
almacenamiento ST700
INSTRUCCIONES DE ARMADO
Korean, Japanese 6
www.suncast.com
1-800-846-2345 or 1-630-879-2050.
1-800-846-2345 ou le 1-630-879-2050.
1-800-846-2345 o al 1-630-879-2050.
To purchase Suncast replacement parts and learn about other Suncast products
visit us online or call.
Pour acheter des pièces de rechange Suncast et pour plus d’informations sur
d’autres articles Suncast, rendez-vous sur notre site Internet ou appelez-nous.
Para comprar piezas de repuesto Suncast y obtener más información acerca de
otros productos Suncast, visítenos en línea o llámenos por teléfono.
Question and Answer IconNeed help?

Do you have a question about the Suncast ST700 and is the answer not in the manual?

Suncast ST700 Specifications

General IconGeneral
BrandSuncast
ModelST700
CategoryStorage
LanguageEnglish

Summary

Preparation, Safety, and Maintenance

Assembly Instructions Review

Thoroughly read all instructions before assembly to prevent component damage.

Correct Assembly Sequence

Follow instructions precisely; Suncast is not liable for parts lost or damaged due to incorrect assembly.

Safety Warnings and Precautions

Do not store chemicals, allow children inside, or expose to extreme temperatures. Use as stationary storage.

Cleaning and Care Guide

Clean annually with mild soap and water. Avoid harsh cleaners and stiff brushes to prevent permanent staining.

Parts Identification

Front Panel (A)

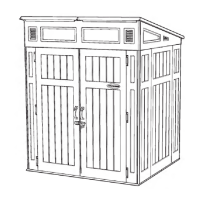
Identify the front panel component labeled 'A' for assembly.

Side Panels (B)

Identify the two side panel components labeled 'B' for assembly.

Back Panel (C)

Identify the back panel component labeled 'C' for assembly.

Bottom Panel (D)

Identify the bottom panel component labeled 'D' for assembly.

Top Panel (E)

Identify the top panel component labeled 'E' for assembly.

Assembly Steps

Attach Side Panels to Front Panel

Insert side panel (B) tabs into front panel (A) slots and push firmly to engage.

Attach Remaining Side Panel

Insert remaining side panel (B) tabs into front panel (A) slots on the opposite side and push firmly.

Install Back Panel

Install back panel (C) by inserting side panel (B) tabs into back panel (C) slots and pushing firmly.

Complete Assembly

Insert Bottom Panel

Insert bottom panel (D) smooth side up into the storage table and push until it snaps into place.

Attach Top Panel

Lower top panel (E) onto the table, aligning hinge holes with pegs on the back panel (C).

Related product manuals