Do you have a question about the SunnCamp Air-Volution Inceptor 390 Air and is the answer not in the manual?
Instructions for laying out the flysheet, sliding into the channel, and inflating the tubes using the provided pump.
Guidance on attaching storm straps to the captive clips at each corner for added stability in windy conditions.
Ensuring all entrances are closed and zipped to maintain awning alignment during setup.
Steps for securing the awning by pegging all remaining tags, starting with the rear and front corners.
Instructions for securing each guy rope at a suitable distance from the awning for stability.
Advises keeping a fire bucket filled with water and warns against smoking or naked flames near the awning.
Highlights guy ropes and awning pegs as trip hazards, especially in the dark.
Recommends cleaning with fresh water and a damp cloth, avoiding detergents or chemical cleaners.
Stresses drying the awning thoroughly before storage to prevent mildew and damage.
States that repairs should only be made by manufacturer-recommended agents to avoid voiding the warranty.
Advises unscrewing valves during storage to prevent malfunction and ensure a good air seal.
Explains that pressure changes are due to temperature, not leaks, and advises monitoring tube pressure.
Covers manufacturing defects for twelve months; requires proof of purchase for replacement or repair.
Lists specific damages not covered, including over-inflation, wear and tear, misuse, and improper storage.
Notes that the warranty does not affect statutory consumer rights regarding product use.
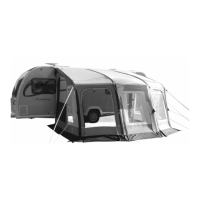
The SunnCamp Inceptor 390 Air is an inflatable awning designed for camping and caravanning, providing an additional sheltered space attached to a caravan. It is intended for light use in normal weather conditions and is not suitable for storms, gales, sub-zero, or tropical environments.
The primary function of the Inceptor 390 Air is to extend the living space of a caravan, offering a versatile area for various activities such as dining, relaxation, or storage. Its inflatable structure, supported by air tubes, allows for relatively quick and easy setup compared to traditional pole awnings. The awning includes multiple access points, windows with curtains, and ventilation options to enhance comfort and usability. It is designed to be secured to the ground using pegs and guy ropes, providing stability.
Setup and Inflation: The awning utilizes inflatable bladders, retained within reinforced, zipped oxford polyester sleeves, which require inflation to 5 psi for rigid support. Over-inflation should be avoided as it can rupture the bladder. The air valves are attached with retaining straps and need to be screwed into place carefully, ensuring not to cross-thread them. The awning comes with a manually operated air pump specifically designed for its valves; other pump types, such as 12V tyre inflators or compressors, must not be used. The pump requires assembly, including attaching the dump valve to the outlet side (indicated by an arrow pointing away from the handle marked 'inflate'), and then connecting the hose/pressure gauge and the largest nozzle. The dump valve is crucial to prevent over-inflation.
To set up, the awning flysheet is laid out on a flat, smooth, and dry ground area, with the entrance positioned correctly, ideally away from the wind. The beaded rear edge slides into the caravan's awning channel. The four corner tags are then secured to the ground with awning pegs. Each inflatable tube has a single inflation valve at ground level, positioned at the front of the awning. Accessing the valve requires opening the closest entrance. The valve cap is removed (turning anti-clockwise), and the inflator hose nozzle is inserted firmly into the valve. The pump is operated while adjusting the flysheet as the tubes inflate. Once 5 psi is reached, pumping stops, the nozzle is disconnected, and the valve cap is replaced. This process is repeated for all inflatable tubes. After inflation, the awning is brought to an upright position by pegging out the storm mate straps, which may need re-pegging later.
Stability and Security: Adjustable rear support poles are fitted to each corner of the awning. Their flattened top sections are inserted into reinforced retaining pockets behind the triangular panels. These poles are extended and secured with mini quick locks, ensuring the rear weather seal pads are positioned between the caravan wall and support bars. Integrated sewn-in vertical storm pole pockets, located in the central air beam, can be used with a rear support pole (additional poles are available separately) to aid stability and water dispersal, especially in heavy rain. The flat end of the pole is inserted into the pocket, adjusted to slightly lift the roof (without over-adjusting), and tightened with the quick lock bracket.
Storm mate straps are attached to captive clips at each corner to help secure the awning in windy conditions, though they are not designed for severe adverse weather. All entrances must be closed and zips fully secured during pegging to ensure proper alignment. Remaining tags are secured with awning pegs, starting with the rear two corners, then the front two, to achieve the correct shape. Pegs should be inserted at a 45-degree angle away from the awning and hammered in with a mallet, not pressed with a foot. Guy ropes are secured with pegs at a suitable distance from the awning, and their tension is adjusted to bring the awning to its natural shape. Guy ropes are a trip hazard, especially in the dark, and should be marked.
Access and Ventilation: Side entrances are single-skinned and can be rolled out of the way and retained by loops and toggles. When closed, the zip cover/baffle must be pressed into place, aligning velcro tabs and positioning the skirt correctly, secured by awning pegs, to prevent water ingress. These panels can also be used with a veranda bar (supplied) to create a veranda, or zipped out to fit a SunnCamp Air Annexe (available separately). Front entrances can be rolled out of the way or raised to create a porch using porch poles (available separately). When used as a porch, the spike end of the poles is inserted into the eyelets at the entrance's two corner pegging points, and a guy rope is hooked over the spike and secured to the ground with a peg. Tension is adjusted to make the porch square. When closed, the zip cover/baffle must be secured, aligning velcro tabs and positioning the skirt correctly, secured by awning pegs, to prevent water ingress.
Windows and Curtains: All windows have curtains that can be closed and secured with Velcro tape. When open, curtains are rolled up and secured with a toggle and loop.
Draught Skirt: A draught skirt is supplied to minimize drafts and improve insulation.
Weather Skirt: Once the awning is erected, the weather skirting at the base should be correctly laid out to prevent water ingress and can be secured with pegging points.
Safety: It is advisable to have a 'Fire' bucket filled with water placed outside the awning. The awning fabric is fire retardant, but not fireproof; therefore, smoking or using naked flames (including traditional campfires) inside or near the awning is prohibited. Guy ropes and awning pegs are trip hazards and should be marked and not left 'half in'. The tent includes a sewn-in label warning against carbon monoxide poisoning, and BBQs or gas appliances should never be used or left inside the awning, even if not actively burning.
Dismantling: To deflate the tubes, access the respective valve via an entrance or access flap. The air release collar of the valve is turned anti-clockwise to remove it and allow air to escape. The release collar remains attached by a plastic tab. Un-pegging can be done before, during, or after deflation. Once fully un-pegged, the beading is slid from the caravan's awning channel. The awning should then be carefully rolled before placing it back in the carry-bag. The valve should NOT be refitted before storing.
Cleaning: Both the inside and outside of the awning should only be cleaned with fresh, clean water and a damp cloth. Detergents or chemical cleaners must not be used.
Storage: The awning is best stored in its original carry-bag. If the awning is dismantled when wet, it MUST be thoroughly dried as soon as possible. After a wet pack-up, the awning should be re-erected as soon as possible to allow the flysheet, guy ropes, and carry-bag to fully dry naturally before repacking. Storing a wet awning will cause mildew and make it unusable; damage from incorrect storage is not covered by the manufacturer's warranty. The valves body should be left unscrewed from the air tubes when packing away the awning.
Repairs: Repairs to the awning should only be made by the manufacturer's recommended agents. Unauthorized third-party repairs will void the manufacturer's warranty. An emergency repair patch is enclosed for small holes in inflatable bladders. Over-inflated bladders that explode are not repairable. Spare bladders with full instructions are available from SunnCamp stockists.
Seams: The main seams of the awning are hot air taped to prevent leakage. Remaining seams should be treated with a seam sealant to maximize weatherproofing. Seam sealant should also be applied to main seams where the tape has lost adhesion or has been damaged (e.g., tie points or suspension points). Seam sealant is available from SunnCamp stockists.
Valves: The valves rely on a good air seal, which can fail if left under compression during storage. To prevent valve malfunction, the valves should be fully unscrewed when the product is in storage. Replacement valves are available from SunnCamp stockists.
Air Pressure Maintenance: Atmospheric conditions, such as changes in ambient temperature, can cause the air tubes to appear to lose or gain pressure. If this occurs, the tubes may require a top-up or release of excess pressure. This is not considered a sign of leakage or puncture. If leakage is suspected, the valve should first be inspected to ensure no parts are cross-threaded and that the air seals are in good condition and tight. Removing and re-fitting a valve, then re-inflating, may help. If a valve is faulty or a bladder has developed a leak, spares are available.
UV Deterioration: Prolonged exposure to direct sunlight can weaken the fabric. To avoid UV deterioration, the awning should be sited in a shaded area where it is protected from strong sunlight.
Moisture/Condensation: Moisture collecting on the inside of the awning's fabric is condensation caused by the occupier, not a sign of leakage. Damage caused by condensation is not covered by the manufacturer's warranty.
Warranty: The awning is covered by a manufacturer's warranty against manufacturing defects for twelve months from the date of purchase. The company undertakes to replace or repair, free of charge, any defect due to faulty workmanship or material. The receipt and proof of purchase must be retained. The warranty does not cover over-inflation of TPU tubes, general wear and tear, defects from neglect, misuse, unauthorized modifications, additions or repairs, damage from storms, winds or other inclement weather, damage from abuse, misuse, dropping or similar damage from failure to follow storage or erection instructions, moisture inside the flysheet (condensation), leakage through seams due to excessive abrasion or damage to sealant tape, seams coming apart from over-tensioning, broken or damaged zips from undue force, jamming or incorrect pegging, broken buckles from undue force, damaged carry bag from overloading, incorrect packing or general misuse, inflatable bladder damage due to wear and tear (bladders are perishable components and easily replaceable), damage from incorrect pitching or dismantling, damage from cooking inside the tent/awning, damage from UV degradation, products used on permanent sites, displays or commercial use by rental companies, or transportation/shipment costs to/from the manufacturer for repair/assessment. Any claim for missing parts or faulty goods must be made before use. The manufacturer is not responsible for claims regarding missing parts or faulty items not checked by the user prior to use. If returned for assessment, the product must be completely dry and clean; failure to do so may affect the warranty and deem the product unfit for inspection.
| Category | Camping Equipment |
|---|---|
| Width | 390 cm |
| Hydrostatic Head | 6000 mm |
| Awning Rail Height | 235-250 cm |
| Air Tubes | Yes |
| Poles | No |
| Guy Lines | Yes |
| Pegs | Yes |
| Pump | Yes |
| Carry Bag | Yes |
| Material | Pro-Tek 300D |