To fill Water Bottle (P), remove
the twist off cap with rubber
stopper. Fill bottle completely by
placing it under a light stream of
running water. Close the bottle
by pushing in the rubber
stopper and twisting the cap.
Turn the bottle upright and
allow the vacuum to form. You
may experience a few initial drips.
Locate the attached wire bottle holder and bottle sipper
tube hole location on the Back Wire Panel (D). Place the
sipper tube into the hole and pull the wire holder down
to secure the bottle in place. When refilling your Water
Bottle (P), never squeeze it
. This may cause a fracture
in the plastic and make it impossible for the necessary
vacuum to form.
Note:
Temperature fluctuations and excessive cage
vibrations sometimes cause occasional dripping. Whenever you move your
CritterTrail
®
Run-About Habitat™ always remove the Water Bottle.
Place a quality food mixture (Not Included) into your pet’s Round Food Dish(Q). The
dish can be placed in any corner of your new CritterTrail
®
habitat. Do not place Food
Dish (Q) under the Water Bottle (P).
Line up the tabs on the Look-Out
Lid (O) with the slots on the Look-Out Base (N) and
press together until they
snap into place. Attach one end of
the 10" Fun-nel™ Tube (T)
to the bottom
of the Look-Out Room. Place the
assembled Look-Out and tube into the
front, left side opening in the Roof Top (B).
Next, attach the Connector Ring (R)
to the Elbow (S). Insert the assembled
Elbow/Ring
through the front door
opening and attach to the 10" Fun-nel™ Tube (T).
Place the
Locking Cap (V ) inside the open Roof Top (B) hole in the back of the Habitat.
Place the assembled Front Wire Panel w/ Door (C) and the assembled Back Wire
Panel (D) on to the Scatter-less Base (A). The Wire Panel Assembly should fit inside
the tabs of the Scatter-less Base (A). To secure, snap the two Side Latches (E) on the
Scatter-less Base (A) to the Wire Panel Assembly (C & D).
Lock the Bubble Plug (G) into the bottom circular opening of the left side. Slide the
Twist Lock Opening Cap (U) downward into the u-shaped lip on the top, left side
passageway. To lock, turn so the gap faces downward. To unlock, turn the gap so it faces
upward and slide up. Next, slide the U-Tube (F) onto the circular opening of the right
side. The U-Tube (F) will allow your pet to have access to the Exercise Ball.
Slide the Ball Tube (H) into the Roof Top Lid (M) by lining up the two plastic guides along
each of the slots in the lid with the two slots on the Wheel Tube. Snap the Ball Securing
Stand with Screw (L) onto the opening on the Roof Top Lid (M). Place the Roof Top Lid
with attached Ball Support Tube and Securing Stand into the opening of the Roof Top, and
gently press down until the pieces click into place. Assemble the Ball by lining up the four
tabs on the Solid Ball Half (I) with the four indentations on the Ball Half with the Sliding
Door (J), and press gently until they snap together.
Connect the Ball Attachment Hub (K) by lining up its four tabs with the holes on the
open end of the ball, and gently twist the Ball Attachment Hub (K) until it clicks
into place. Slide the assembled ball into the Roof Top Lid (M).
Secure the ball by
tightening the screw on the Ball Securing Stand (L), and slide the hub guard on the Ball
Tube (H) over Ball Attachment Hub (K).
NOTE: Be sure to lock the top lid closed until it clicks shut to keep your pet secure.
Examine each part and identify each component using the parts identication list.
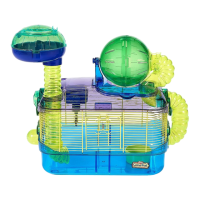
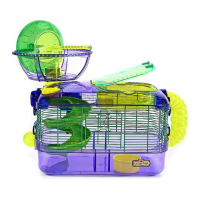
Habitat Measures/Dimensions de l'habitat /El hábitat mide: 20” (51cm) L x 11.5” (29cm) W x 18” (45.7cm) H
First, attach a Roof Top Passageway (W) with
Latch Assembly (E) to the left and right side of
the Roof Top. Press firmly, the Assembly snaps
tightly into Roof Top.
Place the Roof Top (B) onto the top of the
assembled bottom portion of the habitat. Line
up the Roof Top (B) over the assembled Wire
Panel Assembly (C & D). To secure, connect
the two Side Latches (E) on the Roof Top (B)
to the Wire Panel Assembly (C & D).
STEP 3
Attach Wire Panels
STEP 4
Roof Top Attachment
STEP 6
Accessory Attachment
STEP 8
Using the Water Bottle and Food Dish
Look-Out Room Assembly
Run-About Ball Assembly
B
STEP 2
Fill Scatter-less Base with Bedding
Fill the Scatter-less Base
(A) with a liberal amount
of bedding material.
(Not Included)
A
C
D
A
H
L
B
K
M
M
H
L
I
J
K
G
U
P
D
Q
D
O
N
T
T
T
SB
R
O N
V
Unlocked Locked
E
E
A A
C
D
V
Parts Identification: Item #100079211
COLORDESCRIPTIONKEYQTY. COLORDESCRIPTIONKEYQTY.
Scatter-less Base
Roof Top
Front Wire Panel w/ Door
Back Wire Panel
Side Latch
U-Tube
Bubble Plug
Ball Tube
Solid Ball Half
Ball Half w/ Sliding Door
Ball Attachment Hub
Ball Securing Stand w/ Screw
A
B
C
D
E
F
G
H
I
J
K
L
1
1
1
1
4
1
1
1
1
1
1
1
Roof Top Lid
Look-Out Base
Look-Out Lid
Water Bottle
Round Food Dish
Connector Ring
Elbow
10” Fun-nel™ Tube
Twist Lock Opening Cap
Locking Cap
Rooftop Passageway
M
N
O
P
Q
R
S
T
U
V
W
1
1
1
1
1
1
1
1
1
1
2
Blue
Purple
Yellow
Yellow
Green
Neon Yellow
Neon Yellow
Neon Yellow
Neon Green
Neon Green
Neon Yellow
Blue
Blue
Blue
Neon Green
Blue
Green
Neon Yellow
Neon Yellow
Neon Yellow
Neon Green
Blue
Green
Note: Once
Assembly snaps
into place, it
should not be
removed.
W/E
B
WW
F
Place the Front Wire Panel w/ Door (C) so the spring loaded door
latch opens downward. Place the Back Wire Panel (D) so that the
opening for the bottle nozzle is on the bottom. Connect the Front
Wire Panel w/ Door (C) to the Back Wire Panel (D) by hooking
the wire into each other (as pictured).
C
D
C
D
Opening
for bottle
nozzle.
Door
opens
down.
C
D
STEP 1
Connect the Wire Panels
W/E
W/E
Unlocked Locked
G
B B
G
60516
08-19-2010
03-31-2005
Critter Trail Z Instructions
James