EasyManua.ls Logo

Supersonic SC-603 - User Manual

Supersonic SC-603
2 pages
Print Icon
To Next Page IconTo Next Page
Loading...
Model#: SC-603
360º HDTV Digital Amplified
Motorized Rotang Antenna
USER GUIDE
Specificaons
+ Operaon Frequency: 45 - 860MHz
+ Gain: 25 - 35dB
+ Standing Wave Rao: < 1.5
+ Noise Parameter: < 2dB
+ Impedence: 75 Ω
+ Operaon Voltage: AC110V ± 10% 60Hz
+ Power: < 3W
+ Rotating Speed: 4r / minute
Set-Up Guide (aer last installaon step)
1. Make sure the antenna has been assembled according to the
Figures to the right. Receiver connects to antenna.
2. Aer connecng the antenna to power, please press the
revolving buon on the remote control. The antenna will begin
revolving. Please connue revolving the antenna unl the TV
program reaches the best signal quality.
3. Turn off the power aer you’ve found the best antenna posion.
Copyright ©2015 Supersonic Inc. All rights reserved.
Features and specificaons are subject to change without prior noficaon
Prop 65 Warning: This product may contain chemicals known to the State of California to cause cancer and birth
defects or other reproducve harm.
"V" DIPOLE
ARIAL BOOM
"V" DIPOLE
Question and Answer IconNeed help?

Do you have a question about the Supersonic SC-603 and is the answer not in the manual?

Summary

Specifications

Set-Up Guide

Step 1: Dipole Component Removal

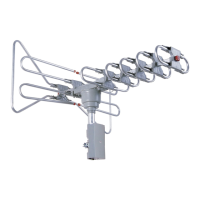
Instructions for removing the aluminium dipole components.

Step 2: Spreading the U Dipole

Guidance on how to spread the "U" dipole.

Step 3: Spreading the V Dipole

Guidance on how to spread the aluminium "V" dipole.

Step 4: Positioning the Aluminium Set

Instructions for pulling the first aluminium set forward.

Step 5 & 6: Aligning the V Dipole

Aligning the "V" dipole to the proper size hole.

Step 11: Securing the U Dipole

Applying screws and wing nut to the "U" dipole.

Step 12: Connecting Dipoles

Instructions for connecting both dipoles together.

Step 13: Rotor Placement

Placing the rotor in the correct orientation.

Step 14: Antenna to Rotor Placement

Placing the whole antenna on top of the rotor.

Step 15: Antenna Alignment on Rotor

Positioning the antenna on matching holes of the rotor.

Step 16: Dipole Alignment and Screwing

Aligning and screwing the dipole to the rotor.

Step 17: Initial Wing Nut Application

Applying wing nuts loosely for further attachment.

Step 18: Pole Alignment

Aligning the pole correctly for screw placement.

Step 19: Screw and Wing Nut Assembly

Assembling screws and wing nuts with a screwdriver.

Step 20: Final Wing Nut Tightening

Firmly tightening both wing nuts without over-pressure.

Step 21: Rotor Upside Down Adjustment

Turning the rotor upside down and unscrewing.

Step 22: Aluminium Line Securing

Securing the aluminium line with screws.

Step 23: Second Aluminium Line Securing

Securing the second aluminium line with screws.

Step 24: Outdoor Mounting

Mounting the antenna outdoors on a high ground.

Step 25: Final Connection

Connecting the antenna to the TV for scanning channels.

Supersonic SC-603 Specifications

General IconGeneral
BrandSupersonic
ModelSC-603
CategoryAntenna
LanguageEnglish