EasyManua.ls Logo

Sure-Loc X-Press - User Manual

Sure-Loc X-Press
4 pages
Print Icon
To Next Page IconTo Next Page
Loading...
PARTS ENCLOSED
Clip for
X-Straps
(2) Stretchable Rubber Straps
X–PRESS
INSTRUCTIONS
Limited 2-Year Warranty
Press all bows safely, quickly
and with ease!
A
B
D
“4-IN-ONE” PRESS
C.S. Gibbs Corporation
100 W. Quality Lane
Versailles, IN 47042
(812) 689-9926 phone
(812) 689-9927 fax
www.sureloc.com
Booklet Contents:
Pg 2
Important jack information
Pg 2 X-PRESS Assembly
Pg 2 Using the X-PRESS
Pg 3 X-PRESS diagram
Pg 4
Important maintenance
and care instructions
Pg 4 USL kits
Pg 4 Press stand assembly
Pg 4 Tray installation
Pg 4 Serving jig
Detailed instruction movie also on DVD!
A
Conventional Limb Angle
B
Parallel Limb Technology
C
Ultra-Short Limb Bows see back page
D
Crossbows
–1–
PUB# PF43360–1003
C
Question and Answer IconNeed help?

Do you have a question about the Sure-Loc X-Press and is the answer not in the manual?

Summary

X-PRESS INSTRUCTIONS

Parts Enclosed

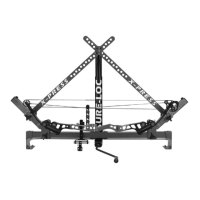
Lists all components included with the X-PRESS bow press.

Bow Type Compatibility

Details the types of bows the X-PRESS can safely handle, including limb angles.

X-PRESS ASSEMBLY

Assembly Steps

Step-by-step instructions for assembling the X-PRESS bow press.

USING THE X-PRESS

Setting Jack Height and Bow Placement

Guidelines for setting jack height and positioning the bow for safe pressing.

Pressing Different Bow Types

Specific instructions for using the X-PRESS with various bow limb configurations.

Crossbow Pressing Methods

Procedures for using the X-PRESS with crossbows.

Detailed Pressing Procedure

Comprehensive steps for adjusting the press and securing the bow.

IMPORTANT JACK INFORMATION

Jack Operation Limits and Warnings

Crucial information regarding jack usage to prevent damage and ensure safety.

JACK MAINTENANCE

Jack Disassembly and Maintenance

Instructions for taking apart, cleaning, and maintaining the press jack.

Jack Reassembly Procedures

Steps for correctly reassembling the bow press jack.

X-PRESS MAINTENANCE AND CARE

General Care and Lubrication

Tips for preserving the X-PRESS through regular cleaning and lubrication.

USL Kits for Specific Bows

Information on accessory kits for ultra-short and specific limb bow types.

Bow Press Stand Assembly

Instructions for assembling the optional bow press stand.

Accessory Installation

Guidance on installing the tray and using the serving jig.

Overview

The Sure-Loc X-PRESS is a versatile bow press designed to safely and efficiently press a wide range of bows, including conventional limb angle, parallel limb technology, ultra-short limb bows, and crossbows. It is backed by a limited 2-year warranty.

Function Description:

The primary function of the X-PRESS is to compress bow limbs, allowing for safe and easy string work, cam maintenance, limb removal, and other adjustments. It achieves this through a jack-driven mechanism that applies pressure to the bow limbs via X-straps and riser support units. The press is designed to mimic the way a bow's limbs flex when drawn, ensuring that the bow is not damaged during the pressing process.

Important Technical Specifications:

  • Jack System: Features a gear-driven jack for controlled limb compression. The jack ram has a maximum recommended extension of 11 inches from the jack pin to the top of the outer jack housing to prevent galling and lock-up.
  • Limb Support: Utilizes two X-straps and adjustable riser support units with 7/8" limb support pins. Rubber straps are included to secure the bow.
  • Adjustability: Offers extensive adjustability for various bow types and sizes. The jack height, X-strap positions (high or low holes), and riser support unit positions can all be adjusted to accommodate different limb angles, riser lengths, and cam configurations.
  • Mounting: Can be mounted on a dedicated bow press stand or a workbench.
  • Materials: Constructed with durable components, including a horizontal main tube, jack bracket, and various knobs and bolts for secure adjustments.

Usage Features:

General Operation:

  1. Assembly: The press requires initial assembly, which involves installing the jack on the horizontal main tube, attaching the X-PRESS main frame, and installing riser support unit knobs. Tools required are two 1/2" wrenches.
  2. Jack Height Setting: Proper jack height is crucial. The X-straps, when placed on the jack pin, should be square to the bow limbs at the point where the 7/8" limb support pins contact the limbs. This minimizes the chance of limb supports sliding up into the cams. The selected holes of both X-braces must match. The jack height and X-straps should be set to match the direction the limbs flex when drawn, allowing for full relaxation of the bow.
  3. Riser Support Unit Adjustment: Loosen the front knobs of the riser support units and slide/crank the pin units to position the inside 7/8" pins close to where the bow riser and limb meet. For X-PRESS (not PRO models), a specific thumb and forefinger technique is recommended for easier sliding of the supports.
  4. Bow Placement: For initial setup, place the bow riser or limb on top of the inside 7/8" pins with the bow string down. Adjust pin units until they rest in the pocket where the riser and limbs meet. Ensure rubber straps are on the inside 7/8" pins toward the press arms.
  5. X-Strap Positioning: Remove the hairpin clip from the jack pin, remove X-straps from the jack post, and rest them on the inside 7/8" pins. Turn the bow over with the string side up and set it under the inside 7/8" pins. Pull the rubber straps under the limb and over the pin to support the bow.
  6. Fine-tuning X-Strap Alignment: With one hand, pull an X-strap up and loosen the side knob. While holding the X-strap/bracket assembly to the limb, slide the outside 7/8" pin bracket so the pin rests just below the cams, ensuring enough room for cam work. The 7/8" pin may be placed between limb savers and the cam if present. Slide the other end of the X-strap onto the jack pin to the nearest hole, keeping the outside 7/8" pin as close as possible to the limb. Repeat for the other X-strap, ensuring the hole count (high or low) matches on both sides.
  7. Pressing: Reinsert the hairpin clip and crank the jack up to relax the bowstring.

Specific Bow Type Usage:

  • Conventional Bows (A): Start with the jack set about 4-6" from the bottom of its travel.
  • Parallel Limb Technology Bows (B): For these bows, minimize jack height. For string work/cam maintenance, start about 1" up from the bottom of jack travel. For full bow relaxation/disassembly, start approximately 6" up from the bottom.
  • Ultra-Short & Past-Parallel Limb Bows (C): Requires SURE-LOC® USL Kits (sold separately) for proper pressing. USL Kits are not needed for Mathews bows.
  • Crossbows (D):
    • Method 1: Remove the stock assembly from the limb bezel assembly. Press the limb bezel assembly in the X-Press by itself like a standard bow, following general setup instructions.
    • Method 2: Place the crossbow in the X-PRESS with the trigger guard facing outward. Raise the jack to allow X-straps to clear the sight or scope, providing clearance for work.

Accessories (Sold Separately):

  • USL Kits: Ultra-short limb bows (Kit 1) and Ultra-short limb Bowtech bows with center pivoting limbs (Kit 2). These kits are easy-to-install accessories that save time and money. Caution: May cause damage to other bows. Not needed for Mathews bows.
  • Bow Press Stand: A dedicated stand for mounting the X-PRESS. Assembly involves attaching cross braces, leg assemblies, and leveling footpads.
  • Tray: An optional tray that can be installed on the bow press stand for holding tools and parts.
  • Serving Jig: Allows re-serving ends without removing strings or cables.

Maintenance Features:

General Care:

  • Waxing: Applying car wax to the horizontal main tube aids in the adjustment of the riser supports.
  • Cleaning: Do not wax swing arms or limb support brackets; wipe these parts with an oil-free cleaner.
  • Jack Usage: Do not force the jack against its upper or lower limits, as this can damage gear drive parts.

Jack Maintenance (Monthly/Annually):

  • Monthly: Extend the jack shaft fully and wipe the inner tube down with a silicone-based lubricant.
  • Annually (or when wear is observed): Disassemble the jack for inspection and maintenance.
    1. Raise jack 4-6" and detach it from the horizontal main tube.
    2. Remove the jack shield clip and slide off the shield to expose gears.
    3. Drive out the roll pin in the small gear (using a 5/32" punch), slide out the crankshaft, and remove both gears. Remove the drive screw pin.
    4. Separate the inner tube from the outer jack sleeve by tipping the upper end of the jack down and gently sliding the halves apart. Remove the thrust washer and bearing from the drive screw end.
    5. Inspect inner tube and outer jack sleeve ends for burrs; use fine grit sandpaper or a file to smooth rough edges.
    6. Wipe old grease/lubricant from tube and sleeve with a clean cloth. Lubricate tube mating surfaces with a lithium-based grease. Clean and lubricate the jack's drive screw.
  • Reassembly:
    1. Install the thrust washer and bearing on the drive screw end.
    2. Slide the outer sleeve over the drive screw, aligning the tube slot with the detent in the outer jack sleeve.
    3. Install the drive screw pin and slide the large gear over the drive screw end, aligning the pin with the slot in the back of the gear.
    4. Slide the crankshaft halfway in and install the small gear with teeth facing the large gear. Carefully slide the crankshaft the rest of the way in, aligning the pin bore with the slot in the gear, and gently drive the roll pin back into the shaft.
    5. Lubricate the gears.
    6. Reinstall the jack shield and jack shield clip.
    7. Remount the jack assembly on the X-PRESS.

Sure-Loc X-Press Specifications

General IconGeneral
BrandSure-Loc
ModelX-Press
CategoryPower Tool
LanguageEnglish