SVEN GC-W800 Game Racing Wheel
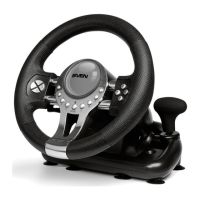
The SVEN GC-W800 is a game racing wheel designed for PC, PS3, PS4, and Xbox One, offering a realistic driving experience in autosimulators. Its ergonomic design, featuring a rubber coating and a built-in vibration feedback mechanism, enhances immersion by simulating speed, uneven road surfaces, vibrations during turns, collisions, and crashes. The included pedal unit, with brake and acceleration pedals, allows for quick speed adjustments and braking. For stable gameplay, the GC-W800 can be securely fixed to a table using its rubber suction caps and/or a fixation stand.
Technical Specifications
General:
- Model: GC-W800
- Wheel Diameter: 10 inches
- Steering Angle: 180 degrees
- Interface: USB
- Modes: Digital and Analog
Vibration Feedback:
- Motors: 2 vibration motors
- Feature: Built-in vibration feedback for enhanced realism
Controls:
- Axes: Two axes (Steering X, Accelerate Y+, Brake Y-)
- D-Pad: 8-position D-Pad
- Gear Shifter: Tiptronic lever for changing gears
- Buttons: 12 additional programmable buttons (including HOME button, Buttons 1-12, Paddle Shifters)
- Pedals: Included foot pedal unit with brake and acceleration pedals
Compatibility:
- PC: Windows XP/Vista/7/8/10
- Consoles: PS3, PS4, Xbox One
Package Contents:
- Game Racing Wheel: 1 pc
- Pedal Unit: 1 pc
- Fixation Stand: 1 pc
- Software CD Disk: 1 pc
- Operation Manual: 1 pc
- Warranty Card: 1 pc
Usage Features
Installation and Connection:
- Placement: Install the device on a flat surface (e.g., a table) using its 5 suction caps. If needed, secure it further with the fixation stand.
- Pedal Unit Connection: Connect the pedal unit to the racing wheel via its integrated cable to the RJ-11 jack (14).
- PC Connection: Connect the racing wheel to a free USB port on your computer using the USB cable (15).
- Driver Installation (PC): Insert the software CD into your PC's disk drive and run "setup.exe" to install the drivers. An icon "LS-USBMX 1 2 3 Steering..." will appear on your desktop for future checks and calibration.
- Game Controller Settings (PC): Double-clicking the desktop icon opens the "Game devices" window. In "Direct Input" mode, the wheel is recognized as "Wired Wheel." To switch between "Direct Input" and "XInput" modes, press and hold the HOME button.
- Properties and Calibration (PC): Click "Properties" to open the "Wired Wheel" window, where you can verify axis and key functionality. For calibration, select the "Parameters" tab, click "Calibrate," and follow the on-screen instructions.
Vibration Feedback Setup (PC):
- Access: In the "Wired Wheel" properties, select the "Vibration test" tab.
- Strength Adjustment: Adjust the "Vibration strength" slider to increase or decrease the force of vibration feedback (e.g., 85% as shown in Fig. 9).
- Test Buttons: Use "Left force," "Both force," or "Right force" buttons to test the vibration feedback.
- Confirmation: After setting and testing, click "Confirm."
- In-Game Adjustment: For games supporting "Force Feedback," the feedback level can be further adjusted for specific situations like crashes, obstacles, or road signs within the game's settings (e.g., "Stick Volume," "Road Effects," "Collision," "Engine").
Sensitivity and Key Mapping (PC):
- Sensitivity Setup: In the "Controllers Function" tab, adjust "Sensitivity setup" (from "Lower" to "Highest") to control the responsiveness of the wheel and pedals. Higher sensitivity results in quicker reactions.
- Dead Zone Setup: Adjust the "Dead Zone setup" for Steering (X), Brake (Y-), and Accelerate (Y+) to prevent unintended input from minor presses or turns.
- KeyMap Setup: Reprogram button assignments in the "KeyMap Setup" section by selecting the desired function next to each key designation.
Mode Switching:
- The HOME button (6) allows switching between Digital and Analog modes.
- Digital Mode: Provides static ON/OFF input for axes (full on or full off).
- Analog Mode: Provides proportional input based on the steering angle and pedal pressure (smooth control).
Operation Without Pedals:
- The paddle shifters (5) can substitute the pedal unit: the left paddle shifter acts as the brake, and the right paddle shifter acts as the accelerator.
Console Usage (PS3, PS4, Xbox One):
- PS3: Connect the wheel and pedals to the PS3 console. Power on the console. The channel LED indicator will light up automatically upon connection. Press HOME during gameplay to access the XBM interface or hold HOME to enter the MENU setup window.
- PS4: Connect the wheel and pedals to the PS4 console. Power on the console. Connect the racing wheel to the PS4 controller via a USB cable (the controller must be off). After connection, the red LED will light up on the wheel and controller. Press HOME during gameplay to access the XBM interface.
- Xbox One: Connect the wheel and pedals to the Xbox One console. Power on the console. Connect the racing wheel to the Xbox One controller via a USB cable (the gamepad must be off). After connection, the red indicator will light up on the wheel and gamepad. Press HOME during gameplay to open the main menu.
Maintenance Features
- Disassembly and Repair: Do not disassemble or repair the device yourself. All maintenance and repairs should be performed by qualified service center specialists.
- Protection: Protect the device from high humidity, dust, strong magnetic fields, vibrations, high temperatures, corrosive liquids, and gases.
- Cleaning: Use a clean, soft cloth to clean the device's casing. Do not use solvents such as gasoline or alcohol, as they can damage the surface.
- Physical Damage: Avoid dropping the device to prevent damage.
Troubleshooting
- Device Not Working After Software Installation:
- Check if the USB cable is securely connected to the PC.
- Ensure "Game Controller" status is "Confirm" after installation.
- Verify no conflicts with other peripheral devices.
- Restart your PC if the issue persists.
- Motors Not Vibrating in Game:
- Exit the game, disconnect and reconnect the controller from the USB port.
- If vibration feedback still doesn't work, restart the computer.
- Analog Axis Operating Automatically:
- Calibrate the steering wheel and confirm settings.
- Enter "Option – Controllers – Dead Zone" to adjust the dead zone range and ensure axes are within the dead zone.
- Vibration Feedback Operating Automatically:
- Enter "Force Feedback" settings and calibrate it.
- Insufficient Vibration Feedback:
- Enter "Force Feedback" settings and adjust the force of feedback.
If these solutions do not resolve the problem, contact the nearest authorized service center for professional assistance. Do not attempt to repair the device yourself.