EasyManua.ls Logo

SWF SWF/E-T601C User Manual

Default Icon
75 pages
To Next Page IconTo Next Page
To Previous Page IconTo Previous Page
Page #14 background image
9
LEVELING THE MACHINE
The machine must be leveled when it is installed. Balancing the machine horizontally protects the
needle from moving out of position.
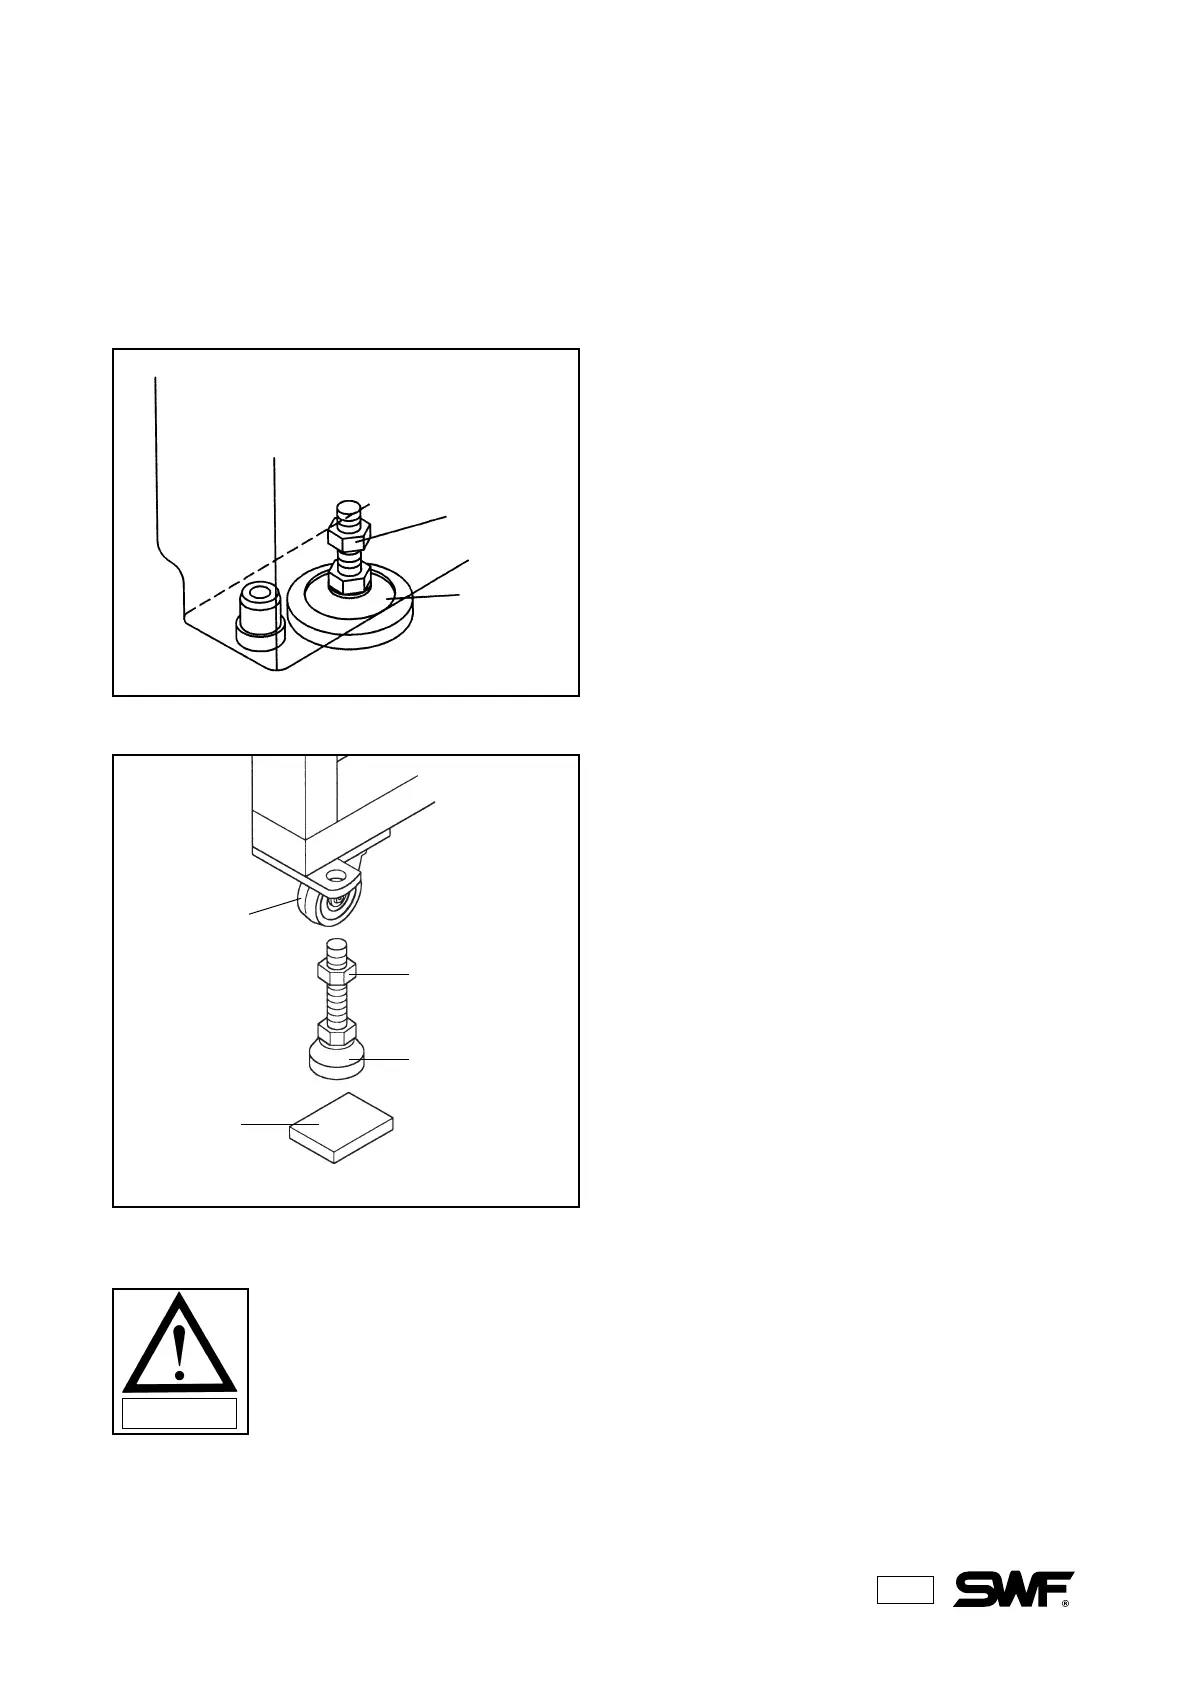
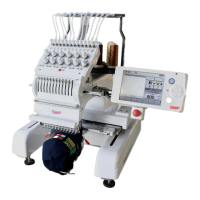
Nut
Adjusting
bolt
Nut
Adjusting bolt
Rubber
Caster
1) When there is no stand attached. adjust the front,
rear, left and right of the machine using the level
adjusting bolt. When the machine is level,
tighten the fixing nut.
2) When there is a stand attached, insert the four
horizontally adjusting bolts into the holes on the
stand. Then place the four rubber mats (for
vibration prevention) under each of the bolts.
Adjust the bolts until the caster is raised above
the level of the floor. Use a level to adjust the
machine using the horizontally adjusting bolts so
that the machine is level on all four sides. When
the machine is level, tighten down the fixing
nuts.
CAUTION
1) The machine must be balanced horizontally in all four directions : front, back, left and
right.
2) If the height of the four adjusting bolts varies over 10mm, use spacers beneath the
lower bolts to make the heights even.
Question and Answer IconNeed help?

Do you have a question about the SWF SWF/E-T601C and is the answer not in the manual?

SWF SWF/E-T601C Specifications

General IconGeneral
BrandSWF
ModelSWF/E-T601C
CategorySewing Machine
LanguageEnglish

Summary

SAFETY RULES

Delivery of Your Machine

Safe procedures for receiving and handling the embroidery machine upon delivery.

Installation Environment and Precautions

Critical environmental factors and safety steps for machine installation.

Safe Machine Operation Procedures

Guidelines and warnings for operating the embroidery machine safely.

Troubleshooting and Support

Steps for addressing problems and contacting technical assistance.

Understanding Warning Stickers

Explanation of various warning labels and their significance for safety.

INSTALLATION AND MACHINE ASSEMBLY

Machine Environment Requirements

Specifies optimal temperature, humidity, height, grounding, and lighting for machine setup.

Electrical Safety and Setup

Details on grounding, voltage, circuit breakers, and electrical safety precautions.

Leveling the Machine for Operation

Instructions for ensuring the machine is perfectly horizontal for optimal performance.

Peripheral Device Assembly Overview

General guide to assembling machine peripherals like stands and tables.

PARTS OF THE MACHINE

FUNCTIONS AND FEATURES

Design Manipulation Features

Covers memory, mirroring, scaling, repetition, and frame reversal functions.

Operational Controls and Navigation

Explains functions like automatic/manual offset, return to start, and non-stitching movement.

Advanced Operational Features

Details automatic trimming, thread break detection, and power safeguards.

Data Handling and System Information

Covers floppy drive, editing, machine stoppage, RPM, memory, and compatibility.

BUTTON AND SWITCH OPERATION

Emergency Stop Button Usage

How to operate the emergency stop button for immediate machine shutdown and restart.

Thread Tension Control Board Operations

Using ON/OFF buttons and toggle switches on the tension adjustment board.

THREADING AND TENSION

Upper Thread Path and Threading

Detailed guidance on routing the upper thread through the machine.

Upper Thread Tension Adjustment

Instructions for setting the correct tension for the upper thread.

Bobbin Threading and Tension

Procedures for inserting the bobbin and adjusting its tension.

Bobbin Winding Operation

Guide to using the bobbin winder and ensuring proper bobbin filling.

NEEDLE, HOOK, AND STITCH MECHANICS

Stitch Formation Process

Explanation of how embroidery stitches are created by needle and hook interaction.

Needle Selection and Changing

Guidelines on choosing the right needle and procedures for replacing it.

Needle and Hook Relationship

Understanding the timing and interaction between the needle and hook for correct stitches.

Thread Break Detection System

How the thread break detection unit functions and its maintenance.

MAINTENANCE AND INSPECTION

Regular Inspection and Cleaning

Checklist for regular inspections and detailed cleaning procedures.

Lubrication: Oil Supply Guidelines

Where and when to apply oil to machine parts for proper function.

Lubrication: Grease Supply Guidelines

Where and when to apply grease to machine parts for reduced wear.

MACHINE ADJUSTMENTS

Thread Trimmer and Blade Adjustments

Procedures for adjusting the thread trimmer, movable blade, and their tensions.

Picker Mechanism Adjustments

How to adjust the picker position and starting height for correct operation.

Presser Foot Adjustments

Procedures for adjusting presser foot height and noise reduction.

Drive Belt Tension Adjustments

Steps for checking and adjusting the tension of the X and Y axis drive belts.

Encoder and Solenoid Adjustments

Procedures for adjusting encoder and jump solenoid for system control.

TROUBLESHOOTING

NEEDLE CHART

BACKING MATERIAL GUIDE

Types of Embroidery Backing

Explains tearaway, cutaway, and specialty backings and their uses.

HOOPING AND TENSION MANAGEMENT

Proper Fabric Hooping Techniques

Best practices for hooping fabric and caps to ensure stability and quality.

Thread Tension Management

How to check and adjust upper and bobbin thread tensions for optimal stitching.

Related product manuals