Do you have a question about the Swimline HYDROTOOLS 8940 and is the answer not in the manual?
Instructions for pools with factory pre-cut openings, including hole punching and burr removal.
Steps for marking, drilling, and cutting openings for skimmer and return fittings on un-cut walls.
Detailed procedure for attaching the skimmer housing, faceplate, and gaskets to the pool wall.
Procedure for installing the return fitting, directional ball, and connecting the return hose.
Guidelines for maintaining proper pool water level and adjusting the return fitting's flow direction.
Instructions for cleaning the skimmer basket and procedures for vacuuming the pool.
Procedure for draining the pool and securing fittings to prevent damage from ice.
This document outlines the installation, operation, and maintenance of the Model 8940 Thru-Wall Skimmer, a component designed for swimming pool filtration systems. The skimmer's primary function is to collect debris from the pool's surface, preventing it from reaching the pump and filter, thereby maintaining water clarity and system efficiency. It also includes a return fitting to direct filtered water back into the pool.
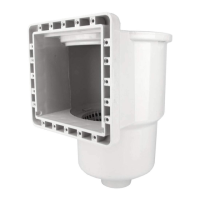
The Model 8940 Thru-Wall Skimmer system integrates several key components to manage water circulation and debris removal. The main Skimmer Housing is installed through the pool wall, creating an opening where water from the pool's surface enters. This housing contains a Skimmer Basket (8928) that traps larger debris like leaves and insects, preventing them from clogging the filtration pump. A Flap Weir (8926) is positioned at the skimmer opening to regulate water flow into the skimmer, ensuring that only surface water, where most debris accumulates, is drawn in. The Locking Top Cover (8927) secures the skimmer basket and weir, preventing them from floating out and providing a safe cover for the skimmer opening.
Water is drawn from the skimmer housing through a hose adapter (8905) at the bottom, which connects to the suction side of the pool's filtration pump. This adapter is designed to create a secure, airtight connection, crucial for the pump's prime and efficient operation. The system also includes a Return Fitting (8949) with an "Eyeball" component. This fitting is installed separately through the pool wall and connects to the pressure side of the filtration system. Its adjustable "Eyeball" allows users to direct the flow of filtered water back into the pool, optimizing circulation and debris movement towards the skimmer.
The Vac Adapter Plate & Elbow (8929) is an optional accessory designed for pool vacuuming. When attached to a vacuum hose, it allows the pool pump to draw water directly from the pool bottom through the vacuum, effectively cleaning the pool floor. This adapter ensures that the vacuuming process is integrated seamlessly with the existing filtration system.
Installation of the skimmer system varies depending on whether the pool wall is factory pre-cut. For pre-cut walls, the process involves punching out designated holes and the rectangular opening, then deburring the edges to prevent liner damage. For non-pre-cut walls, a Hole Template Guide is used to mark and drill 1/4" holes and cut the rectangular opening for the skimmer, as well as a 2-3/8" diameter circle for the return fitting. Precision in these cuts is vital to ensure a proper seal and prevent leaks.
During skimmer housing installation, one of the 8905 hose adapters is screwed into the bottom of the housing using Teflon tape for a watertight seal. It's important to avoid over-tightening to prevent cracking and to never use glue or sealant on these pipe threads. The skimmer face plate (8919) and gaskets (8946) are then aligned with the drilled holes in the wall panel. The installation creates a "sandwich" of materials: the face plate, gasket, vinyl liner, metal wall panel, gasket, and skimmer housing, all secured with stainless steel Philips head screws (8947). The vinyl liner is cut along the inside edges of the face plate only after the pool has been filled to approximately 2" below the return fitting, ensuring the liner is properly stretched and positioned.
The return fitting installation involves disassembling the 8949 return fitting, screwing the remaining 8905 hose adapter into the flange end using Teflon tape, and inserting the fitting through the vinyl liner and wall panel with rubber gaskets. The "eyeball" side should face inside the pool. The adjustable directional ball fitting is then screwed into the flange side, allowing users to direct water flow away from the skimmer opening for optimal circulation.
For normal operation, maintaining the water level midway up the skimmer face plate is crucial. If the water level drops too low, the pump may cavitate (draw air) and lose its prime, leading to inefficient filtration. The "eyeball" portion of the return fitting can be adjusted by loosening its knurled outer ring, allowing users to direct the water flow as desired to improve pool circulation.
Regular maintenance is essential for the longevity and efficient operation of the skimmer system. The Skimmer Basket (8928) should be cleaned periodically to remove trapped debris. To do this, the Locking Top Cover (8927) is removed, and the basket is lifted out. It is recommended to shut off the pool pump before performing this task to prevent debris from being drawn into the pump or filter.
For pool vacuuming, the top cover or the Flap Weir (8926) can be removed. The weir flap can be folded forward, and its pins squeezed toward the center to remove it. The skimmer basket does not necessarily need to be removed during vacuuming. The vacuum hose is filled with water by temporarily inserting its cuff into the return fitting while the pool pump is on, ensuring all air is removed from the hose. The 8929 Vac adapter is then attached to the hose and placed inside the skimmer housing, keeping the hose cuff submerged to prevent air from re-entering the system and causing the pump to cavitate.
Winterizing the pool requires specific steps to protect the skimmer system from damage due to freezing. The pool level should be drained approximately 2" to 4" below the skimmer opening. The "eyeball" fitting in the return is removed, and the wall fitting is securely plugged with 1-1/2" plugs. All filter hoses from the skimmer and wall fitting must be disconnected. It is critical to ensure that the skimmer housing remains free of water accumulation throughout the winter, as damages caused by ice formation are not covered under warranty. This proactive approach to winterization helps preserve the integrity of the skimmer and prevents costly repairs.
| Brand | Swimline HYDROTOOLS |
|---|---|
| Model | 8940 |
| Type | Sand Filter |
| Voltage | 115V |
| Filter Media | Sand |
| Operating Pressure | 50 psi |