The document provided is an owner's/operator's manual for the Swisher E4-S4000 Trimmer. This manual details the assembly, operation, maintenance, and safety guidelines for the device.
Function Description
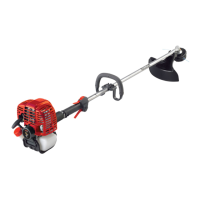
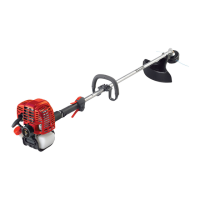
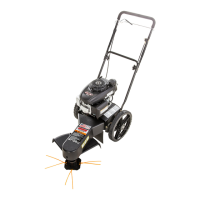
The Swisher E4-S4000 is a hand-held power equipment designed for trimming and cutting grass. It is built to deliver superior performance and reliability, emphasizing quality, comfort, safety, and durability. The unit is powered by a high-performance Swisher engine, which is described as a hybrid 4-stroke engine lubricated by oil mixed with gasoline and air from the carburetor. This design aims to provide high power with low displacement and weight. The trimmer is equipped with a cutting attachment shield and a trimmer head, which can be used with various trimmer line styles (semi-automatic, manual, fixed, or flail) depending on the application. It is capable of cutting grass by swinging the trimmer from left to right and can also be used for edging by tilting the handle.
Important Technical Specifications
The E4-S4000 Trimmer has the following key specifications:
- Dry weight (less attachments): 13.0 lb / 5.9 kg
- Engine model: SF3410E
- Engine type: Power Boost Chamber
- Bore x stroke: 1.5 x 1.2 in. / 38 x 30 mm
- Displacement: 2.1 cu. in. / 34 cc
- Maximum power: 1.4 HP / 1.0 kW @ 8,000 RPM (min⁻¹)
- Fuel/oil ratio: 50:1 with ISO-L-EGD or JASO FC class 2-cycle mixing oil. Swisher E4 engine oil is recommended.
- Carburetor type: Walbro WYL, diaphragm-type
- Fuel tank capacity: 23.7 oz / 700 ml
- Ignition: One-piece electronic, program-controlled
- Spark plug: NGK CMR5H
- Air cleaner type: Non-reversible heavy-duty filter element
- Starting method: Recoil
- Stopping method: Slide switch
- Transmission type: Automatic, centrifugal clutch w/bevel gear
- EPA Emission Compliance Period: Category A (300 hours Extended)
The manual explicitly states that specifications are subject to change without notice.
Usage Features
The Swisher E4-S4000 Trimmer is designed for user-friendly operation with several features:
- Handle Adjustment: The handle can be positioned for optimal operator comfort, typically about 10 inches ahead of the throttle assembly, and secured with four socket-head screws.
- Throttle Lever Free Play Adjustment: The throttle lever free play should be approximately 3/16-1/4 inch (4-6 mm) and can be adjusted by loosening a locknut on the cable adjuster.
- Line Cutter Position: The line cutter on the cutting attachment shield can be adjusted to two positions to achieve different line lengths for cutting.
- Fuel System: The engine operates on a 50:1 mixture of unleaded gasoline (87 octane or higher) and ISO-L-EGD or JASO FC class 2-cycle mixing oil. A primer bulb system helps push fuel through the carburetor for easier starting.
- Starting Procedure: The engine is started by sliding the ignition switch to "ON," setting the choke lever to "CLOSED" (for cold engines), setting the throttle to "fast idle," pressing the primer bulb until fuel flows, and then pulling the recoil starter handle. Once started, the choke lever is moved to "OPEN."
- Stopping Procedure: The engine is stopped by idling briefly (about 2 minutes) and then sliding the ignition switch to "O" (Engine OFF).
- Idle Speed Adjustment: The idle speed is adjustable to ensure the cutting attachment does not rotate when the engine is at idle, typically set to 3,000 (±300) RPM.
- Shoulder Strap: While not required for grass trimming, a shoulder strap is recommended for extended operation to enhance comfort and maintain the cutting path parallel to the ground.
- Cutting Techniques: The manual describes techniques for trimming/mowing grass (swinging from left to right with the head horizontal) and edging (tilting the handle about 100° to the left and moving forward with the trimmer vertical).
- Safety Features: The unit requires the cutting attachment shield to be installed and securely tightened before operation. It also warns against operating without a muffler and spark arrester screen.
Maintenance Features
The manual provides detailed maintenance instructions to ensure the longevity and safe operation of the trimmer:
- Daily Maintenance: Before each use, operators should remove dirt/debris from the engine, check cooling fins and air cleaner for clogging, and clean as necessary. They should also check for loose/missing screws, secure the cutting attachment, and inspect for fuel/grease leaks.
- 10-Hour Maintenance (or more frequently in dusty conditions): This includes removing and inspecting the pre-filter and air cleaner element, cleaning them with soap and water, and replacing them if damaged. The manual stresses the importance of directing compressed air from the inside of the filter only when cleaning.
- 10/15-Hour Maintenance: This involves removing and cleaning the spark plug, adjusting the electrode gap to 0.024-0.028 inch (0.6-0.7 mm), and replacing it with an NGK CMR5H or equivalent resistor type spark plug if necessary.
- 50-Hour Maintenance: This includes removing and cleaning the cylinder cover and fins, greasing the gear case with lithium-base grease, lubricating main shaft splines, and extracting/replacing the fuel filter element.
- 139/150-Hour Maintenance: After the first 139 hours and every 150 hours thereafter, the combustion chamber should be decarbonized, and valve clearance adjusted. Annual spark plug replacement is also recommended.
- Spark Arrester Screen Maintenance: If the engine becomes sluggish, the spark arrester screen should be checked and cleaned by removing the engine cover, muffler, and then the screen itself.
- Long Term Storage: For storage longer than 30 days, the unit should be thoroughly cleaned, fuel drained from the tank, fuel lines and carburetor cleared (by priming and running until the engine stops), and the spark plug removed to pour 1/4 ounce of 2-cycle mixing oil into the cylinder before reinstalling the plug. The air cleaner element should also be cleaned and reassembled, and any worn/damaged parts repaired or replaced. The unit should be stored in a clean, dust-free area.
The manual also includes a troubleshooting guide for common issues like the engine not starting, low power output, and additional problems like poor acceleration or excessive vibration. It emphasizes the use of authorized Swisher parts and service for repairs to maintain warranty validity.