Make sure that the value written on the unit’s voltage
selector (near the power entry jack) matches your line
voltage. Connect the unit to mains and to the USB
port on your computer. Turn on the unit. After a few
seconds, the operating system should detect the unit
and show it in the device list (It may ask for the system
CD first). USB Studio runs with the drivers provided
by the operating system (Windows 98 or 2000 or Mac
System 9).
Check that all pots are turned all the way left, and the
pushbutton switches on the front panel are disengaged.
Connect your monitoring system input to the «Mon
out» RCA jacks on the back (alternatively, use the
headphone output on the front). Play some sound over
the audio device in your computer. Turn the «Computer»
pot all the way up, then adjust the monitoring level
using the «Monitor» and/or «Headphone» pot.
Connect a signal source to one of the unit’s analog
inputs on the back. Turn the input’s level pot up making
sure the «MON OL» Led is off, or just very briefly
lights during loud transients. You should hear the
source through the monitors. Push the «REC EN»
switch of the respective input, then bring the «Rec
Level» pot up. Watch the level on the Led bar. Now, you
should be able to record the signal in your computer.
To hook up a digital source to the USB Studio D, plug
it in the TOSLINK or RCA connector on the back.
Make sure the input selection switch on the rear is in
the right position (Opto or Coax). The LOCK led on
the front panel should light. By turning up the «Digital
In» pot, you should be able to hear the signal in the
monitors, or, when the REC EN switch is pushed in,
record it over the USB interface. The digital out takes
the signal from either the REC or the MON mixes, as
set by the switch on the front panel. Make sure the
level is low enough not to light the OL Led.
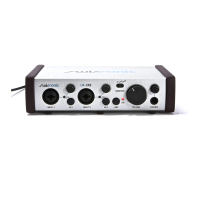
Designed for recording studio quality sound, the USB
Studio combines the flexibility of an 11-channel stereo
mixer with the ease of use of the USB interface. Two
professional quality mic pres allow the connection of
(and do justice to) any mic. High impedace instrument
inputs, a phono preamp and four stereo inputs complete
the device. The USB Studio D adds support for optical
and coax S/PDIF digital i/os. True 20-bit converters
and matching signal processing circuits place the USB
Studio in a class of it’s own.
Quick Start
Overview
4
 Loading...