Do you have a question about the SwissQprint Nyala LED and is the answer not in the manual?
Introduction to the customer, system guarantees, and contact information for swissQprint AG.
Overview of the manual's purpose, including safe operation, maintenance, and optimal use of the machine.
Information on site requirements, transport, unloading, and preparing for machine installation.
Details technology, installation, operation, and maintenance of the machine.
Contains information about the Amber output software for the machine.
Provides information on servicing the machine by authorized service personnel.
Explains the chapter numbering and the use of the table of contents for navigation.
Details available optional extras and how they are indicated in the manual.
Notes on text references, sketches, schematic representations, and dimensional information (SI units).
Guidance on where to keep the operating and service manuals for easy access.
Ensuring the documentation remains complete and up-to-date, including filing updates.
Lists the standards referenced in the operating manual for machine execution.
Explains the purpose of the rating plate for uniquely identifying the device and its components.
Defines directional terms like 'right', 'left', 'forwards', 'backwards' relative to operator view.
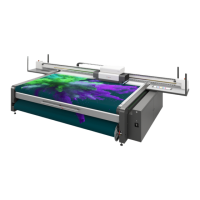
Specifies the approved uses of the machine: output station for print data and printing on various materials.
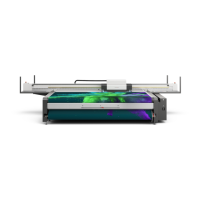
Identifies key components of the printing system with numbered labels.
Provides connection points for electricity, network, air, and details on recommended location size and barrier marking.
Describes the operating unit, including its approximate weight and visual representation.
Specifies optimal ambient temperature, humidity, and ventilation requirements for print results.
Lists corrosive substances to keep away from the printer to prevent damage to ink and print heads.
Details print output rates for flatbed and roll-to-roll modes, and print material dimensions.
Outlines electrical connection requirements and power consumption for the vacuum pump.
Provides details on variable drop size, color channels, resolution, and color configuration of the print head.
Emphasizes operator safety, awareness of dangers, and the importance of following instructions.
Defines the essential requirements for safe operation, including intended uses and material limitations.
Lists consequences of misuse and specific examples like ignoring instructions or unauthorized modifications.
Explains the meaning of 'Danger!', 'Warning!', 'Caution!', and 'Note!' symbols and their associated risks.
Defines the manufacturer's role in delivering a safe, compliant machine with included documentation.
Outlines the owner's duties for ensuring trained personnel, safe condition, and reporting incidents.
Details responsibilities for operating personnel, including safety gear, halting faults, and cleaning.
Lists necessary qualifications for operating personnel: literacy, fitness, training, and manual comprehension.
Covers general safety regulations, pre-operation checks, and restrictions on modifications and external devices.
Divides operation into phases (Printing, Adjustment, Material Supply) and outlines workstation safety requirements.
Highlights dangers during printing, emphasizing not reaching into the active area while the machine is running.
Warns about injuries from moving/rotating components during material supply and adjustment work.
Explains barrier marking and lists dangers like crushing, being drawn in, optical radiation, tripping, and poisonous materials.
Details safety light barriers, their function, and how they signal activation.
Explains the function of emergency stop switches for quick machine shutdown and their locations.
Describes the switch that stops movements when the print head carriage contacts an object.
Notes that the LCD display shows faults and the machine's operating status.
Warns against using the emergency stop for normal shutdown and the main switch for emergencies.
Explains the switch that signals an open vacuum slide cover and its effect on machine movements.
Describes the switch that reports an open purge tray, blocking machine movements.
Details measures taken for overloads or blocked drives, including emergency stops and ERROR status.
Mandates close-fitting clothing and appropriate PPE like goggles and chemical-resistant gloves.
Emphasizes checking and maintaining safety signs for the machine to prevent risks.
Explains that safety symbols have specific meanings and indicate prohibited dangerous behaviors.
Describes mandatory signs (round, blue) indicating the requirement to wear personal protective equipment.
Details warning symbols (triangular, yellow) that draw attention to dangers to life and limb.
Warns of shock risk, specifying authorized personnel for electrical cabinets and cable protection.
Details dangers of getting caught or pulled in by moving parts and necessary precautions.
Explains risks from foreign objects caught by the print head carriage and precautions.
Warns about hot exhaust air from vacuum pumps and avoiding direct exposure to the jet.
Provides first aid instructions for contact with chemicals and warns about skin/eye damage.
Covers risks from chemicals, storage, smoking, flames, UV lamps, and lists fire extinguisher types (A, B, C).
Outlines steps for fire events: switching off, assessing, using extinguishers, and safety rules.
Details dangers of inhaling/ingesting chemicals, first aid, and safety instructions for chemical handling.
Provides guidelines for handling hazardous substances, observing SDS, and explains hazard labels.
Instructs on proper storage, protection, ventilation, and correct use of chemicals.
Covers measures to prevent pollution from cleaning agents and inks, and proper disposal.
Advises contacting service for disposal and following national regulations for waste management.
Details safety instructions for UV lamps, including wearing protection and providing ventilation.
Stresses the importance of thorough training, danger awareness, and seeking manufacturer info for undocumented situations.
Highlights the need for specialist knowledge and expertise for maintenance, provided through training.
Assigns responsibility to the operator for safe handling and emphasizes adherence to safety regulations and training.
Identifies components of the operating unit: monitor, emergency stops, keyboard, mouse, drawer, and code scanner.
Explains the protective circuit function of emergency stop switches and their locations on the machine.
Describes the membrane keyboard and LCD display, noting its use for diagnostics and service settings.
Details functions like ONLINE/OFFLINE mode, carriage movement (forwards, backwards, left, right), and speed adjustments.
Provides a checklist for daily inspections before starting the machine, including visual checks and functional tests.
Guides through the procedure for switching on the machine and PC, including a caution about initial movement.
Emphasizes safe handling of cleaning agents, proper ventilation, and correct cleaning to avoid print head damage.
Explains how to check print heads under UV-free lighting and differentiate between poorly and correctly maintained states.
Details steps for cleaning print heads using the Amber software, including selecting standby and purging ink.
Provides instructions for cleaning print heads after pauses and specific steps for white/dirty print heads.
Explains how stray light can damage print heads and provides methods for masking surfaces.
Guides on using rulers and register pins for accurate material placement, with cautions on pin selection and removal.
Explains the purpose of stray light protection for drizzle and purge stations and how to attach it.
Warns about magnets affecting pacemakers and damaging electronics, and details assembly procedures.
Provides specific steps for aligning and installing stray light protection on the drizzle station.
Details the procedure for aligning and installing stray light protection on the purge station.
Guides on preparing the roll holder, including winding direction and pressurizing the holder.
Instructs on fitting the roll holder onto the roll support, with cautions about heavy rolls and placement.
Details fixing the compensating rocker in the upper position using magnets for easier roll material feeding.
Explains how to pivot the pressure roller to the feed position for material feeding.
Guides on pushing the encoder upwards to fix it in the top position for material feeding.
Explains how to feed roll material from behind and fix it to the cardboard core with tape.
Instructs on lowering the encoder until it rests on the material, making its height adjustable.
Details how to lock the pressure roller into the desired position after adjustment.
Explains how to change the rotation direction of the unwinding unit via the membrane keyboard.
Details changing winding unit rotation and activating/deactivating the automatic tensioning device.
Provides notes on good masking for printing results and warns about damage to slider vacuum.
Explains how to activate/deactivate vacuum zones using the membrane keyboard in ONLINE mode.
Guides on opening the cover and setting the vacuum position for uniform contact with the print medium.
Instructs on adjusting the vacuum slide for the rear position, ensuring uniform contact with the print medium.
Details actions for short breaks: leaving printer online, positioning print head, and cleaning print heads.
Outlines steps for switching off the device: cleaning, parking print head, closing software, and powering down.
Emphasizes adhering to intervals, using appropriate tools, and observing safety precautions during maintenance.
Stresses that only trained personnel should perform servicing, use correct parts, and wear PPE.
Highlights careful handling of operating materials like ink and cleaning fluids for reliability and environmental protection.
Warns about ink hazards, expiry dates, and the need for PPE, ventilation, and original UV ink.
Advises using only approved flushing solutions and warns against mixing fluids or improper disposal.
Identifies CASTROL LONGTIME PD 2 as the lubricant for linear bearings and spindle bearings.
Explains the various symbols used to differentiate between service/maintenance tasks and responsibilities.
Presents a table of maintenance tasks, frequency, and who is responsible for performing them.
Emphasizes machine cleanliness for optimal operation and warns against using compressed air for cleaning.
Provides instructions for cleaning and checking safety light barriers using a test rod.
Details how to check the print head carriage protection switches using a trip rod and confirming messages.
Guides through replacing ink containers using a code scanner, including safety tips.
Explains manual replacement of ink containers, including entering expiration dates.
Provides steps to remove the cover and access filter mats in the control cabinet, with electrical safety warnings.
Details cleaning the vacuum plate using a scraper or isopropyl alcohol, with cautions.
Explains how waxing improves sliding properties and provides steps for cleaning and applying wax.
Guides on removing the print head cover for access to carriage tasks, requiring standby position and machine shutdown.
Details removing the front metal sheet for access to print head carriage tasks, involving unscrewing and lifting.
Instructs on replacing filter mats for UV lamps, including removing covers and cleaning prefilters.
Guides on replacing the filter mat for the UV power supply, involving cover removal and switching off the machine.
Details cleaning the anti-static units using a brush and isopropyl alcohol, requiring cover and sheet removal.
Explains how to change drizzle paper to prevent saturation, including cover plate handling and disposal.
Guides on changing the drizzle mat and paper, involving cover plate removal and proper disposal.
Details emptying and cleaning the purge tray, including safe handling of UV ink waste and disposal.
| Brand | SwissQprint |
|---|---|
| Model | Nyala LED |
| Category | Printer |
| Language | English |