EasyManua.ls Logo

SYDELL 930-2 - User Manual

SYDELL 930-2
2 pages
Print Icon
To Next Page IconTo Next Page
Loading...
NOTE: ALSO CAN TIGHTEN SET SCREW ON BEARING AT THIS TIME.
PLACE 5/16 X 1" BOLR THROUGH HOLE ON PIN AND TIGHTEN.
INSERT THE CURVED PIPE THROUGH THE HOLE ON THE LOCK/RELEASE
AND THEN USE 1 /4 X 1 1/4" BOLT TO MAKE SURE PIECE DOES NOT SLIDE OUT.
AND SECURE WITH LINCH PIN. (THIS IS YOUR LIFT HANDLE)
TAKE THE HANDLE ON THE RIGHT SIDE OUT AND PLACE IT IN THE
1 1/4" SQUARE TUBING ON THE BOTTOM RIGHT OF THE TABLE AS SHOWN
LOCATE BOTH HANDLES ON THE TOP OF THE CAGE. TURN THE HANDLE
ON THE LEFT 90 DEGREES AS SHOWN AND TIGHTEN SET BOLT
INSERT PIN THROUGH GATE AND THEN INTO BEARING ON CAGE.
SET COMPLETE CAGE INTO ASSEMBLED FRAME. LIFT UP ON CAGE AND
INSERT 1" SQAURE STABILIZER BAR (A) INTO 1 1/4 SQUARE TUBING ON
BACK OF BOTH END GATES AS SHOWN AND SECURE SET BOLT.
BOTTOM OF BOTH END GATES AS SHOWN AND SECURE SET BOLT
INSERT 1" SQAURE STABILIZER BAR (B) INTO 1 1/4 SQUARE TUBING ON
ASSEMBLY INSTRUCTIONS FOR #930-2
TILT TABLE
STEP #5
NOTE DIAGRAM B
STEP #7
STEP #6
STEP #4
STEP #3
STEP #1
STEP #2
SYDELL INC.
46935 SD Hwy. 50
Burbank, SD 57010
(605) 624-4538
www.sydell.com
email: sydell@sydell.com
Question and Answer IconNeed help?

Do you have a question about the SYDELL 930-2 and is the answer not in the manual?

Summary

Assembly Instructions

Step 1: Stabilizer Bar (A) Installation

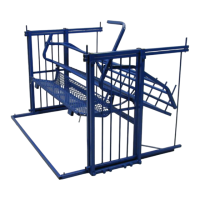
Insert 1" stabilizer bar (A) into 1 1/4" square tubing on back of both end gates.

Step 2: Stabilizer Bar (B) Installation

Insert 1" stabilizer bar (B) into 1 1/4" square tubing on bottom of both end gates.

Step 3: Cage Placement and Pin Insertion

Set cage into assembled frame, lift, and insert pin through gate into bearing.

Step 4: Pin Securing and Bearing Check

Place 5/16 x 1" bolt through pin hole and tighten; optionally tighten set screw.

Step 5: Left Handle Adjustment

Turn left handle on cage top 90 degrees and tighten its set bolt.

Step 6: Lift Handle Installation

Install right handle into bottom right tubing and secure with linch pin.

Step 7: Lock;Release Pipe Installation

Insert curved pipe through lock/release hole and secure with 1/4 x 1 1/4" bolt.

SYDELL 930-2 Specifications

General IconGeneral
BrandSYDELL
Model930-2
CategoryIndoor Furnishing
LanguageEnglish