This document is an owner's manual for a Systemair remote controller, providing detailed instructions and specifications for its use with an air conditioning unit.
Remote Controller Specifications
The remote controller supports various models including RRG10A(E2S)/BGEF, RG10A(E2S)/BGEFU1, RG10A1(E2S)/BGEF, RG10A2(E2S)/BGEFU1, RG10A2(E2S)/BGCEFU1, RG10A2(E2S)/BGCEF, RG10A10(E2S)/BGEF, RG10B(E2)/BGEF, RG10B1(E2)/BGEF, RG10B2(E2)/BGCEF, RG10B10(E2)/BGEF, and RG10B10(E2)/BGCEF. It operates on a rated voltage of 3.0V, powered by two R03/LR03 dry batteries. The signal receiving range is up to 8 meters, and it can operate in an environment with temperatures ranging from -5°C to 60°C (23°F to 140°F).
Handling the Remote Controller
Inserting and Replacing Batteries:
To insert or replace batteries, slide the back cover downward to expose the battery compartment. Insert two R03/LR03 batteries, ensuring the (+) and (-) ends match the symbols inside the compartment. Then, slide the battery cover back into place.
Battery Notes:
For optimal performance, do not mix old and new batteries or batteries of different types. If the device will not be used for more than 2 months, remove the batteries from the remote control. Batteries should not be disposed of as unsorted municipal waste; refer to local laws for proper disposal.
Tips for Using Remote Control:
The remote control must be used within 8 meters of the air conditioning unit. The unit will emit a beep when a remote signal is received. Curtains, other materials, and direct sunlight can interfere with the infrared signal receiver.
Notes for Using Remote Control (FCC/ICES Compliance):
The device complies with local national regulations. In Canada, it adheres to CAN ICES-3(B)/NMB-3(B). In the USA, it complies with part 15 of the FCC Rules, meaning operation is subject to two conditions: it may not cause harmful interference, and it must accept any interference received. The equipment has been tested and found to comply with Class B digital device limits, designed to provide reasonable protection against harmful interference in a residential installation. If interference occurs, users are encouraged to reorient or relocate the receiving antenna, increase separation between equipment and receiver, connect the equipment to a different circuit, or consult a dealer/experienced radio/TV technician. Changes or modifications not approved by the party responsible for compliance could void the user's authority to operate the equipment.
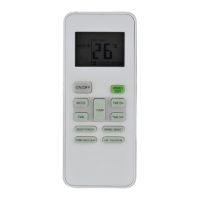
The remote controller features several buttons for various functions:
- ON/OFF: Turns the unit on or off.
- TEMP ▲ (Increase Temperature): Increases the temperature in 1°C (1°F) increments, up to a maximum of 30°C (86°F). Pressing TEMP ▲ and TEMP ▼ together for 3 seconds alternates the temperature display between °C and °F.
- TEMP ▼ (Decrease Temperature): Decreases the temperature in 1°C (1°F) increments, down to a minimum of 16°C (60°F).
- MODE: Scrolls through operation modes: AUTO → COOL → DRY → HEAT → FAN. Note that HEAT mode is not supported by cooling-only appliances.
- ECO/GEAR: Enters the energy-efficient mode in a sequence: ECO → GEAR (75%) → GEAR (50%) → Previous setting mode → ECO.
- OK: Confirms selected functions.
- TIMER: Sets the timer to turn the unit on or off.
- BREEZE AWAY: (Model dependent) Avoids direct airflow, available in COOL, FAN, and DRY modes.
- CLEAN: Starts/stops the Self Clean or Active Clean function (model dependent). Refer to the USER'S OPERATION & INSTALLATION MANUAL for details.
- LED: Turns the indoor unit's LED display and air conditioner buzzer on and off (model dependent), creating a comfortable and quiet environment.
- Turbo: Enables the unit to reach the preset temperature in the shortest possible time.
- SET: Scrolls through operation functions: Fresh → Sleep → Follow Me → AP mode → Fresh. The selected symbol flashes, and pressing OK confirms.
- FAN SPEED: Selects fan speeds in the order: AU → 20% → 40% → 60% → 80% → 100%. Pressing TEMP ▲ or ▼ increases/decreases the fan speed in 1% increments.
- SWING: Starts and stops horizontal louver movement. Holding down for 2 seconds initiates vertical louver auto swing.
- FRESH: (Model dependent) Starts/stops the Fresh feature.
- SHORTCUT: (Model dependent) Restores current settings or resumes previous settings. Holding for more than 2 seconds restores current operation settings.
- SLEEP: (Model dependent) Saves energy during sleeping hours.
Remote Screen Indicators
The remote screen displays various indicators when powered up:
- Transmission Indicator: Lights up when the remote sends a signal to the indoor unit.
- TIMER ON/OFF Display: Shows if the timer is set to turn on or off.
- Silence Feature Display: Indicates if the silence function is active.
- FAN SPEED Display: Shows the selected fan speed (Silence, LOW, MED, HIGH, AUTO) with percentage ranges (e.g., 1%-20% for Silence, 21%-40% for LOW). Fan speed cannot be adjusted in AUTO or DRY mode.
- Breeze Away Display: (Some units) Indicates the Breeze Away function is active.
- Active Clean Feature Display: Indicates the Active Clean function is active.
- Fresh Feature Display: Indicates the Fresh feature is active.
- Sleep Mode Display: Indicates Sleep mode is active.
- Follow Me Feature Display: Indicates the Follow Me function is active.
- Wireless Control Feature Display: Indicates wireless control is active.
- Low Battery Detection Display: Flashes if batteries are low.
- MODE Display: Shows the current mode (AUTO, COOL, DRY, HEAT, FAN).
- ECO Display: Appears when ECO feature is activated.
- GEAR Display: Appears when GEAR feature is activated.
- LOCK Display: Appears when LOCK feature is activated.
- Temperature/Timer/Fan Speed Display: Displays the set temperature (default), fan speed, or timer setting. Temperature range: 16-30°C/60-86°F (or 20-28°C/68-82°F for some models). Timer setting range: 0-24 hours. Fan speed setting range: AU-100% (blank in FAN mode).
- Horizontal Louver Swing Display: Indicates horizontal louver swing.
- Vertical Louver Auto Swing Display: Indicates vertical louver auto swing.
- TURBO Mode Display: Indicates Turbo mode is active.
- "A" / "B" Indicators: "A" indicates "Not available for," and "B" indicates "this unit."
How to Use Basic Functions
Before Operation: Ensure the unit is plugged in and power is available.
- AUTO Mode: Select AUTO mode, set desired temperature, then turn on the air conditioner. In AUTO mode, the unit automatically selects COOL, FAN, or HEAT based on the set temperature, and fan speed cannot be set.
- COOL or HEAT Mode: Select COOL/HEAT mode, set temperature, set fan speed, then turn on the air conditioner.
- DRY Mode: Select DRY mode, set desired temperature, then turn on the air conditioner. In DRY mode, fan speed is automatically controlled and cannot be set manually.
- FAN Mode: Select FAN mode, set fan speed, then turn on the air conditioner. In FAN mode, temperature cannot be set, and no temperature displays on the remote screen.
Setting the TIMER
TIMER ON/OFF: Sets the amount of time after which the unit will automatically turn on/off.
- TIMER ON Setting: Press the TIMER button to initiate the ON time sequence. Use the Temp up/down buttons multiple times to set the desired time. Point the remote to the unit and wait 1 second for TIMER ON to activate.
- TIMER OFF Setting: Press the TIMER button to initiate the OFF time sequence. Use the Temp up/down buttons multiple times to set the desired time. Point the remote to the unit and wait 1 second for TIMER OFF to activate.
- Timer Increments: Time increases in 30-minute increments up to 10 hours, then in 1-hour increments up to 24 hours. Setting the timer to 0.0h cancels the function.
- TIMER ON & OFF Setting Example: If the current time is 1:00 PM, setting the timer for 2.5 hours ON and 5 hours OFF means the unit will turn on at 3:30 PM and turn off at 6:00 PM.
How to Use Advanced Functions
- Swing Function (Horizontal Louver): Press the SWING button to start/stop horizontal louver movement.
- Swing Function (Vertical Louver): Press and hold the SWING button for more than 2 seconds to activate vertical louver auto swing (model dependent).
- Airflow Direction: Continue pressing the SWING button to cycle through five different airflow directions. The louver moves within a certain range each time the button is pressed until the preferred direction is reached.
- Cleaning Louver: When the unit is off, press and hold MODE and SWING buttons together for one second to open the louver for cleaning. Press and hold MODE and SWING buttons together for one second again to reset the louver (model dependent).
- LED Display: Press the LED button to turn the display on/off on the indoor unit.
- Actual Room Temperature Display: Press and hold the LED button for more than 5 seconds (some units) to display the actual room temperature. Pressing it again for more than 5 seconds reverts to displaying the setting temperature.
- ECO/GEAR Function: Press the X-ECO button to enter the energy-efficient mode (ECO → GEAR (75%) → GEAR (50%) → Previous setting mode → ECO). This function is only available in COOL mode.
- ECO Operation: In cooling mode, the remote controller automatically adjusts the temperature to 24°C/75°F and fan speed to Auto to save energy (if the set temperature is less than 24°C/75°F). If the set temperature is above 24°C/75°F, only the fan speed changes to Auto. Pressing ECO again or modifying mode/temperature stops ECO operation.
- GEAR Operation: Enters GEAR operation, allowing for 75% or 50% electrical energy consumption. The display alternates between electrical energy consumption and set temperature.
- SHORTCUT Function: (Some units) When the remote is on, pressing this button reverts to previous settings (operating mode, temperature, fan speed, sleep feature). Holding for more than 2 seconds restores current operation settings.
- Silence Function: (Some units) Press and hold the FAN button for more than 2 seconds to activate/disable Silence function. This may result in insufficient cooling/heating capacity due to low compressor frequency. Pressing ON/OFF, Mode, Sleep, Turbo, or Clean buttons during operation will cancel Silence function.
- FP Function: (Heat pump air conditioner only) Press this button twice within one second under HEAT Mode with a setting temperature of 16°C/60°F or 20°C/68°F (for specific models) to activate FP function. The unit operates at high fan speed with the temperature automatically set to 8°C/46°F. Pressing On/Off, Sleep, Mode, Fan, or Temp buttons will cancel this function.
- LOCK Function: Press CLEAN and Turbo buttons together for more than 5 seconds to activate Lock function. All buttons will be unresponsive except pressing these two buttons again for 2 seconds to disable locking.
- SET Functions (via SET button):
- Breeze Away Function: (Some units) Avoids direct airflow, available in COOL, FAN, and DRY modes.
- FRESH Function: (Some units) Energizes the ion generator to purify the air.
- Sleep Function: Decreases energy use during sleep. Not available in FAN or DRY mode.
- Follow Me Function: Enables the remote control to measure the temperature at its current location and send this signal to the air conditioner every 3 minutes. This optimizes temperature around the user. Press and hold the Turbo button for 7 seconds to start/stop the memory feature for Follow Me. "On" or "OF" (off) displays for 3 seconds.
- AP Function: (Some units) Choose AP mode for wireless network configuration. For some units, it requires continuously pressing the LED button seven times in 10 seconds to enter AP mode.
The design and specifications are subject to change without prior notice for product improvement. Consult with the sales agency or manufacturer for details.