EasyManua.ls Logo

Systemdek IIX User Manual

Systemdek IIX
3 pages
To Next Page IconTo Next Page
Page #1 background imageLoading...
Page #1 background image
INSTRUCTION MANUAL
The Systemdek Model IIX
INTRODUCTION
The Systemdek is a two speed belt drive transcription turntable. Top performance can be maintained and
satisfaction assured by careful adherence to the assembly and operating instructions.
1. UNPACKING
1.1 IMPORTANT: Read the instructions before proceeding with further unpacking.
1.2 Remove the top packing to allow removal of cover and other accessories.
1.3 Remove further packing to expose turntable.
1.4 Remove turntable from carton and prepare for assembly.
1.5 Remove drive hub packing and place carefully to one side.
2. IMPORTANT INSTRUCTIONS
2.1 Please ensure that the main bearing does not become contaminated by dust or other foreign matter.
2.2
Do not attempt to dismantle any part of the turntable, as it is set during production to provide optimum
performance.
3. ASSEMBLY
3.1 Fit bearing housing and fix in position by means of the screws provided.
3.2 Inject oil into the bearing housing using the full measured amount '.8 ml' in the syringe provided and drop
ball bearing into housing.
3.3 Fit drive hub into the bearing housing to locate on ball bearing.
3.4 Fit drive belt by passing round the drive hub and on to the motor pulley.
Motor pulley top groove = 33 R.P.M.
Motor pulley bottom groove = 45 R.P.M.
3.5
Mount the tone arm on the arm mounting board following manufacturers instructions and fit to arm
support by means of two M5 screws and washers provided. Do not tighten at this stage.
NOTE: A tone arm earthing screw is provided at the rear.
3.6 Remove nylon chassis transit screws.
3.7 Fit platter by locating on drive hub centre boss.
3.8 Fit the record mat.
Question and Answer IconNeed help?

Do you have a question about the Systemdek IIX and is the answer not in the manual?

Systemdek IIX Specifications

General IconGeneral
Drive TypeBelt Drive
Platter MaterialGlass
MotorAC Synchronous
Speed33 1/3, 45 RPM
PlatterGlass
SuspensionSpring Suspension

Summary

Introduction

Unpacking Instructions

Read Instructions Before Unpacking

Read all instructions before beginning the unpacking process.

Remove Top Packing

Remove top packing materials to access the cover and accessories.

Expose Turntable

Continue removing packing materials to reveal the turntable unit.

Remove Turntable from Carton

Carefully take the turntable out of its carton for assembly.

Handle Drive Hub Packing

Remove drive hub packing and set it aside safely.

Important Operational Guidelines

Protect Main Bearing from Contamination

Ensure the main bearing remains free from dust and foreign particles.

Do Not Dismantle Turntable

Avoid dismantling any part of the turntable as it is factory set for optimum performance.

Turntable Assembly Steps

Fit Bearing Housing

Mount the bearing housing and secure it with the provided screws.

Lubricate Bearing Housing

Add 0.8ml of oil and the ball bearing to the bearing housing.

Install Drive Hub

Insert the drive hub into the bearing housing, locating it on the ball bearing.

Mount Drive Belt

Position the drive belt around the drive hub and motor pulley.

Mount Tone Arm

Mount the tone arm and attach it to the support, leaving screws loose.

Remove Transit Screws

Remove the nylon transit screws securing the chassis.

Fit Platter

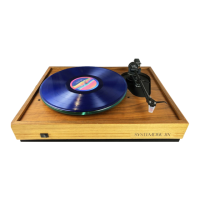
Place the platter onto the drive hub centre boss.

Install Record Mat

Place the record mat onto the platter.

Connect Power Supply Cable

Connect the power cable to the amplifier or directly to the mains supply.

Verify Mains Voltage

Check the unit's rating plate for correct mains voltage before connecting.

Setting-Up Procedure

Adjust Sub-Chassis Suspension

Turn suspension support screws to adjust sub-chassis height.

Levelling Platter and Arm

Position Unit for Levelling

Place the unit with its back on a table edge and check belt position.

Dress Tone Arm and Cable

Locate the tone arm and dress the audio cable for free floating.

Level Platter

Use a level on the platter and adjust screws for precise levelling.

Prepare for Moving

Remove the platter before moving the turntable to prevent setting alteration.

Speed Change Operation

Adjust Speed Using Drive Pulley

Change belt position on the two-speed drive pulley for 33 or 45 RPM.

Useful Hints

Care of Drive System

Keep drive rim, belt, pulley, and hub clean; apply silicone wax if needed.

Care of Bearing

Bearing is robust; oil change only needed for transit loss or spillage.

Specifications