EasyManua.ls Logo

TACKLIFE VT02 - User Manual

TACKLIFE VT02
10 pages
Print Icon
To Next Page IconTo Next Page
Loading...
Model: VT02
Question and Answer IconNeed help?

Do you have a question about the TACKLIFE VT02 and is the answer not in the manual?

Summary

Safety Information and Precautions

General Safety Rules

Adhere to rules for safe operation, including product usage, testing known supplies, and inspecting casing integrity.

Voltage Detection Considerations

Understand factors affecting voltage detection, such as insulation, distance, and field strength, and be aware of potential voltage presence.

Operating Voltage Limits

Avoid exceeding rated voltage and exercise caution with AC voltages over 30Vrms due to electric shock danger.

Product Structure and Operation

Device Structure Overview

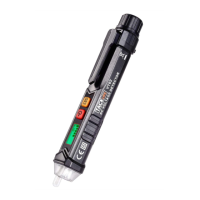
Identifies key components of the voltage detector, including probe, LED flashlight, LCD screen, and buttons.

Powering On and Off

Instructions for switching the voltage tester on by pressing the power button for 2 seconds and off by pressing once.

Sensitivity Adjustment

Guide on changing sensitivity modes from default low (48-1000V) to high (12-1000V) by holding the button.

LED Flashlight Functionality

Instructions for activating the LED flashlight by pressing the sensitivity/flashlight button for over 2 seconds.

Live;Null Wire Detection

Guides on identifying live and null wires using buzzer alarms, indicator lights, and LCD screen.

AC Voltage Detection

Procedure for detecting AC voltage, noting stronger signals show more bars and frequent buzzers.

Automatic Shutdown Feature

The tester automatically switches off after approximately 3 minutes of inactivity to save battery.

Low Battery Indicator

Explains the LCD symbol for low battery and advises prompt replacement to avoid false readings.

Technical Specifications and Maintenance

Key Technical Specifications

Details operating voltage, AC voltage range (12-1000V), temperature, humidity, altitude, and safety compliance.

Battery Replacement Procedure

Steps for replacing batteries, emphasizing correct polarity and ensuring the battery cover is locked before use.

Maintenance and Cleaning

Advice on cleaning the tester with a soft cloth and avoiding repair attempts unless qualified.

Warranty and Support

24-Month Product Warranty

Details the 24-month after-sales service promise, including refund or replacement options.

Warranty Coverage Details

Outlines the warranty terms: 30-day money back, 30-90 day replacement, and 90 days to 6 months with extra warranty.

How to Return Products

Provides contact information and instructions for returning products, including RMA procedures.

Warranty Registration

Encourages users to register warranty information online at tacklifetools.com for exclusive service.

Overview

This document is a user manual for the TACKLIFE VT02 Advanced AC Voltage Detector.

Function Description

The TACKLIFE VT02 is an advanced AC voltage detector designed to identify the presence of AC voltage in electrical systems. It helps users determine live and null wires and detect AC voltage in various applications. The device is equipped with a non-contact voltage (NCV) sensor, an LED flashlight, a signal indicator, and an LCD screen for visual feedback. It is intended for use by individuals who need to safely and accurately detect AC voltage.

Important Technical Specifications

  • Operating Voltage: 3V
  • AC Voltage Detection Range: 12V to 1000V (high sensitivity mode) and 48V to 1000V (low sensitivity mode), at 50/60Hz.
  • Operating Temperature: 0°C to 40°C
  • Storage Temperature: -10°C to 50°C
  • Relative Air Humidity: ≤95%
  • Altitude: ≤2000m
  • Safety Compliance: CAT.III 1000V, CAT.IV 600V; CE certified.
  • Battery: 2 x 1.5V AAA batteries.

Usage Features

The TACKLIFE VT02 offers several user-friendly features:

Switching On/Off:

  • To switch on, press the power button for 2 seconds. The buzzer will alarm, and the LCD screen will light up.
  • To switch off, press the power button once. The screen will turn off.

High/Low Sensitivity Modes:

  • The device defaults to low sensitivity mode (48-1000V) upon startup.
  • To switch to high sensitivity mode (12-1000V), press and hold the sensitivity/flashlight button until the LED light turns on, then press the same button once to make the "S" button light up.
  • The sensitivity mode resets to low sensitivity each time the tester is turned on, requiring manual adjustment if high sensitivity is needed.

LED Flashlight:

  • When the tester is running, press the sensitivity/flashlight button for more than 2 seconds to turn on the LED light.
  • Press the same button for more than 2 seconds to turn off the light.

Live/Null Wire Test:

  • Live Wire Test: When the sensor is close to a live wire, the buzzer alarms rapidly, the red indicator flashes quickly, and the LCD shows red light.
  • Null Wire Test: When the sensor is close to a null wire, the buzzer alarms slowly, the red indicator flashes slowly, and the LCD shows green light.
  • Distinguishing Wires in Sockets: Due to varying socket structures, the LCD light color may not always differentiate live/null wires. In such cases, distinguish by the number of brightness bars on the screen (more bars for live wire). If wires are very close, separate them or distinguish by signal strength (stronger for live, weaker for null).

AC Voltage Detection:

  • Place the probe near the AC power supply. The red indicator flashes upon sensing AC voltage.
  • The stronger the voltage, the more bright bars appear on the LCD screen, and the more frequently the buzzer alarms.

Automatic Shutdown:

  • To conserve battery, the device automatically switches off after approximately 3 minutes of no button presses and no voltage signal detection.

Low Battery Indicator:

  • When the battery voltage drops below 2.5V, a "battery" symbol appears on the LCD, indicating that batteries need replacement.
  • The device will automatically turn off if the voltage drops below 2.3V.
  • Using the tester with a low battery can lead to false readings and potential safety hazards.

Maintenance Features

Battery Replacement:

  • Rotate the battery cover as shown in the manual.
  • Remove old batteries and replace them with two new 1.5V AAA batteries, observing positive and negative polarity.
  • Ensure the battery cover is locked before using the device to avoid electric shock.

Cleaning:

  • Wipe off debris with a moist, soft cloth.
  • Do not use cleaning agents or solvents.
  • Ensure the voltage detector is completely dry before use.

Repair and Service:

  • Beyond battery replacement, users should not attempt to repair or service the multimeter unless qualified and equipped with the necessary calibration, performance testing, and service instruments.

Warranty:

  • TACKLIFE offers a 24-month after-sales service.
  • Within 24 months, customers can request a refund or replacement for any product issues.
  • 30-day Money Back Guarantee: Full refund within the first 30 days of purchase.
  • 30 to 90 days: Replacement of defective unit due to manufacturer fault.
  • 90 Days to 6 Months: Replacement of defective unit. Registering on the website provides an extra 24 months of warranty.
  • Warranty Registration: Customers are invited to register their warranty information at www.tacklifetools.com for exclusive service.
  • Returning Products: Contact support@tacklife.net with the order number to receive an RMA # and return address. Fill out the RMA info form provided in the manual and include it in the return package. For Amazon Fulfilled purchases, contact Amazon for returns within 30 days.

TACKLIFE VT02 Specifications

General IconGeneral
BrandTACKLIFE
ModelVT02
CategorySecurity Sensors
LanguageEnglish