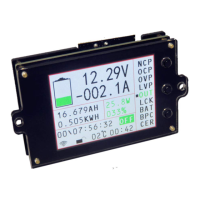
Note: If the battery (power supply) under normal operation has a voltage range of
(6-80V), you can use its own power supply wiring. First, adjust the jumper cap of the
power supply selection interface to “2W”, and then connect it. The positive and
negative poles of the battery (power supply) are connected to the voltage
measurement port “+Bat-”; note that “+” is connected to the positive pole of the
battery (power supply), “-” is connected to the negative pole of the battery (power
supply), and the positive and negative poles of the power supply are not connected.
Wrong or reverse, connect the positive pole of the battery (power supply) to the
positive pole of the load, the negative pole of the battery (power supply) to the
negative pole of the load through the Hall sensor, the current direction flowing
through the Hall sensor and the power-on arrow of the Hall sensor When the
direction is the same, the measured current will show a positive value, otherwise the
measured current will show a negative value.