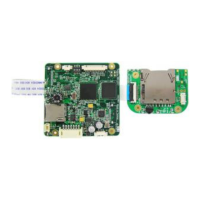
EasyManua.ls Logo

Talitor 3001077m User Manual

Talitor 3001077m
2 pages
To Next Page IconTo Next Page
Page #1 background imageLoading...
Page #1 background image
Basic Connection
Main board
Main board + optional I/O board
Power up the board
There are 2 kinds of power switch – mechanical
slide switch and electronic tact switch . Refer
to your supplier on which kind you would get.
Default Value
Video Resolution: 720x480
Recording Quality: Fair (1.2Mb)
Frame Rate: 25/30 frames per second
Motion Sensitivity: High
Motion Area: All area effective
Schedule Setting: All (Sunday to Saturday)
motion recording
Storage: Overwrite
Recording Length: 30 minutes a file
Date/Time Stamp Format: YYYY/MM/DD
Date/Time Stamp Position: Upper right
Date / Time Stamp Color: White
Language: English
External Trigger: Deactivate
Status Display: On
Start to record
Once power on unit, recording is factory preset
at motion activated. It can be reset as
continuous recording, having schedule, and
external trigger activation thru MENU. Manual
recording can always take place when
button is pressed. (Refer to “Remote Control )
* Please press “menu key before take away
the SD card, otherwise the recording will not be
saved onto SD/MicroSD card.
Playback Function
Press key on remote control to get i nto
playback menu. You can use Quick search”,
and enter the date/time which you would like to
view. Or get into “List all”, and press
button to playback from a selected recording.
Screen Icons
: The red square will sh ow up continuously
when device is recording
: Standby but not at recording
: Schedule on motion detection activat ed
: External trigger activat e recording
: Schedule continuous recording
: Manual recording by pressing “REC”
button on remote contro ller
…… / : Frame rate
per second
: Resolution: 1280 x 720
: Resolution: 720 x 480
: Resolution: 320 x 240
: Overwrite old files when SD card is full
: Stop recording when SD card is full
: Video system (NTSC/PAL)
Remote Control Diagram
Name
Function
Power
Power on/off the device
Playback
Playback the recording files
Menu
Enter the menu setting
Up
Move upward or increase
While playback - Volume up
Left
Move left, fast backward
OK
Confirm the setting/change
Still image (snapshot)
Right
Move right, fast forward
Down
Move downward or decrease
While playback - Volume down
Esc
Escape current menu
REC
Manual record
Bz
Buzzer on/off
LED
LED on/off
Keylock
Key lock/unlock
* Power key will not work when board is using
mechanical power switch
P/N: F40077004
Hidden Video Recorder
Quick Guide
HVR-D1
Version: 090724
H VR D1
Model No. 300107 7
Time/Date stamp
Recording method
Frame rate
SD card method
Video
system
Key lock
OK
Buzzer on/off
Down
Power
Playback
Up
Left
Escape
LED on/off
Right
Menu
Record
Key lock/
Un-lock
Optional models:
Main
board
I/O
board
Audio
3001077m
x
x
3001077ma
x
3001077c
x
3001077ca
* Please backup/format SD card regularly
in order to keep efficiency of SD card
Recording
* The default value of LED indicators and buzzer are
ON, please turn it off via remote control if required.
* LED indicators and buzzer will be ON when powering
on, and then on or off according to user s setting.
Keypad connection
Red: power; green: reference;
black: ground
IR receiver (Only for main board)
External trigger (2 blue cables)
Power switch
Microphone (Optional)
5V power out
Red: power; black: ground
Camera power out and
video in
Red: power
Black: ground
Yellow: video
Black: ground
12V DC input
Reserved battery pin
12V DC output
MicroSD
Card
(Optional)
ON
1
2
3
4
On board IR
receiver
SD card (Optional)
FFC cable
Bottom of main board
Dip switch:
Off
On
1
NTSC system
PAL system
2
Main board IR
I/O board IR
3
Analog video in
Digital YUV in
4
Mechanical power switch
Electronic power switch
Main
board
Audio/Video output (connector is on bottom of PCB)
Yellow: video; white: audio; black: ground
Audio/Video output
Yellow: video; white: audio; black: ground
A/V output
connector of
main board
* Please power off before connecting
or dis-connecting the I/O board
On
Off
Question and Answer IconNeed help?

Do you have a question about the Talitor 3001077m and is the answer not in the manual?

Talitor 3001077m Specifications

General IconGeneral
BrandTalitor
Model3001077m
CategoryDVR
LanguageEnglish

Summary

HVR-D1 Quick Guide Overview

Basic Connection and Hardware

Details on connecting power, A/V, microphone, and I/O board with dip switch functions.

Default Settings and Screen Icons

Explains default configuration values and on-screen icons for operation.

Remote Control Operation

Visual guide to the remote control layout and functions for device operation.

Device Operation and Status

Starting Recording and Status Display

Instructions on how to start recording and interpret status indicators.

Playback Functionality

Guide to accessing and playing back recorded video files.

Device Information and Support

LED Status Indicators

Explanation of the Red, Green, and Yellow LED status lights.

Recording Duration Estimates

Estimated recording times based on resolution, quality, and storage capacity.

Frequent Use Functions and Settings

Covers file naming conventions, recording modes, and schedule setup.

Frequently Asked Questions (FAQ)

Answers common user queries regarding playback, storage, and device operation.

Technical Specifications

Detailed technical parameters and capabilities of the HVR-D1.

Included Accessories

List of accessories provided with the HVR-D1 device.