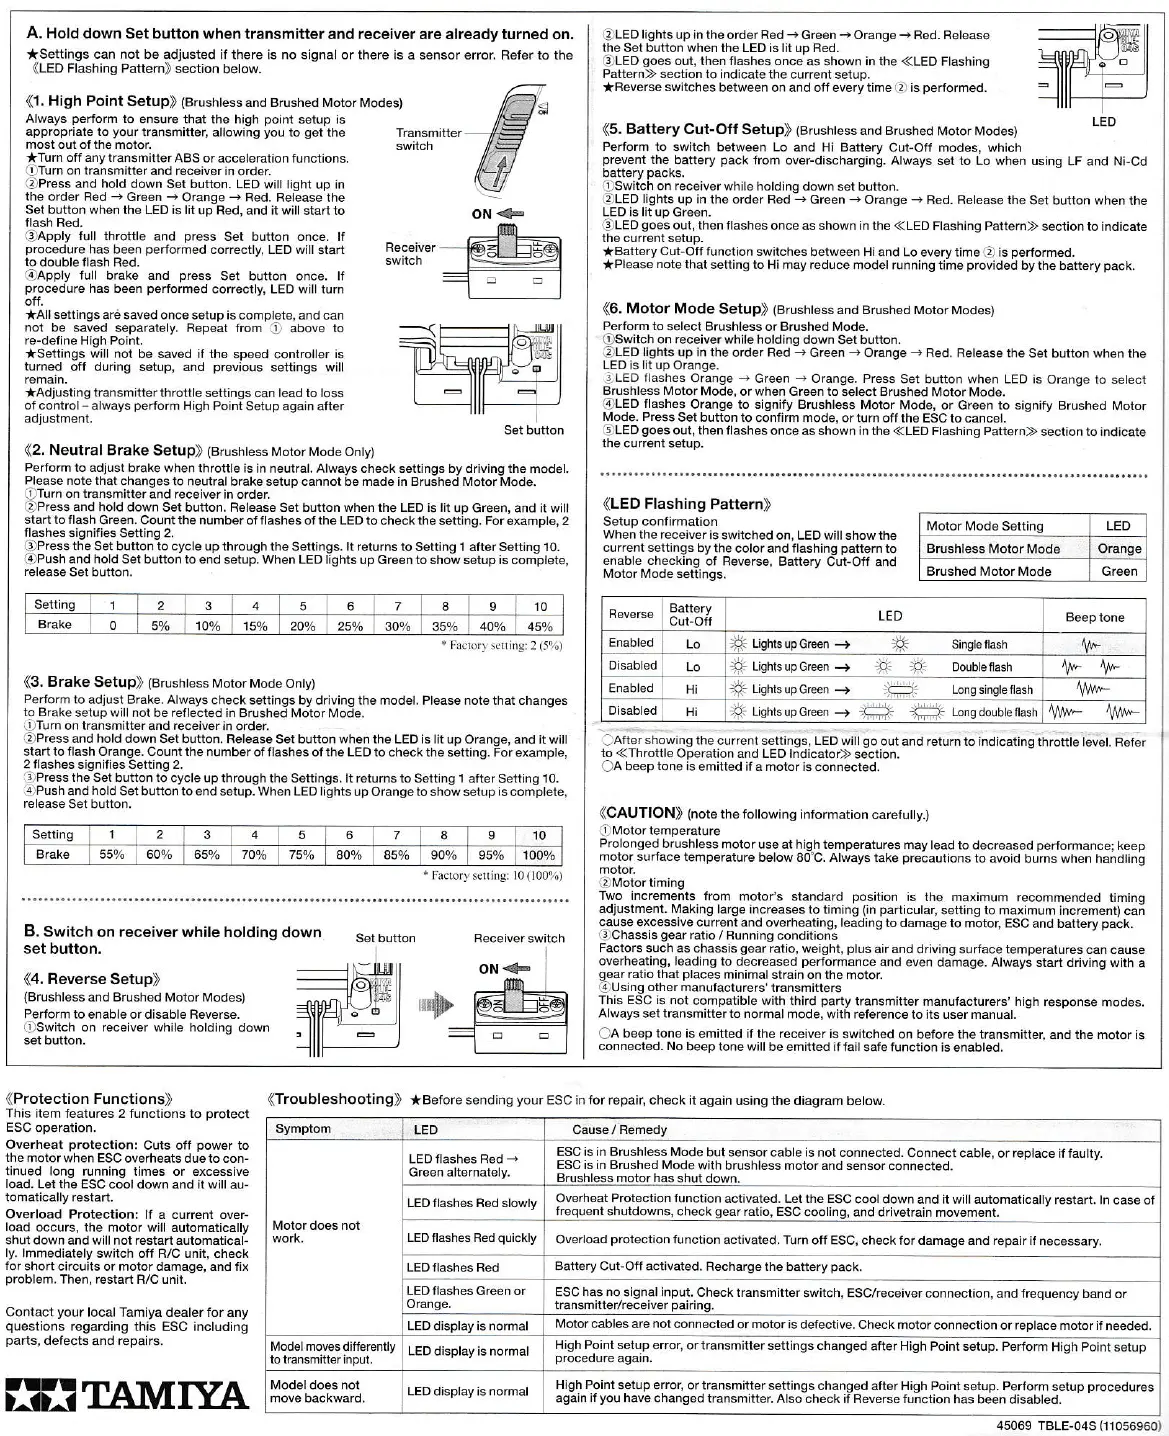
A,
Hotd down Set button when
transmitter and receiver are alreadyturned
on.
*Settings
can not be adjusted
if there is no sisnal orthere is a sensor error. Refer ro the
(LED
Flashinq
Pattern) section
telow.
-
1. High
Point Setup) (&ushtess
and Brushed Motor Modes)
6-
Always
pertorm
lo
ensu,e thal the high
poini
s€tup i"
H
*
app,opriäte to
your
transmitter. allowng
you
to
got
the
Transmnrer
lE
most oui olthe motor.
swrlch lA
* Iurn ott any tralsmitre,
ABS o. acceleration tunciion
".
lfn
!
Turnon lra;smitterand
receiverh ordor
fr!-lJ
)
Press aad hold
down Sel butlon. LED
will
light
up in
'L!/
the
order
Bed
'
Green
-
Orange
-
R6d. Belease the
Set bLrtton when the LED rs lit up
R6d. and it willsta4 to
ON <-
,-Äppiv-'i,rr
rt',ofir"
and
press
Set bu on once. tt
-Ll
procodure
has
been
oerfdmed
conectlv. LED wilr stad
HeceNer
-§ä:
En@ll
todoubleflash
Bed
_
swrtch
I--l
a
Apoly
full bcke and
press
Set button o4ce. lr
=--
--------_1
procedu.e
has beer
perroimod
coneclly. LED wrrltu-
I
-
-
l
Perform
to adjust brake whon
throttleis in neutral. Always check settings bydriving the mod€|.
Pleas noie that changesto
neulralbrake setup cannot be made in Brushed Motor Mode.
lrTuh
on transmitter
and rec€iver in order
ar)Press
and
hold
down Sel button. Belease Set bution when the LED is lit
up creen, and it will
starl toflash
Greon. Countthe numberolflashesofthe LED lo
checkthe setting, For €xample,2
flashes
siqnifies S€tting 2,
G)Press
the S€t button to cycle up through the
Settings.
rt
returns to Settang 1 after Setting 10.
aoPush and hold Set tutton lo erd
setup.
when LEO
lights up Greento showsetup is compleie,
*All
settingsarä
saved once setup is complete, and
ca.
noi be
saved soparately, Fepeat from
C
above
to
*Seilings wil nol
be saved rl ihe speed
conrroller
is
turned
orr during setup, and
previous
settings will
*Adjusting
transmitterthrottlesettinss
can lead to loss
orcontrol
-
always
perform
Hish Point
Setup again after
((2.
Neutral
Brake Setup»
(Brushtess
[4otor[4ode onty)
Settinq
2 3
6 7 I
10
Brake
o
5% 100/o 150/o 20ah 250/" 304/,
+
Facror\ scrting:2
(5%)
Setting
2
3 5 6
I 9
,0
554/"
6006 65% 70'% 75ya
aoo/o 854 900/r 950/0 100%
i
Factorysenins:
l0(100%)
B. Switch
on receiv*while holding
set button.
«4.
Reverse Setup»
(Brushless
and Brushed Molor Modes)
P€rform
to enable or disable Reverse.
Oswitch
on rcceiver while holding
down
((3.
Brake
Setup))
(Brushress
Moto. rvtode
onty)
P€rrom
to adiust BEke. Always
check seaings by driving the model. Please rcte that changes
lo B,
ake selup wrll aot be re'ledeo in
Brushed Motor lvlode,
irTurn
on transmrtter and recerver'nord€r
OPressand
holddown
Setbutton. B€l€ase Set bution when the LED is lit up Orange,
and itwill
siarttoflash OEnge. Countthe numberofflashes
of lhe LED to checkthe setting. Forexample,
2 llashes sionilies Setthd 2
3
Press lhetel buaon ld
cycls up rhrough the Setlings.lt relurs to Selnng 1
alrer Setting
10.
itPush
and
hold
Sei button toend setup. When LED riihts
upOrangero show setup iscomptete,
down
seJhurton
--------r
u]ur r
----@{El
flH
@LED
lighis
up inthsorderRed
iGreen +OEnge +
Bed. Release
the Sst butron when the LED is lit up Bed.
arLED goesout,
thenflashes once
as shown
in the
<<LED Flashing
Pattern>> section to indicate
the current selup.
*Reveße
switches
between on and ofieverytime
(,
is
perrorned.
«5.
Battery Cut-OfiSetup»
(Brushlessand
Brushed
tvtotor
[,todes)
LED
Perlorm to
switch between Lo and Hi Battery Cut.Off
modes, which
prevenl
ihe
battery
päck
lrom oveFdrschargng. Always
set to Lo when ushg LF
and Ni-Cd
(rswitch
on
receiverwhrle
holdrnq down
setbullon.
,
LED
lighls
up in the order Bed
,creen
.
Oranse
-
Red. Felea* the
S6t buflon when lhe
LED is lit up Green.
i
LED
goes
out. lhen tlashes
once as shown i4 the.<LED Flashhg Partern>/
section toindrcare
*Battery
Cut-Ofilunclion
swilches between Hiand
Lo everyiime
i,
is
perlormed.
*Please
noteihat
settins to Hi may reduce modelrunning
time
provided
by the battery
pack.
«6.
Motor Mode
Setup))
(Brushlessand
Brushed MotorModes)
Perform to selec! Brushless or Brushed Mode-
O§witch
on receiverwhile holdinq down
Set
bution.
OLED
lights up in
theorder Red
+
Green
+Orangs
-
Bed. Bslease the Sel button when the
LED is lit up
Orange.
I
-ED
llashes Oralge
-
Green
-
Oranga. Prass
Sel bJtton when LED rs Oränge to
select
Brushless Moto.Mode,
orwhen Greento
aelectBrushed Motor Mode.
(3,LED
llashes
Orange lo sisnify Brushless
^rotor
lr4ode, or creen to signiry
Brushed wlotor
Mode- Press
Set bulton to
confim mode, orturn otf the ESC to cancel.
a5iLED
goes
out, then flashesonc€
as shown
'nthe
<<LED Flashing Pattsrn>>
section lo indical€
«LED
Flashinq Pattern»
Whenthe receiveris
switched on, LED willshowthe
culrent settings by the
colorand flashinq
pattern
to
enable checkrng
ol Beveße, Battery
CunOfl and
Molor Mode settinqs,
Eattery
Cut-Off
LED
#.'Ushtsupcß6n, l*
sinsleflash
+
Lishlsupcrcen
,
:Pi
;9.
DoubEnssh
Hi
o
Lighlsupcreen -+
-
Lo-gsngleffash
Hi
o
I'ghsupc,ee_-+
(-
-
Lolgoolbleflasn
aAäershowing
thecurrent settings, LED wiltgo
otlt and return ro indic;ting
th;fite tevet. Ferer
lo.< l hrottle
Ope,ation and LLD lndrcator >
section.
a
A beeptono isemitted
ifa molor rs connected.
((CAUTION))
(note
the followins information
caref utty.)
a!)tüotor
tempeEtur€
Prolonged
brushless motor
useal hiqh temperatures maylead
to decreased
pertormance:
keeD
motor surlace temperature
below 80"C. Alwäys ta[e
precaulions
to avoid
burns when handtrng
€)lvlotor
timing
Iwo hcremenls
from motois slandard
oosilion rs rhe maiimum reohmended trmind
adtustment. Makinq
la'ge rncreases to timinö
(in
parlicula(
setthq
to maximum
incremen0 ca;
quse excessive curenl and overhsating,
leading to damageto
motor, ESC and baltery
pack.
elohassis
Sear
ratio / Running
conditions
Factors such as chassis
gear
ratio,
weight,
plus
air and driving
surracst€mperaluresca. cause
overheating, leading to
decreased
perfoffiance
and
evon damag6. Atways srarr d ving with
a
gear
ratiothat
places
minimalsirah on lhe motor
G
Usrng other manufaclurcrs
transmrtters
This ESC is not
compatible with third
party
Vansmitter manufacnrrers' high response
modes,
Always set lransmitter to normalmode,
with reference to ils user manuat.
OA
beep tone is
emitted ifthe receiver is switched
on belore the transmitter, and the motor is
connected. No
beep tone willbe emitted iffailsafo runction
is enabled.
LED
Brushless MotorMode
Orango
Brushed Motor Modo
((Protection
Functions»
This
atem fealures 2 functions to
protect
ESC
operation.
Overheät
protection:
Cuts otf
power
to
the motorwhen
ESC overheats duelo con-
tinued
long flrnning times or excessive
load. Let the ESCcooldown and it willau,
Overload Protection: lI a cü ent oveF
load
occurs, the motor will automalically
shut down and willnot rcslartautomatical-
ly.
lmmediately switch off B/C unit, check
for
short circuils or motor damage, and fix
problem.
Then, rcstarl B/C unit-
Coniact
your
localTamiya dealer for any
questions
regarding this ESC including
parts,
delects
and
repairs.
(froubleshooting»
*Beforesending
yourESC
infor repan, check itagain
usingthe diagram below.
LED
ESC is in Brushless lvlode
but sensorcable is not connected. Connect
cabre, or reptace if fautty.
ESC is in Brushed lvlodewith
brushless motor and sensor
connected.
Brushless motor has shut down-
LED flashes Red slowly
Overheat Protection function
activated. LettheESC
cootdownand it witt automarica
y
restart. tn case of
frequentshutdowns,
check
sear
ratio, ESC cooling,
and drivetrain movement.
LEDilashes Fed
quickly
Overload
protoction
function aciivated.
Turn off ESC, checkfordamage and repairjt
necessä.y.
Batt€ry
Cut-Ofi activaled. Recharge ihe battery
pack.
ESC has no
signal
input,
Checktransmitter
switch, Esc/receiverconnection,
and lrequency band or
Vansmilt€r/r€ceiv€r
pairing,
LED dasplay is noffid
I\4otor cabl€s ar€ not connected
or
motor is
defective. Check motorconn€ction
or reptace moror irnoed€d.
Model moves
difieEntly
LED display is normal
High Point setup eror'
orvansmitter settings changed
after High Point setup. Perform
High Poinr setup
High Point
setup error, orlransmitter
settings changed after High Pointsetup. Perform
setup
procedures
asaln
ir
you
have
chansed transmitt€r.
Also check if Beveßefunction has
been disabted.
fiS^lTAMTYA
45069 TBLE-o4S
h
1056960)
 Loading...