Do you have a question about the Tascam DR-10L Pro and is the answer not in the manual?
Describes the key features of the TASCAM DR-10L Pro recorder, including its design and technologies.
Explains the symbols, formatting, and terms used throughout the manual for clarity.
Lists registered trademarks, logos, and copyright information related to the product and its software.
Details essential accessories like microSD cards, batteries, and monitoring equipment that must be purchased separately.
Lists optional accessories, such as the AK-BT1 Bluetooth adapter, available for separate purchase.
Advises on precautions to take when moving the unit between different temperature environments to prevent condensation.
Provides instructions on how to properly clean the unit using a dry soft cloth to avoid damage or discoloration.
Outlines important precautions regarding operating temperature, placement, and environmental conditions to ensure proper function.
Explains how to obtain support and warranty service for TASCAM products based on the region of purchase.
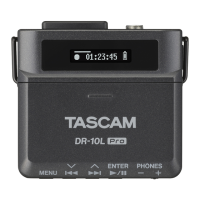
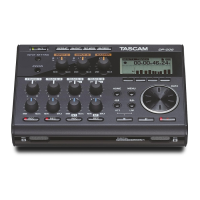
Identifies and describes the front panel components of the DR-10L Pro, including the display and battery compartment.
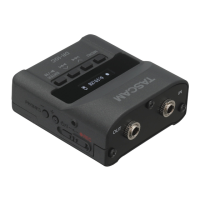
Identifies and describes the components located on the bottom panel of the DR-10L Pro, including buttons and jacks.
Identifies and describes the components located on the side panels of the DR-10L Pro, including ports and switches.
Identifies and describes the components located on the top panel of the DR-10L Pro, including input jacks and connectors.
Explains the available power sources for the unit, including AAA batteries and USB bus power, with usage precautions.
Details the process of connecting the included lavalier microphone to the unit, including locking the connector and using accessories.
Provides step-by-step instructions for inserting and removing microSD cards, including precautions and formatting prompts.
Guides users on how to safely turn the unit on and off, including automatic power-off functions and power status display.
Explains how to set the unit's internal clock for accurate date and time recording and file management.
Details the process of formatting microSD cards for optimal performance and compatibility with the unit, including error handling.
Instructs users on connecting headphones or other monitoring equipment to the unit to listen to input or playback sound.
Guides users through the physical installation of the AK-BT1 Bluetooth adapter to enable wireless functions.
Describes the layout and indicators of the Home Screen, which appears after the unit starts up, showing status and information.
Explains how to navigate the Menu Screen and operate basic menu procedures to change settings.
Details the procedures for starting, stopping, and managing recordings, including one-touch recording and file naming conventions.
Explains how to play back recorded files, skip between them, and search through audio content.
Guides users on adjusting the headphone output volume using the dedicated +/- buttons on the unit.
Describes the file structure, including the SOUND and UTILITY folders, and the naming conventions for recorded files.
Provides instructions on how to delete recorded files directly from the unit using the menu system.
Covers various settings related to recording, including REC LEVEL and LOW CUT filter adjustments.
Explains how to use the limiter function to prevent distortion from sudden loud input signals.
Details how to enable and use the auto level function for automatic adjustment of recording levels.
Describes how to set the phase (DEFAULT/INVERT) to match different microphone types for optimal signal recording.
Covers settings related to recording file formats, including WAV, MP3H, and MP3L options.
Allows users to select between MONO and POLY (stereo) file types for WAV recordings.
Enables users to set the sampling frequency for recordings, choosing between 44.1kHz and 48kHz.
Allows users to select the quantization bit depth for recordings, including 16bit, 24bit, and 32-bit float.
Explains how to customize file names using TEXT, DATE, or UNIT NAME options, and sets the file number.
Guides on setting custom 6-character TEXT strings for file names, including allowed characters.
Details how to set the starting file number for recordings, with a default of 0001.
Covers general settings such as automatic power off and backlight adjustments.
Explains how to enable or disable the automatic power off feature to conserve battery power.
Allows users to adjust the display backlight brightness and timeout duration.
Provides instructions for formatting microSD cards using QUICK or ERASE options for optimal performance.
Guides users on setting the battery type (ALKALINE, Ni-MH, LITHIUM) for accurate battery level monitoring.
Explains how to set the internal clock of the unit for accurate date/time stamps on recordings.
Describes how to reset all unit settings to their factory default values.
Lists the different types of marks that can be added during recording: time, peak, BOF, and manual marks.
Explains how to set the time mark function to automatically add marks at specified time intervals during recording.
Details how to set the peak mark function to automatically add marks when input signals exceed a set peak level.
Explains that BOF marks are added automatically when microSD card write errors occur during recording.
Mentions that manual marks can be added using the dedicated control app.
Guides on connecting the unit to a computer via USB for power and data transfer.
Details how to switch the unit to USB mass storage mode to access the microSD card from a computer.
Explains how to enable the remote control function via Bluetooth using the BLUETOOTH menu item.
Provides instructions for downloading and installing the DR-10L Pro CONNECT app on a smartphone or tablet.
Guides on pairing the unit with a smartphone/tablet via Bluetooth using the DR-10L Pro CONNECT app.
Explains how to enable the timecode function via Bluetooth to synchronize with Atomos products.
Details the process of pairing the unit with supported Atomos devices for timecode synchronization.
Guides on how to stop pairing with Atomos products by turning off the Bluetooth setting.
Explains how to initialize pairing data to connect with a new Atomos product.
Describes how to use the remote control app with the unit running freely on the last received timecode.
Lists technical ratings for the unit, including recording media, formats, input/output specifications, and audio performance.
Details the technical specifications for the analog input (mic jack) and analog output (headphones jack).
Presents the audio performance characteristics, such as frequency response, distortion, and dynamic range.
Provides general specifications like mic bias voltage, power details, and battery operation times under various conditions.
Shows estimated recording times based on different microSD card capacities and recording formats.
Displays the physical dimensions of the TASCAM DR-10L Pro unit.
| Sampling Rate | 44.1kHz, 48kHz, 96kHz |
|---|---|
| Output Connector | 3.5mm headphone output |
| Recording Format | WAV (BWF) |
| Microphone | Lavalier microphone (included) |
| Input Connector | 3.5mm TRS |
| Storage Media | microSD card |
| Features | Limiter, low-cut filter |
| Bit Depth | 16-bit, 24-bit |
| Power Source | 1 x AAA battery |