Do you have a question about the Tascam DR-60D and is the answer not in the manual?
Details FCC compliance, user guidance, and Canadian ICES-003 compliance.
Safe handling, placement, power, and maintenance guidelines for the unit.
Highlights potential hazards and critical operating precautions.
Proper disposal of electronic equipment and batteries according to regulations.
Precautions for safe handling, charging, and disposal of batteries.
Steps for installing batteries, SD card, and powering on the unit.
Setting the unit's clock and preparing the SD card for use.
Basic steps for starting recording, stopping, and playback.
Connecting to a DSLR and monitoring audio signals from the camera.
Lists the capabilities and functionalities of the TASCAM DR-60D recorder.
Explains manual formatting and lists package contents.
Lists trademarks and informs about SD card usage for recording/playback.
Advises on handling SD cards and suitable operating environments.
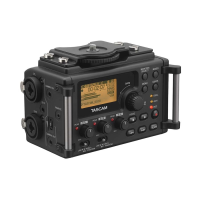
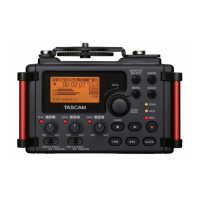
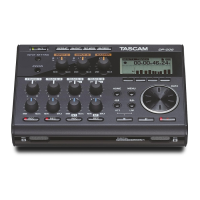
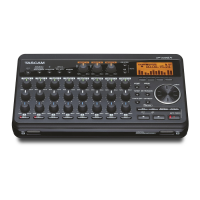
Identifies and describes the front panel buttons, knobs, and indicators.
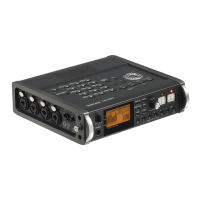
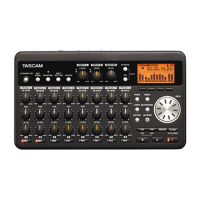
Explains input and output connectors on the left side of the unit.
Details controls on the right side, including SD card slot and power.
Describes USB port, audio jacks, and battery compartment on the rear panel.
Explains DSLR attachment bracket and tripod mounts on top and bottom.
Details indicators and information on the Home Screen.
Explains power, operation, track, and playback status indicators.
Describes indicators for level align, playback EQ, and peak levels.
Explains prerecording, format, sampling frequency, and input source indicators.
Describes file name, time, filter status, and lists menu items.
Guides on navigating and selecting options within the unit's menu.
Details the purpose and operation of QUICK, Record, and MIXER buttons.
Explains available power sources: AA batteries, AC adaptor, USB.
Instructions for installing and using AA batteries.
Details connecting and using optional AC adaptor and external battery pack.
Explains powering the unit via USB connection to a computer.
Guides on turning the unit on, off, and initial startup.
Explains resume function and setting the unit's internal clock.
Step-by-step instructions for handling SD cards.
Explains write protection and precautions for SD card handling.
Guides on formatting an SD card for use with the DR-60D.
Instructions for connecting the unit to a DSLR camera.
Explains connecting headphones and external monitoring systems.
Guides on activating and choosing audio signals for monitoring.
Setting recording format, sample rate, and max file size.
Guides on connecting microphones and external audio sources.
Instructions for LINE IN recording and configuring input switches.
Details enabling and using phantom power for condenser microphones.
Guides on plug-in power and setting input levels to prevent distortion.
Explains adjusting input gain levels (LOW, MID, HIGH) for microphones.
Details using the limiter to prevent distortion from loud sounds.
Using low-cut filter and introduction to recording modes.
Guides on making recording settings for MONO and STEREO modes.
Explains file saving and starting recording procedures.
Describes the file naming structure used in MONO/STEREO recording.
Explains capturing audio at two input levels.
Guides on configuring the unit for dual recording.
Details file naming and starting dual recording.
Guides on making settings for recording four independent channels.
Instructions on initiating a 4-channel recording.
File naming for 4CH and setting up automatic recording.
Configuring start/end levels and delay for automatic recording.
Splitting recordings into new files manually or by size.
Adding and navigating recordings using marks.
Capturing audio before record and delaying recording start.
Using self-timer for delayed recording and auto tones for sync.
Setting tone duration and enabling the slate button.
Estimated recording times based on card capacity and file format.
Guides on navigating folders and files using the BROWSE screen.
Explains icons and performing file operations like viewing info.
Guides on deleting files and managing folders.
Instructions on creating new folders for file organization.
Controlling volume and defining playback scope (all files/folder).
Details setting a specific folder as the playback area.
Explains selecting files for playback and skipping through them.
Describes pause, stop, rewind, fast-forward, and repeat modes.
Explains jump-back feature and playing dual recordings.
Outlines functions accessible via the QUICK button.
Accessing quick menu and its functions like Level Align, Play EQ, Gain.
Instructions for deleting and splitting files using the quick menu.
Cautions and examples for the file division process.
Using Level Alignment to enhance playback sound quality.
Selecting equalizer settings and adjusting mic gain via quick menu.
Adjusting stereo balance and volume levels for each channel.
Explains MS decoder use and decoding signals during recording.
Decoding MS signals during playback and PAN/WIDE settings.
Explains connecting the unit to a computer via USB for file transfer.
Guides on copying files and safely disconnecting the unit.
Guides on accessing info screens and details shown.
Details the status of the SD card and system settings/firmware.
Covers auto power save, backlight, contrast, battery type, phantom power voltage.
Instructions for resetting, quick formatting, and full formatting the SD card.
Guides on customizing file name formats (WORD or DATE) and options.
Shows RC-3F connection and guides on configuring footswitch functions.
Explains using RC-3F/RC-10 and configuring wired remote settings.
Lists and explains messages related to file names, division, and card formatting errors.
Explains messages concerning card capacity, file errors, and division issues.
Lists and explains various system and device error messages and troubleshooting.
Addresses problems like unit not turning on, not functioning, SD card issues, and playback failures.
Troubleshoots problems with erasing files and files not appearing on the computer.
Lists recording media, file systems, channel counts, and audio input/output specifications.
Details headphone/line jacks, audio performance, and computer compatibility.
Lists USB controllers, OS, power details, and estimated battery life.
Continues battery life, lists physical specs and operating temperature.
| Recording Media | SD/SDHC card (up to 32GB) |
|---|---|
| Number of Tracks | 4 |
| Sample Rates | 44.1kHz, 48kHz, 96kHz |
| Bit Depth | 16-bit, 24-bit |
| Storage | SD/SDHC card slot |
| Phantom Power | +48V |
| USB Interface | USB 2.0 |
| Audio Formats | WAV (BWF) |
| Outputs | 1 x 3.5mm stereo mini jack |
| Power Supply | 4 x AA batteries, USB bus power, AC adapter |
| Weight | 510g (without batteries) |
| Inputs | 2 x XLR/TRS combo |