Do you have a question about the Tascam Digital Portastudio DP-24 and is the answer not in the manual?
Safety compliance information and FCC rules for US users regarding radio frequency interference.
Guidelines for proper disposal of electrical and electronic equipment (WEEE).
Compliance statement for Canadian digital apparatus (ICES-003).
Warnings and precautions regarding operation of the laser product.
Adjusting the final mixed track for optimal sound quality and impact.
Steps to burn a master file onto an audio CD for playback.
Process for burning music or data onto blank CD-R or CD-RW discs.
Explanation of available input jacks (A-H) and LINE-GUITAR switch.
How to route input signals to specific tracks for recording.
Verifying current input signal routing to tracks on the Assign screen.
Enabling +48V phantom power for condenser microphones.
How to listen to signals during recording and playback using speakers or headphones.
Understanding OL indicators and level meters for signal monitoring.
Adjusting the 3-band EQ for tracks and inputs via the Mixer screen.
Overview of effect send systems for applying reverb, delay, etc.
Practicing recording takes without capturing audio data.
Step-by-step guide for the initial recording process, including setting levels.
Covers setting tracks, pan/level, input selection, and input levels for multitrack recording.
Process of recording additional audio onto different tracks while playing back others.
How to cancel recent actions, including editing and recording.
Reverting the most recent action performed on the unit.
Reverting multiple past actions to return to an earlier state.
Technique for replacing sections of recorded tracks by manually punching in/out.
Controlling punch operations using an external foot switch.
Technique to combine multiple tracks onto new tracks, allowing more recording layers.
Defining start (IN) and end (OUT) points for various functions.
Automatic recording within defined IN/OUT points, with pre/post-roll.
Defining parameters like MODE, PREROLL, and POSTROLL for auto punch.
Simulating auto punch recording without capturing audio.
Executing the auto punch recording process after rehearsal.
Reviewing different recorded versions (takes) of a track using virtual tracks.
General steps for performing track edits using the TRACK EDIT screen.
Copying a selected audio section and pasting it to another track.
Copying a section and inserting it, shifting subsequent audio.
Moving a selected audio section and pasting it to another track.
Moving a selected audio section and inserting it, shifting subsequent audio.
Copying an entire track to another track without affecting IN/OUT points.
Erasing an entire track, disregarding IN/OUT points.
Applying and editing compressor, noise suppressor, de-esser, and exciter effects.
Adding guitar-specific effects like amp simulation and modulation to tracks.
Introduction to send effects like reverb, delay, and chorus.
Applying send effects to tracks and adjusting their parameters.
Process of creating a stereo master file from multiple recorded tracks.
Using track and stereo faders to control volume and balance.
Controlling multiple track faders simultaneously for balanced adjustments.
Using the 3-band EQ on tracks and inputs via the Mixer screen.
Setting send levels for applying reverb, delay, or chorus effects.
Recording the final mixdown into a master file.
Defining the IN/OUT points that determine the range for master file recording.
Steps to perform the mixdown and record the master file.
Listening to the created master file to assess its quality.
Overall steps for mastering a track, including using EQ, compression, and normalize.
Applying equalization during the mastering process.
Using compression for dynamics control during mastering.
Maximizing overall track volume to the highest possible level.
Reducing quantization distortion by applying a noise shaping technique.
Steps for establishing a USB connection between the DP-24 and a computer.
Procedures for safely removing the USB connection to prevent data loss.
Explanation of transferring tracks (WAV files) via the AudioDepot folder.
How to transfer WAV files from a computer to the DP-24's AudioDepot folder.
How to transfer recorded tracks from the DP-24 to a computer's AudioDepot folder.
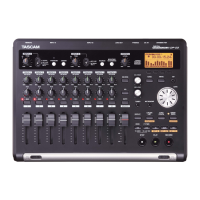
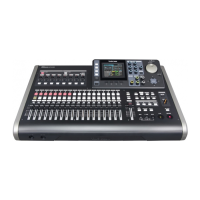
| Tracks | 24 |
|---|---|
| Simultaneous Recording Tracks | 8 |
| Storage Media | SD/SDHC card |
| Digital Output | No |
| Inputs | 8 XLR/TRS combo jacks |
| Phantom Power | Yes |
| Built-in Effects | Reverb, Chorus, Delay, EQ |
| Display | Color LCD |
| USB | USB 2.0 |
| Weight | 6.2 kg |
| Outputs | Stereo output, monitor output |
| Headphone Output | 1/4" stereo |
| Resolution | 24-bit/48 kHz |
| Power Supply | AC adapter |