Do you have a question about the Tascam DR-701D and is the answer not in the manual?
Details FCC compliance for Class B digital devices and user responsibilities for interference.
States compliance with Canadian ICES-003 standard for digital apparatus.
Manufacturer's declaration of compliance with technical standards.
Provides 14 essential safety guidelines for operating the equipment.
General guidelines for safe battery installation, handling, and usage.
Warns about placing near heat sources and potential interference.
Step-by-step guide for installing AA batteries.
Instructions on how to power on the device from standby.
Instructions on how to power off the device into standby mode.
Connecting external microphones and headphones.
Connecting external monitor speakers or amplifiers.
Connecting to a camera for audio input during recording.
Connecting to a camera for audio output monitoring.
Using HDMI for camera clock synchronization and timecode.
Using the BNC connector for timecode input to synchronize recordings.
Configures input sources for channels (EXT IN, built-in mic, IN jacks).
Setting input gain levels for each channel to avoid distortion.
Enabling the limiter to automatically adjust input gain and prevent overload.
Enabling ALC to automatically adjust input level based on sound.
Configuring the low-cut filter to reduce low-frequency noise.
Instructions on how to start and stop the recording process.
Procedure for connecting the unit to a computer using a USB cable.
Instructions for transferring audio files between the unit and a computer.
Troubleshooting steps for when the unit fails to power on.
Troubleshooting steps for general operational failures.
Troubleshooting steps for when recording cannot be initiated.
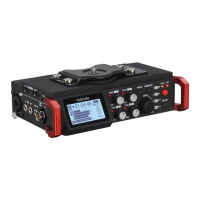
The TASCAM DR-701D is a linear PCM recorder designed for use with DSLR cameras, offering high-quality audio recording capabilities to complement video production. This device is engineered to capture pristine sound, providing a robust solution for filmmakers and videographers who require professional-grade audio.
The DR-701D serves as an external audio recorder that can be mounted directly onto a DSLR camera, integrating seamlessly into a video production workflow. It records audio in Linear PCM format, ensuring uncompressed, high-fidelity sound. The device supports various recording formats, including MONO, STEREO, and POLY (6ch), allowing for flexible audio capture depending on the production needs. It can record up to six tracks simultaneously, including four individual mic/line inputs and a stereo mix, providing ample channels for complex audio setups.
A key feature is its ability to synchronize with a camera's clock via HDMI, ensuring precise timecode alignment between audio and video. This is crucial for post-production, simplifying the editing process. The DR-701D can also receive HDMI timecode from the camera and record it into the BWF Time Reference field, further enhancing synchronization accuracy. For external timecode sources, it includes a BNC connector for linear timecode (LTC) input, with an internal generator that synchronizes to the external signal.
The recorder offers multiple input options, including four XLR/TRS combo jacks for professional microphones (with phantom power support), a 3.5mm stereo mini jack for external stereo mics (with plug-in power), and a 3.5mm stereo mini jack for camera audio input. This versatility allows users to connect a wide range of microphones and audio sources. Output options include a 3.5mm stereo mini jack for headphones, a 3.5mm stereo mini jack for line out, and a 3.5mm stereo mini jack for camera audio output, enabling monitoring and routing of audio signals. HDMI input and output connectors facilitate integration with cameras and HDMI monitor recorders, allowing recorded audio to be added to HDMI video input from a camera and then output.
The DR-701D records to SD, SDHC, or SDXC cards, providing ample storage for long recording sessions. It features a clear display that shows essential information such as timecode reception status, recorder operation status, elapsed time, power supply status, HDMI connection status, recording settings, level meters, remaining time, peak values, project name, trim levels, and GANG status.
The DR-701D is designed for intuitive operation, making it accessible for both experienced audio professionals and those new to external recording.
Proper maintenance ensures the longevity and optimal performance of the DR-701D.
| Audio quality | 16 bit |
|---|---|
| Frequency range | 20 - 80000 Hz |
| Microphone input impedance | 2000 Ω |
| USB 2.0 ports quantity | 1 |
| Product color | Black, Red |
| Weight | 567 g |
|---|---|
| Dimensions (WxDxH) | 169 x 113.5 x 57.3 mm |