Do you have a question about the Tascam RC-848 and is the answer not in the manual?
Information on changes and new features in ROM version 4.00 and above.
Advice on how to read and understand the manual for effective use.
Accessing and configuring settings within Group 1 menus for DA-88/DA-38.
Accessing and configuring settings within Group 2 menus for DA-88/DA-38.
Accessing and configuring settings within Group 3 menus for DA-88/DA-38.
Accessing and configuring settings within Group 4 menus for DA-88/DA-38.
Resetting specific parameters to their factory default values.
Various methods for entering time values into the system.
Storing and directly accessing up to 10 menus using SHIFT and numeric keys.
Detailed explanations of various menu options and their functions.
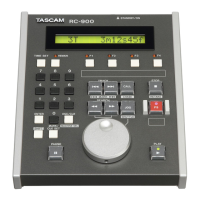
Information on various displays like MACHINE, LOCK STATUS, LCD screen, TAPE TIME.
Switches between different menu groups for navigation.
Used for selecting options, entering numbers, and moving cursors.
Aborts operations or stores selections and numbers.
Used in combination with other keys for advanced functions.
Switches through menus sequentially on the LCD screen.
Stores menu settings and selects menu options.
Show tape rolling direction and shuttle status.
Primary control interface for locating points and navigating menus.
Reads current TAPE TIME and stores it into LOCATE TIME.
Fine-tune time points by incrementing/decrementing frames.
Controls for setting pre/postroll and punch-in/out points.
Rehearsal mode for previewing punch-in recording.
Executes punch-in recording on tape.
Disables functions or used for instant menu access.
Slaves other machines to machine 1 for synchronized operation.
Selects which machine will be controlled by the remote.
Records time code into the subcode area of the tape.
Enables selected machine to play a loop.
Store start and end points for loop playback.
Automatically starts playback after autolocation.
Used for entering numbers into LOCATE TIME or MEMORY NO. windows.
Marks tape rolling direction relative to reference point.
Prepares current LOCATE TIME for storage into memory.
Recalls cue points from memory into the LOCATE TIME window.
Clears LOCATE TIME display or resets parameters.
Captures current TAPE TIME on the fly and stores it into memory.
Controls for Rewind, Fast Forward, Stop, and Play.
Fast winds tape to the current LOCATE TIME point.
Controls the LCD display contrast.
37-pin D-sub connector for analog tape machines.
15-pin D-sub connector for TASCAM analog machines.
9-pin D-sub connector for VTRs or RS-422 devices.
Connects to TASCAM DA-88/38 digital multitrack recorders.
Essential setup steps before operating the system.
Connecting the RC-848 to the DA and other components.
Preparing a new tape with absolute time and subcode data.
Setting, checking, and changing tape locator points.
Setting cue points on the fly or using numeric keys.
Recalling and displaying stored cue points.
Fine-tuning cue points using UP/DOWN keys.
Starting playback automatically after autolocation.
Setting up and executing repeat play between two memory points.
Controlling the play speed of the machine remotely.
Inserting delays in individual tracks for precise timing.
Switching TAPE TIME display to show elapsed time from a specified point.
Performing punch-in recording operations.
Setting crossfade time for click-free punch-ins.
Previewing punch-in recording before actual commit.
Performing automatic punch-in and punch-out.
Entering desired preroll and postroll times.
Copying tracks from one track to another on the DA-38.
Enabling or disabling shuttle monitor function for locating points.
Selecting bit length for TDIF I/O port data.
Enabling or disabling the dither function.
Connecting multiple DAs for synchronization.
Assigning unique ID numbers to machines in the system.
Initiating and managing the synchronization process between machines.
Controls on machine 1 that affect slave machines in CHASE mode.
Procedures for releasing slave machines from master control.
Setting and managing offset values for synchronization.
Automatically entering offset values when syncing.
Manually entering offset values using the numeric keypad.
Direct entry of offset values within the Machine Offset menu.
Adjusting offset values using the plus and minus keys.
Clearing the entered offset values to zero.
Selecting how keys affect master and slave machines.
Copying audio and timecode between two DA-88s digitally.
Controlling machines with a parallel port via EXT 1.
Using event output ports for one-shot pulses.
Setting contact polarity and pulse width for event outputs.
Accessing Event On/Off menu to select event points.
Programming events to start before an IN point for timing adjustments.
Connecting and controlling TASCAM multitrack cassette recorders.
Connecting and controlling TASCAM open-reel recorders.
Connecting and controlling TASCAM CD players.
Lists remote functions that are not operational for analog machines.
Enabling or disabling Chase mode on the DA-60 MKII.
Controlling VTR record drop-in/out with DA/VTR system.
Accessing and configuring settings within Group 3 menus for SY-88 integration.
Accessing and configuring settings within Group 4 menus for SY-88 integration.
Accessing and configuring settings for Group 5 menus on Machine 9.
Accessing and configuring settings for Group 6 menus on Machine 9.
Method A for entering time values using keypad and SHIFT+ENTER.
Method B for entering time values with direct keying-in.
Method C for entering time values using keypad and SHIFT+ENTER.
Detailed explanations of Gen Start Time, Generate Reset, Time Mode, etc.
Detailed explanations of T/C: External, T/C: Abs Diff, T/C: Offset, etc.
Detailed explanations of EXT 3 Cont. Mode, EXT 3 Timer Mode, Frame Display.
Controls park position of a machine connected to EXT 3.
Configures event units controlled via time data from EXT 3.
Manages event units controlled via time data from EXT 3.
Menu settings for Group 6 related to EXT 3 control.
Shows timecode numbers and format from EXT 3.
Selects Rel/Abs difference for EXT 3 master.
Enters offset for EXT 3 master.
Manages preroll time for machines connected to EXT 3.
Controls events via time data entering EXT 3.
Manages event units via time data entering EXT 3.
Switching between ABS and Timecode controlled modes.
Selecting timecode format for master and slave machines.
Selecting the clock source based on application or master machine.
Procedures for recording timecode onto DA-88 tapes.
Setting the start time for the SY-88's timecode generator.
Setting the desired start time for the generator.
Recording timecode onto a dedicated track of the tape.
Selecting timecode output format for DA-88 to external timecodes.
Setting a park position to compensate for slave lag.
Trimming the park position time using plus/minus keys.
Establishing synchronized operation between machines.
Setting and managing offset values for synchronization.
Manually entering offset values for synchronization.
Resetting offset display to zero to disable sync offset.
Copying audio and timecode between two DA-88s.
Connecting a VTR via RS-422 protocol to EXT 3.
Selecting the VTR for remote control.
Lists functions changed or limited when controlling a VTR.
Operation modes and controls specific to Split Mode for VTRs.
Guide to VTR punch-in recording referenced to a picture.
Preparatory steps for VTR punch-in recording.
Setting punch-in and out points for VTR recording.
Pin assignment details for the EXT 1 connector.
Pin assignment details for the EXT 2 connector.
Pin assignment details for the EXT 3 connector.
| Brand | Tascam |
|---|---|
| Model | RC-848 |
| Category | Remote Control |
| Language | English |