EasyManua.ls Logo

TATSOUL 370-S - User Manual

TATSOUL 370-S
9 pages
Print Icon
To Next Page IconTo Next Page
Loading...
P9-1
When a client is getting on the chair,
ALWAYS have the chair locked and the bed
set in a parallel position to the base as shown.
Correct Position
Question and Answer IconNeed help?

Do you have a question about the TATSOUL 370-S and is the answer not in the manual?

Summary

Instruction Manual

Safe Client Positioning

Ensure the chair is locked and bed is parallel to the base when a client is getting on.

Assembly Instructions

Step 1: Install Foot Pegs

Screw foot pegs into the base of the chair.

Step 2: Attach Base to Lift

Fasten the base to the lift mechanism using base bolts and washers.

Step 3: Mount Spring Hook Bracket

Attach the spring hook bracket to the bottom of the seat using the provided hardware.

Step 4: Secure Seat Frame Bracket

Fasten the seat frame bracket to the bottom of the seat with frame bolts and washers.

Step 5: Install Back Teeth

Attach the back teeth component to the seat back using back teeth bolts.

Step 6: Insert Leg Rest Bars

Insert leg rest bars into the seat frame handle and secure with a stopper bolt.

Steps 7 & 8: Tighten Hinge Bolts

Tighten the hinge bolts on the leg rest bars.

Step 9: Mount Seat Frame Bracket to Lift

Place the seat frame bracket onto the lift piston, aligning the notch.

Step 10: Install Back Adjustment Bar

Insert the back adjustment bar into the back teeth and secure the crossbar.

Step 11: Attach Spring to Seat Back

Connect the spring to the seat back adjustment bar and spring hook bracket.

Step 12: Install Adjustable Foot Rest

Insert adjustable foot rest, tighten lock knob, and secure with a locking pin.

Step 13: Fasten Seat Frame Bracket to Piston

Attach the seat frame bracket to the lift piston using a connector bolt, washer, and gasket.

Operating Instructions

Adjustable Features Overview

Details on the adjustable headrest, arm rest, leg rest extender, and foot rest.

Chair Operating Positions

Illustrations of the chair in Chair, Straddle, and Bed positions.

Critical Positioning Warning

Warning against positioning the chair in bed format perpendicular to the base.

Optional Accessories

Face Cradle Accessory

Optional Face Cradle for enhanced comfort and positioning.

Landing Gear Retractable Wheels

Optional TATSoul Landing Gear Retractable Wheels for mobility.

Wing Extensions Accessory

Optional 370 Wing Extensions for added seat width.

Protective Covers Accessory

Optional 370 Protective Covers to maintain seat condition.

Vinyl Aftercare

Use Soft Cleaning Implements

Clean vinyl seats using soft sponges, cloths, and soft-bristled brushes.

Wash with Soapy Water

Wash vinyl seats with mild dish soap mixed with warm water.

Avoid Abrasive Cleaners

Do not use abrasive cleaning compounds like bleach or solvents on vinyl.

Contact Information

General Information Contacts

Email and fax details for general inquiries.

Sales Department Contacts

Email and telephone numbers for sales inquiries.

Technical Support Contacts

Email and telephone numbers for technical assistance.

Overview

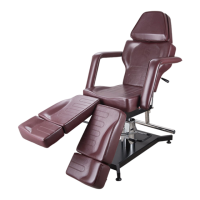
The TATSOUL 370-S is a versatile and adjustable tattoo chair designed for client comfort and artist convenience. This instruction manual provides detailed assembly, operating, and maintenance guidelines for the chair, along with information on optional accessories.

Function Description:

The TATSOUL 370-S serves as a professional tattoo chair, offering multiple configurations to accommodate various tattooing procedures and client positions. It can function as a standard chair, a straddle chair, or a flat bed, providing flexibility for artists and comfort for clients during long sessions. The chair is designed with adjustable components to optimize the client's position and allow the artist easy access to different body parts.

Important Technical Specifications (based on parts list):

The chair's construction relies on a variety of specialized bolts, washers, and wrenches to ensure stability and adjustability. Key components include:

  • Connector Bolts: M10x25 (P1) and M10x40 (O1) with corresponding washers (P2, O2) and split lock elastic gaskets (P3). These are crucial for securing major frame components.
  • Spring Hook Assembly: M6x16 hook screw (S3) with a 6x13x1 connector washer (S2) and spring hook (S1), used for attaching the spring hook bracket.
  • Adjustable Foot Pegs: 48x10x30 mm (W), providing stability and leveling for the base.
  • Base Bolts: M8x20 (T1) with 8x17x1.5 mm base washers (T2), used to fasten the base to the lift mechanism.
  • Back Teeth Bolts: M8x45 (X1), securing the back teeth component.
  • Top Frame Bolts: M8x30 (U1) with 8x17x1.5 mm top frame washers (U2), used for fastening the seat frame bracket.
  • Allen Wrenches: M5 (Z1), M6 (Z2), and M8 (Z3) for tightening various bolts during assembly.
  • Leg Bars: (Y) 2 pcs, for the leg rest assembly.
  • Back Teeth: (X2) 1 pc, a structural component for the backrest.
  • Lock Pin: (Z4) 1 pc, used for securing the adjustable foot rest.

Usage Features:

The TATSOUL 370-S is highly adaptable, featuring several adjustable and removable components:

  • Headrest: Adjustable and removable, allowing for client comfort and specific tattooing needs.
  • Arm Rest: Adjustable and removable, providing flexibility for arm positioning.
  • Leg Rest Extender: Adjustable and removable, accommodating clients of different heights and allowing for various leg positions.
  • Adjustable Foot Rest: Provides support and comfort for the client's feet.
  • Multiple Positions: The chair can be configured into a standard chair position, a straddle position (where the client sits facing the backrest), or a flat bed position.
  • Safety Precaution: When a client is getting on the chair, it is crucial to ALWAYS have the chair locked and the bed set in a parallel position to the base. This ensures stability and prevents accidents.
  • Warning: The manual explicitly states, "DO NOT POSITION CHAIR IN BED FORMAT PERPENDICULAR TO LONG PORTION OF BASE!" This highlights a critical safety instruction to prevent instability or damage.

Assembly Instructions:

The assembly process involves several steps, utilizing the provided hardware and tools:

  1. Step 1: Screw foot pegs (W) into the base.
  2. Step 2: Fasten the base to the lift mechanism using base bolts (T1) and washers (T2).
  3. Step 3: Fasten the spring hook bracket to the bottom of the seat with the spring hook bracket bolt (S3) and washer (S2).
  4. Step 4: Fasten the seat frame bracket to the bottom of the seat with top frame bolts (U1) and washers (U2).
  5. Step 5: Fasten the back teeth (X2) to the seat back with back teeth bolts (X1).
  6. Step 6: Insert leg rest bars (Y) into the handle of the seat frame and fasten the stopper bolt and washer.
  7. Step 7 & 8: Tighten the hinge bolt on the leg rest bars using the appropriate Allen wrench (Z1).
  8. Step 9: Place the seat frame bracket onto the lift piston, aligning the seat frame notch with the piston peg.
  9. Step 10: Insert the back adjustment bar into the back teeth, then fasten the back teeth crossbar over the top with crossbar mounting screws.
  10. Step 11: Attach the spring to the seat back adjustment bar and spring hook bracket.
  11. Step 12: Insert the adjustable foot rest into the seat frame bracket and tighten the lock knob. Insert the locking pin into the foot rest height adjustment holes.
  12. Step 13: Fasten the seat frame bracket to the lift piston using the connector bolt (P1) with a washer (P2) and gasket (P3).

Maintenance Features (Vinyl Aftercare):

Proper care of the vinyl seating is essential for its longevity.

  • Soft Cleaning Implements: Use only soft sponges, dish cloths, and soft-bristled brushes. Avoid steel wool, sharp cleaning tools, or abrasive implements that could tear the vinyl.
  • Soapy Water: Clean vinyl seats with a mixture of mild dish soap and warm water. Dip a soft-bristled brush or cloth into the sudsy mixture and scrub until clean.
  • Avoid Abrasive Cleaning Compounds: Do not use undiluted bleach, as it is too caustic and will cause the vinyl to break down over time.
  • Avoid Specific Chemicals: Do not use cleaning compounds containing:
    • Concentrated detergents
    • Silicone oils
    • Waxes
    • Petroleum distillates
    • Dry cleaning fluids
    • Solvents
    • Acid-based cleaners

Optional Accessories:

The TATSOUL 370-S can be enhanced with several optional accessories:

  • Face Cradle: Provides additional comfort for clients when lying face down.
  • TATSoul LandingGear Retractable Wheels: Allows for easy movement and repositioning of the chair.
  • 370 Wing Extensions: Provides extra width and support for the client's back or arms.
  • 370 Protective Covers: Helps protect the chair's vinyl upholstery from wear and tear, and makes cleaning easier.

Contact Information:

For any questions regarding products, sales, or technical support, customers can contact TATSOUL via email or phone during PST business hours. Emails are typically responded to within a few hours, even during evenings and weekends.

  • General Information Email: sales@tatsoul.com
  • General Information Fax: 1-800-768-5643
  • Sales Email: sales@tatsoul.com
  • Sales Telephone: 1-888-TAT-SOUL (1-888-828-7685) Option 1
  • Technical Support Email: support@tatsoul.com
  • Technical Support Telephone: 1-888-TAT-SOUL (1-888-828-7685) Option 2

TATSOUL 370-S Specifications

General IconGeneral
BrandTATSOUL
Model370-S
CategoryIndoor Furnishing
LanguageEnglish