Installation Instructions for Equalise Backlit Mirror
TAV.EQU.01.RF
Tavistock Ltd, Brassmill Lane Trading Estate, Bath, BA1 3JF
| Tel: 01225 787870 | www.tavistock-bathrooms.co.uk
Please read carefully before you start and retain for future reference
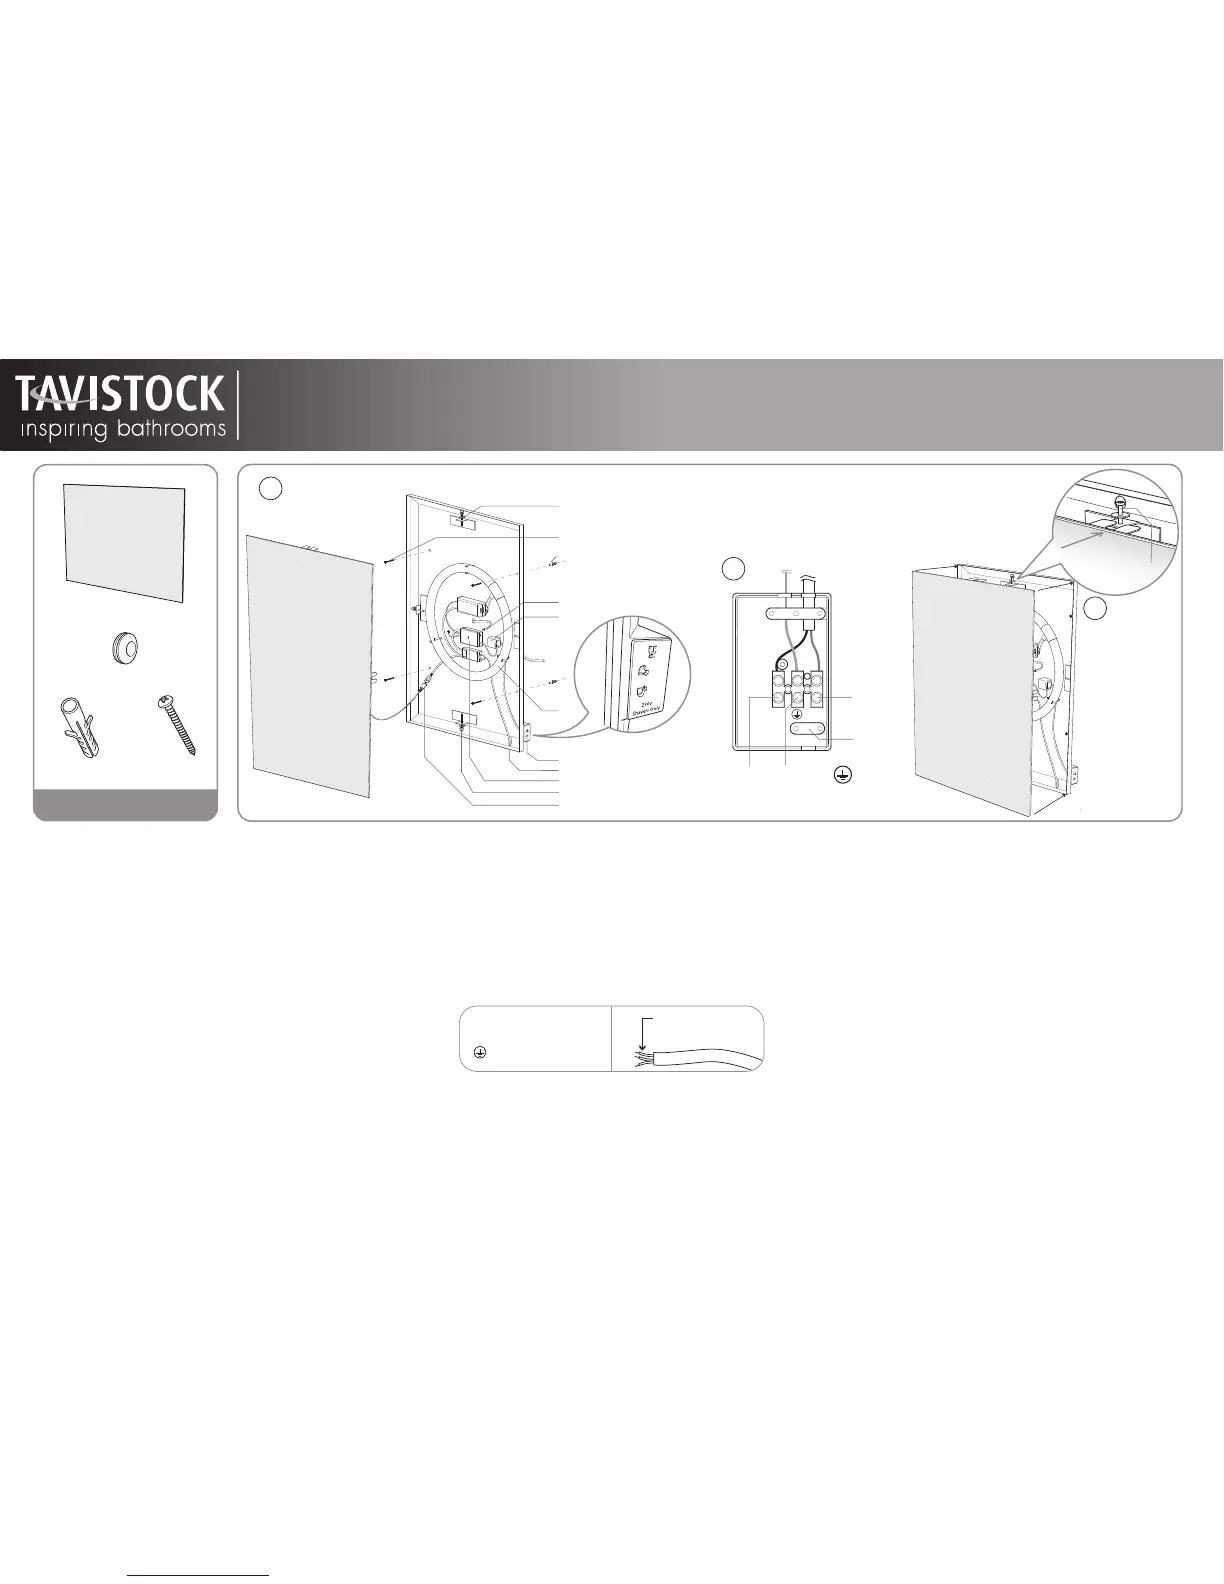
4x wall plugs 4x screws
Lamp
Connection box
Heated pad connector
Securing screws x 4
Power supply cable
Wall plug x 4
Wall fixing screw x 4
Mirror securing screw x 4
IR Sensor switch
Shaver
1
The wall surface must be of suitable strength and construction. This mirror can be
mounted either portrait or landscape. The drain hole that is not in use i.e. whichever is not
at the bottom of the product should be sealed using the rubber grommet supplied.
Note: Wall plugs provided are suitable for Stone or Brick walls. For other wall types use
appropriate wall plugs. If in doubt consult an expert.
To ensure correct operation of the infrared sensor the mirror must be mounted so that
there is a minimum of 150mm clearance immediately adjacent to the sensor.
1) Carefully remove the mirror by removing the cover caps on the sides of the mirror and
loosening the securing screws through the holes (these should not be removed
completely), then separate from the main body. Place the mirror in a safe place for now.
The heated mirror pad should be disconnected by separating the plugs.
2) Mark the desired height of the mirror and draw a horizontal line on the wall (using a
spirit level) which corresponds with the height of the top holes in the back of the mirror
body. Holding the mirror body in place on the horizontal line, mark off all 4 holes in the
back of the mirror body. Also mark off where the electrical supply cable must be placed in
case this needs to be chased out locally for the installation. Place the mirror body to one
side and drill the holes as necessary for the wall plugs.
IMPORTANT: Loose connections can lead to over heating. Excessive temperatures may
lead to scorching of the plastic components, and in extreme cases may even melt.
Charring of components is always a consequence of faulty installation or maintenance,
and any claims are excluded from the warranty.
4) Reconnect the heated mirror pad.
5) Replace the mirror over the front of the body, ensuring that the metal brackets on the
rear of the mirror are located between the metal brackets on the body and the large
washers on the securing screws (see diagram 3) Failure to ensure correct location of
these brackets could result in the mirror being unsafe. Do not leave unattended until fully
secure.
6) Turn back on the electrical supply so that your backlit mirror is operational.
7) To switch the mirror on or off move your hand past the Infrared sensor (must be within
6cm), the heated pad is turned on when the main lamp is illuminated however if the lamp
expires the heated pad will still operate. We recommend the product is turned off after
use.
Strip wires to a suitable
length. DO NOT connect
to a plug & socket outlet.
Colour Coding:
L - Live = Brown
N - Neutral = Blue
- Earth = Green & Yellow
PROCEDURE
3
2
N.B. Ensure connection box cover is securely fastened
in place after connections have been made
L N
Output Wires
Live Terminal
Connection
Earth Terminal
Connection
Neutral Terminal
Connection
Cable Clamp
Insert the wall plugs and screw the mirror body in position having fed the power supply
cable through the rubber grommet in the mirror body. Make sure that all screws are
secure.
3) Ensure that the electrical supply is turned off at the mains. Remove the connection box
cover inside the mirror body and the cable clamp to allow the electrical connections to be
made as follows:
THIS PRODUCT IS MANUFACTURED TO CLASS I
CATEGORY AND MUST HAVE AN EARTH CONNECTION.
! IF IN DOUBT CONSULT YOUR ELECTRICIAN !
Strip the mains PVC supply cable as necessary. Thread the power supply through the
rubber grommet on the switch box and make the necessary connections in accordance
with the current IEE Regulations. Firmly tighten all terminal connections. Make sure the
cable clamp is replaced and tightened and the connection box cover is replaced.
Parts Included
1x grommet
1x mirror
The shaver socket is always active &
able to charge whether light is on/off
Shaver socket
Securing screw & washer

 Loading...