An easy way to add additional shade or privacy area on your Pontoon Boat. Enclosure accommodates both 96” and 102”
width boats and is supported by shock-corded fiberglass pole framework that breaks down for convenient storage. After
initial installation of permanently mounted hardware to your playpen rail, the Enclosure sets up and attaches easily and
comes down in minutes. This product is designed to only be in place on your boat when at idle speed or when
anchored. NEVER leave this product up and assembled on your boat when underway! Never leave the Pontoon
Enclosure in place when unattended or for any prolonged periods.
You will need full access in and
around the boat for initial installation.
It can be done with the boat in the
water, but best acomplished on the
trailer, with a helper.
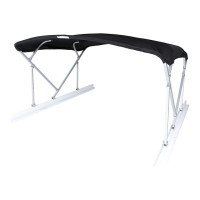
Pontoon Enclosure
Includes:
Fabric Enclosure, Three 8-Section frame pieces, One 3-Section Center Frame piece, Six Side Mounting Brackets, (12)-#10
x 3/4” screws, (16) #8 Self-Tapping male snaps, (14) Short Webbing Snap/Straps, (2) Long Webbing Snap/Strap Assem-
blies, Storage bag and instructions.
Step 1:
Check to be sure that all the components listed above are there. If not, please call Customer Service at (518) 773-9400.
Step 2:
Determine the position on the boat that you desire to enclose. The top itself provides approximately 6 feet of coverage bow
to stern by the width of the playpen rail; so you will need at least that amount of open space. This will vary slightly by the
actual fit to your boat. Note that the mounting brackets will be permanently attached to the outside of the top playpen railing
about 5 feet apart, on each side of the boat - so be sure that the area you choose is clear of entry way doors, Bimini Tops, other
obstructions, etc. The sides of the enclosure are designed to accommodate seating along the sides of the playpen.
Step 3:
Attach the Side Mounting Brackets. Determine the appro-
priate position for the first bracket on one side of your top
playpen railing. The back portion of the enclosure will
accommodate a range of radii for the corners of your playpen
rail so the first mounting bracket should be located at the
very beginning of the bend (radius) on the top rail - make
sure that the open socket portion of the bracket is flush to the top of the railing. Mark screw locations with pen or marker;
Drill mounting holes with 5/32” bit. Secure bracket using two #10 x 3/4” screws and Phillips screwdriver. Measure along
that same railing, 28” from the center of the first bracket, to locate the second mounting bracket. Position that bracket and
secure to the rail with screws as above. Repeat for a third mounting bracket - again located 28” on center from the second.
Step 4:
Secure the remaining three mounting brackets on the opposite side of the playpen railing - directly across from those previ-
ously attached.
Step 5:
Unfold and assemble together one of the 8-Section fiberglass Shock-cord pole assemblies (ferruled end from one section
slips into the non-ferruled end of the next and so on). Insert one end into a mounting bracket, gently bend pole to insert the
Pontoon Enclosure
Instructions
Tools Required:
Phillips Screwdriver
Drill and 5/32” drill bit
(a cordless drill works best)