Do you have a question about the Team Losi 8IGHT-XE and is the answer not in the manual?
Defines terms like WARNING, CAUTION, NOTICE used in manuals for hazard indication.
Discusses handling of hot electronic components and compatibility.
Advises following manufacturer instructions for batteries, especially Li-Po.
Warns of choking hazard and injury from small parts.
Lists guidelines for safe driving and area selection.
Highlights safety for assembly, tool use, and chemicals.
Specifies the product is for ages 14 and up, not a toy.
Instructions for registering Team Losi Racing products online.
Lists necessary tools for assembly and their descriptions.
Explains various symbols used throughout the manual for assembly steps.
Details the process for installing the rear differential assembly.
Details the process for installing the front differential assembly.
Instructions for filling differentials with specific weight oil.
Continuation of front differential assembly steps.
Continuation of front differential assembly steps.
Instructions for filling differentials with specific weight oil.
Details the process for installing the center differential assembly.
Details the process for installing the center differential assembly.
Instructions for filling differentials with specific weight oil.
Details the sequential assembly of shock absorbers.
Details the sequential assembly of shock absorbers.
Details the sequential assembly of shock absorbers.
Details the process for filling shock absorbers with oil.
Details the process for assembling shock absorbers with springs.
Details the process for assembling turnbuckles for adjustments.
Details the process for assembling the front clip.
Details the process for assembling the front clip.
Details the process for assembling the front clip.
Details the process for assembling the front clip.
Details the process for assembling the front clip.
Details the process for assembling the front clip.
Details the process for assembling the front clip.
Details the process for assembling the front clip.
Details the process for assembling the front clip.
Details the process for assembling the front clip.
Details the process for assembling the front clip.
Details the process for assembling the front clip.
Details the process for assembling the front clip.
Instructions for adjusting front kick-up angles using various inserts.
Details the process for assembling the front clip.
Details the process for assembling the front clip.
Details the process for assembling the front clip.
Details the process for assembling the front clip.
Shows the final assembled front clip section.
Details the process for assembling the rear clip.
Details the process for assembling the rear clip.
Details the process for assembling the rear clip.
Details the process for assembling the rear clip.
Details the process for assembling the rear clip.
Details the process for assembling the rear clip.
Instructions for adjusting rear toe-in settings using inserts.
Instructions for adjusting rear anti-squat settings using inserts.
Details the process for assembling the rear clip.
Details the process for assembling the rear clip.
Details the process for assembling the rear clip.
Details the process for assembling the rear clip.
Details the process for assembling the rear clip.
Details the process for assembling the rear clip.
Details the process for assembling the rear clip.
Details the process for assembling the rear clip.
Shows the final assembled rear clip section.
Details the process of attaching various chassis components.
Details the process of attaching various chassis components.
Details the process of attaching various chassis components.
Details the process of attaching various chassis components.
Details the process of attaching various chassis components.
Details the process of attaching various chassis components.
Details the process of mounting servo and battery boxes onto the chassis.
Details the process of mounting servo and battery boxes onto the chassis.
Details the process of mounting servo and battery boxes onto the chassis.
Details the process of mounting servo and battery boxes onto the chassis.
Details the installation of O-rings for the motor can.
Shows user-supplied parts for motor installation.
Details the mounting of components onto the chassis.
Details the mounting of components onto the chassis.
Details the assembly of suspension components.
Details the assembly of suspension components.
Details the assembly of suspension components.
Details the assembly of suspension components.
Details the assembly of suspension components.
Details the assembly of suspension components.
Details the assembly of suspension components.
Details the assembly of suspension components.
Details the assembly of suspension components.
Details the assembly of suspension components.
Details the installation of the front wing.
Details the mounting of electronic components.
Details the mounting of electronic components.
Details the mounting of electronic components.
Details the mounting of electronic components.
Details the installation of wheels and tires.
Details the installation of the car body and decals.
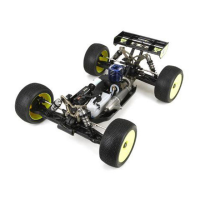
Shows the fully assembled car.
Visual representation of all parts with their corresponding numbers.
Lists part numbers with their English, German, French, and Italian descriptions.
Lists optional parts with their multi-language descriptions.
Details what the warranty covers, excludes, and limits.
Explains how to obtain service and warranty claim requirements.
Provides contact details for warranty and technical support.
Provides instructions for proper disposal of electronic waste in the EU.
| Scale | 1/8 |
|---|---|
| Drive | 4WD |
| Completion Level | Kit |
| Suspension | Independent |
| ESC | Not Included |
| Type | Electric Off-Road Buggy |
| Wheelbase | 325 mm |
| Motor | Brushless |
| Chassis | Aluminum |
| Shock Type | Oil-filled |
| Differential | Bevel Gear |
| Body | Polycarbonate |
| Battery | Not Included |