Do you have a question about the Techko Safe Pool S189A and is the answer not in the manual?
An 8-12 second delay period before the alarm is fully ready for activation.
Allows adults to temporarily disarm the alarm to pass through protected doors.
The alarm is extremely loud; never place the unit close to your ears.
Includes warranty requirements, patent information, and legal notices.
Replace batteries when alarm volume decreases or unit fails to sound.
Plastic resists UV rays; slight discoloration over time is normal.
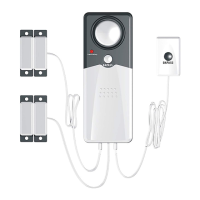
Introduces the TECHKO Safe Pool alarm for pool/spa area safety.
Highlights easy installation, weather resistance, and high siren output.
Keep unit out of children's reach and wear ear protection during testing.
Cannot guarantee complete protection; TECHKO is not liable for damages or injuries.
Read all instructions, secure sensors temporarily to prevent accidental alarms.
Install batteries, then test the alarm siren with ear protection.
Position unit high, test location effectiveness before permanent mounting.
Mount sensors with arrows facing each other, within 1 inch separation.
| Type | Pool Alarm |
|---|---|
| Model | S189A |
| Power Supply | 9V Battery |
| Alarm Type | Audible |
| Battery Type | 9V |
| Weather Resistance | Yes |
| Compliance | ASTM F2208 |
| Alarm Volume | 85 dB at 10 ft. |