Do you have a question about the Technitrend TN-09E and is the answer not in the manual?
Wipe the unit body clean with a soft, damp cloth, avoiding strong chemicals.
Vacuum or rinse filters lightly to remove dust. Dry thoroughly before replacing. Never operate without filters.
Unplug, drain water, clean filter, and dry unit in fan mode before storing in original carton.
Store the power cord away from the unit when not in use as shown in the diagram.
Turn off unit, remove drain knob/plug, use container, empty, and replace plug firmly.
Remove drain knob/plug, attach suitable water tube to spout, drain water automatically.
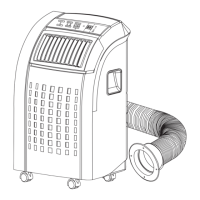
Install exhaust hose, avoiding kinks. Use shortest possible length for efficient operation.
Remove filter frame, insert carbon filter, reassemble frame, and refit inside unit.
Connect foam strips to exhaust pipe and window. Trim excess foam to fit snugly.
Make a 5-inch hole in the wall for the round connector. Fit hose to connector and cover unused hole.
Use SPEED button for high/low fan. AUTO mode selects speed automatically. TIMER sets operating hours.
Press TIMER button to set operating hours (1-12). Unit turns off automatically after set time.
Turn the roller on the air vent to control airflow direction from the vertical louvers.
Unit delays start by 3 mins. Wait 3 mins before restarting after shutdown. Cooling stops below set temp.
Transport upright, place on even surface, connect to grounded supply, ensure proper ventilation, avoid wet areas.
Do not cover unit, avoid wet hands, do not sit on unit, avoid chemical contact, use filters, drain water before storage/moving.
Diagrams of front and back parts, and control panel layout with numbered components.
List and dimensions of included accessories like exhaust hose, foam strips, connectors, and remote control.
Details the function of each button and indicator on the control panel.
How to turn the unit on/off and select modes: Automatic, Cooling, or Fan.
Explains preset temperatures and fan speeds in Auto mode for cooling and fan operation.
How to adjust desired temperature using Up/Down buttons, and how the display shows ambient vs. set temperature.
Check power supply, room temperature range, mode setting, and direct sunshine.
Check filters, vents, temperature settings, and water tank status for little or no operation.
Ensure proper insulation, avoid sun/openings, check heat sources, and unit leveling for insufficient cooling.
Address noise from uneven placement and compressor not running due to overheat or water tank.
Explains the Leakage Current Detection and Interruption circuit (LCDI) for fire risk reduction.
Instructions to test the LCDI plug using TEST and RESET buttons before each use.
Instructions on inspecting the cord for damage and obtaining a replacement if necessary.
| Brand | Technitrend |
|---|---|
| Model | TN-09E |
| Category | Air Conditioner |
| Language | English |