Do you have a question about the Tecnosystemi ProAIR Multi-Zone Series and is the answer not in the manual?
Explains how the Discovery 2X chrono-thermostat adjusts set-point, airflow, and functions.
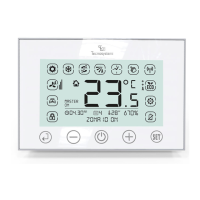
Explains the function of icons like ENTER, MINUS, ON/OFF, PLUS, and SET.
Lists icons for manual, timer, damper, cooling, heating, clock, day, and temperature settings.
Lists icons for radio signal, setting, battery, keypad lock, damper status, comfort level, and humidity.
Details basic configurations for zone and system thermostats, including communication.
Describes how to turn the entire Proair system on or off using the master thermostat.
Guides users on how to adjust the desired temperature setting on the thermostat.
Details how to set the system to summer or winter mode via the master thermostat.
Provides instructions for replacing the thermostat batteries when the level is low.
Explains how to interpret error codes (E0, E1, E2) displayed on the thermostat.
Covers advanced settings for qualified personnel to ensure correct system operation.
Details how to define daily time ranges and desired temperatures for the chrono-thermostat.
Explains how to set damper/grille movement modes (Proportional/Automatic, Manual).
Explains how to set the current time and day of the week on the master thermostat.
Provides instructions for resetting the thermostat to factory settings, with a warning.
Lists technical specifications and components of the Discovery 2X thermostat.
Provides step-by-step instructions for installing the Discovery 2X thermostat.
Explains the basic settings available to the user on the Mini Discovery 2X.
Details basic configurations for the zone thermostat, including communication.
Provides step-by-step instructions for turning the Mini Discovery 2X thermostat ON or OFF.
Guides users on setting the desired temperature for the Mini Discovery 2X.
Details how to regulate damper/grille movement on the Mini Discovery 2X.
Provides instructions for replacing batteries in the Mini Discovery 2X thermostat.
Details error codes (E0, E1, E2, E3) and their meanings for Mini Discovery 2X.
Covers advanced configurations for the Mini Discovery 2X thermostat.
Procedure to integrate Mini-Discovery in Proair system by assigning ID and Zone.
Provides step-by-step instructions for installing the Mini Discovery 2X thermostat.
Explains basic settings and functions of the Stealth 2X thermostat.
Details basic configurations for zone and system thermostats via wired cable.
Guides users on setting the desired temperature on the Stealth 2X thermostat.
Details setting Summer/Winter mode via the master Stealth 2X thermostat.
Explains error codes (E0, E1, E2, E3) for the Stealth 2X thermostat.
Details defining time ranges and temperatures for Stealth 2X programming.
Explains setting damper/grille movement modes for Stealth 2X.
Explains how to set time and day on the master Stealth 2X thermostat.
Instructions for resetting Stealth 2X thermostat to factory settings, with warning.
Lists technical specifications and components of the Stealth 2X thermostat.
Provides installation instructions for the Stealth 2X thermostat.
Details dimensions and installation procedures for the Polaris 2X/3X control unit.
Explains how to manage control unit parameters via the MENU.
Allows viewing thermostat status and setting radio/wired type.
Allows viewing actuator status and setting type (Damper/Grille).
Allows zone association with actuators and renaming zones.
Introduces the configuration submenu with various parameter options.
Defines the opening percentage for motorised dampers/grilles.
Sets Delta-T for proportional opening/closing of actuators.
Covers minimum/maximum set-point and chrono start/end times.
Defines electronic bypass function and post-ventilation settings.
Allows viewing firmware version, protocol model, and control unit ID.
Configures parameters for IR remote control operation.
Searches and identifies actuators connected to the control unit.
Resets all system parameters, useful for configuration changes or actuator replacement.
Sets the time, format (24H/AM-PM), and day of the week.
Allows setting the desired SetPoint for the zone thermostat.
Assigns or deselects the Master function for a zone thermostat.
Sets the system mode (Hot, Cold, Dehumidification, Ventilation).
Controls the ON/OFF status of the Proair system and ducted unit.
Basic steps to configure Polaris 2X with Discovery 2X RF thermostats.
Associates the network ID with Discovery 2X chrono-thermostats.
Adjusts the master/zone status of the thermostats.
Steps to program the first time range (F1) on the control unit.
Steps to program the second time range (F2) on the control unit.
Steps to program the third time range (F3) on the control unit.
Steps to program the fourth time range (F4) on the control unit.
Explains how to copy and paste programmed time ranges.
Explains basic settings and functions of the Stealth 2X - Point thermostat.
Details basic configurations for the zone thermostat.
Guides users on setting the desired temperature on the Stealth 2X - Point.
Details setting Summer/Winter mode via the Stealth 2X - Point thermostat.
Explains error code E3 for the Stealth 2X - Point thermostat.
Details defining time ranges and temperatures for Stealth 2X - Point programming.
Instructions for resetting the Stealth 2X - Point thermostat to factory settings.
Lists technical specifications and components of the Stealth 2X Point thermostat.
Provides installation instructions for the Stealth 2X Point thermostat.
| Type | Multi-Zone Thermostat |
|---|---|
| Mounting | Wall-mounted |
| Display | LCD |
| Power supply | 24V AC |
| Operating mode | Heating, Cooling |
| Zones | Multi-Zone |
| Power Source | 24V AC |