Do you have a question about the TecnoVideo WP10EX Series and is the answer not in the manual?
Loosen two M6 screws to remove the cover and access internal parts.
Route cables and water hose through fairleads into the cabinet.
Perform electrical connections to the solenoid valve via its cable gland.
Wiring details for WP10EXe models: Neutral on Pin 1, Line on Pin 2, GND on Pin 3.
Wiring details for WP10EXd models: Supply voltage between Pin 1 and Pin 2, GND on Pin 3.
Pull safety valve, unscrew pumping element, fill tank with max 10 litres, pressurize.
Unlock pump, pull safety valve to check for air, pump to desired pressure (max 4 bar).
Inspect unit every 6 months, check safety valve, O-rings, cables, and replace filter yearly.
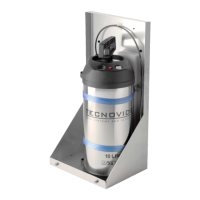
The WP10EX is a stainless steel pressurized washer system with an integral solenoid valve, designed for use with CCTV cameras in industrial, marine, and highly corrosive environments. It is specifically developed to pair with Tecnovideo camera housings or other housings lacking a washer facility. The system features a 10-liter fluid tank that is manually pressurized and includes a built-in pressure gauge. An AISI316L stainless steel compact cabinet protects the unit from environmental agents. The solenoid valve's control voltage needs to be connected to its terminal box via suitable power cables.
The WP10EX series offers several models, distinguished by their supply voltage and explosion protection ratings:
For WP10EXd models, a 1/2" NPT Nickel-plated brass cable gland (EX II 2 G Ex d IIC, II 2 D Ex tD IP68) for armoured cable (O.D. 8.5 to 16mm, I.D. 6 to 12mm) is included.
Installation should only be performed by qualified personnel in accordance with regulations. Before any operation, power must be turned off. The unit should not be connected to a supply circuit until installation is complete. The supply voltage marked on the label must be carefully checked, with a tolerance of ±10%. An incorrect voltage can damage the unit. An all-pole mains switch with a contact opening distance of at least 3 mm in each pole, equipped with differential and overcurrent protection (magnetothermal, maximum 15A), must be incorporated into the electrical installation. This switch must be easily recognizable and accessible. A suitable blow fuse is also required. For mains connection, a multipolar cable of minimum 3x1.5 mm² (15 AWG) with an ordinary PVC sheath is recommended. All cables inside the housing should be fastened to avoid electrical contact with surrounding parts. Electrical connections (plugs and cords) must be protected from environmental factors. The unit case must be properly earthed, connecting all earth ground studs. The earth cable should be about 10mm longer than other cables on the connector to prevent accidental disconnection.
The washer system is opened by loosening two M6 screws to remove the cover. There are five fairleads (two at the bottom, three on the side) for cable and water hose entry; no cable gland is needed for cabinet entry. Electrical connections to the solenoid valve can be made from a telemetry system or a proper switching system, using the included solenoid valve cable gland. The valve label indicates the correct supply voltage. When power is supplied, the solenoid valve opens, allowing water output. Proper grounding is essential.
To control WP10EX Series washer systems via a Dry Contact Relay input, the DCI-EXWP interface (sold separately) is required.
To fill the tank, first pull the red safety valve to ensure the pump is not under pressure. Rotate the pumping element counterclockwise to unscrew and remove it. Fill the tank with a maximum of 10 liters of liquid. A single refill can provide approximately 200-500 washing cycles, depending on camera height, pressure, and water level. Re-fix the pumping element, ensuring the O-ring and its seating are clean. Pressurize the tank only using the pumping element. Do not force the safety valve or unscrew the hand pump if the tank is under pressure.
The unit is designed for use with water or water solutions. Denser mixtures can obstruct the nozzle. If a solution with residual is used, it must be filtered. Inflammable liquids, hydrogen peroxide (or similar oxygen-releasing substances), corrosive substances, liquids containing ammonia, solvents, viscous or greasy liquids, or liquids that form residues (dyes and greases) must not be used. The safety valve must not be bypassed or made inoperative. Observe local legal requirements for accident prevention and regularly check the tank. Keep the O-rings, safety valve, and the inside of the tank clean. When opening/closing the reservoir, ensure correct placement of the O-rings.
Unlock the pump handle by pushing it down and rotating it. After a few moments, pull the safety valve to check that it is not blocked and that air escapes. Pump until the desired pressure (maximum 4 bar) is reached, then lock the handle. When the camera water jet weakens, the internal pressure needs to be restored. The cabinet should eventually be closed.
This equipment is designed for harsh environments and requires minimal maintenance. A suggested inspection interval is 6 months, but extremely harsh conditions may necessitate more frequent checks. During each inspection, verify the proper functioning of the red safety valve and O-ring seals, replacing them if necessary. Check the tank, hand pump, and pressure gauge integrity. Any damage should prompt contact with Tecnovideo for spare parts. Cables, electrical connections, and mounting hardware should be checked for integrity and tightness, and any damaged/loose parts replaced or tightened.
The filter between the tank and the solenoid valve should be checked. It is recommended to replace the filter annually (a spare filter is provided with the MKWP10EX maintenance kit), though replacement intervals may be shorter depending on water impurities. To replace the filter, pull the red safety valve on top of the tank to release pressure. Disconnect the filter from the hoses using the quick connect fittings, then connect the new clean filter. Do not disconnect the filter if the tank is under pressure. When connecting the new filter, observe the arrows on the filter body indicating water flow direction and connect the hoses accordingly.
Dimensions are in millimeters, with tolerances according to QMS. Design and product specifications are subject to change without notice.
| Brand | TecnoVideo |
|---|---|
| Model | WP10EX Series |
| Category | Washer |
| Language | English |