USE
■ OPENING
• Using your thumb, pull back on the lid release button (E) and hold it in the
retracted position - Fig. 1.
• Holding the long handle of the pot (L) with one hand, turn the long handle of
the lid (F) with the other hand in an anti-clockwise direction until open - Fig. 2.
• Then lift the lid.
• Do not open the pressure cooker until the unit has cooled and all internal
pressure has been released. If the handles are dicult to push apart, this
indicates that the cooker is still pressurised - do not force it open. Any
pressure in the cooker can be hazardous.
■ CLOSING
• Place the lid horizontally onto the pot, aligning
the lid positioning marks G(a) and G(b).- Fig. 3
• Turn the lid in a clockwise direction until it
stops - Fig. 3 and you hear the button click as it
engages - Fig. 4.
If you are unable to turn the lid, ensure that the
opening button (E) is properly retracted.
■ MINIMUM FILL LEVEL
• Always put at least 25 cl/ 250 ml (2 cups) of liquid in
the pressure cooker when in use
For steam cooking*:
• The pot must contain at least 75 cl/ 750 ml (6 cups) of
water.
• Place the basket* (J) on the trivet* (K) provided for this
purpose - Fig. 5.
■ MAXIMUM FILL LEVEL
• Never fill your pressure cooker to more than two-thirds full
(mark MAX 2 for maximum filling).
For certain foods:
• For foodstus that expand and/or foam during cooking,
such as rice, pulses, dehydrated vegetables, stewed fruit,
pumpkin, courgettes, carrots, potatoes, fillets of fish, etc. Let
your pressure cooker cool down for a few minutes, and then
place in sink half-filled with cold tap water. Methodically
and gently shake the pressure cooker each time before
opening, after having checked that the pressure indicator
has gone down completely, to prevent bubbles of steam
from overflowing and burning you.
When the appliance
is closed but not in
operation, it is normal
for the lid to move
slightly relative to the
pot. This eect dis-
appears when the
product is pressurised.
Food placed in
the steamer
basket* must
not exceed the
MAX2 mark.
OK
* Basket and timer not included with certain models.
This operation is particularly important when steam is released quickly or after
cooling down with tap water. For soups, we recommend that you do a fast pressure
release with cold water (see Step 1 above)..
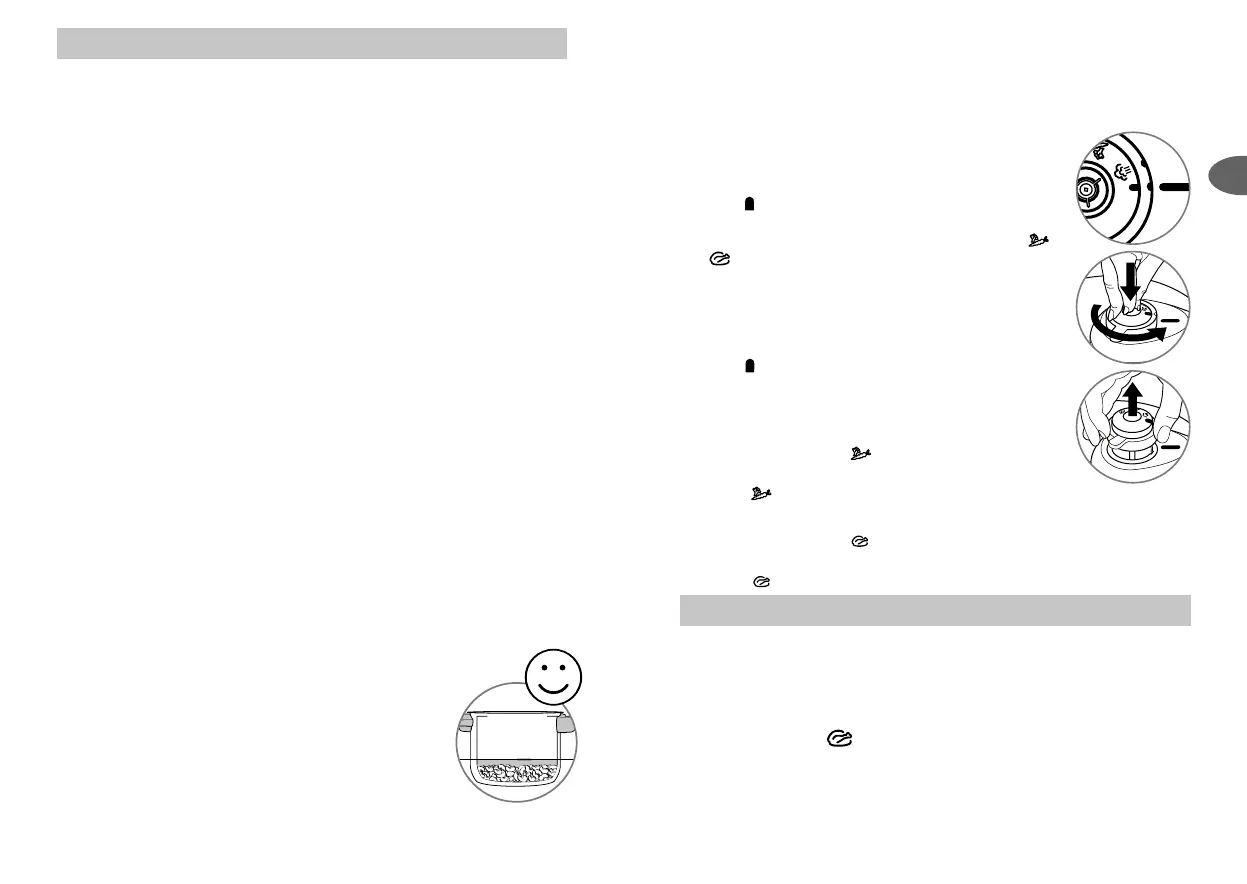
■ USING THE OPERATING VALVE A
To fit the operating valve (A):
Caution, these operations must only be carried out
when the product is cold and not in use.
• Place the operating valve (A) in position, aligning the
symbol on the valve with the positioning mark (H)
as shown in the diagram opposite.
• Press down on the valve then turn it to the symbol
or as shown in the diagram opposite.
To remove the operating valve:
Caution, these operations must only be carried out
when the product is cold and not in use.
• Press down on the valve then turn it to align the
symbol with the positioning mark (H) as shown in
the drawing opposite.
• Remove the valve as shown in the drawing opposite.
To cook vegetables or delicate foods:
• Position the pictogram
on the valve opposite the
positioning mark (H) - Fig. 7.
• Pressure operates at 50kPa (7 psi / 7lbs pressure).
To cook meat or frozen foods:
• Position the pictogram
on the valve opposite the positioning mark (H)
- Fig. 8.
• Pressure operates at 80kPa (12 psi / 12lbs pressure).
BEFORE FIRST USE
• Thoroughly clean the pressure cooker and its components before first use.
• Place the basket trivet (K) in the bottom of the pot and place the basket
(J) on top of it*.
• Fill the pot to two-thirds full with water (maximum mark (Max 2) for filling (O)).
• Close the pressure cooker.
• Position the symbol
opposite the positioning mark (H) - Fig. 8.
• Place the pressure cooker on a heat source, then set to maximum power.
It is normal for steam to be present near the pressure indicator (D) when
the product begins operating.
• When steam begins to escape from the valve, turn down the heat
56
55
EN