English - 6 -
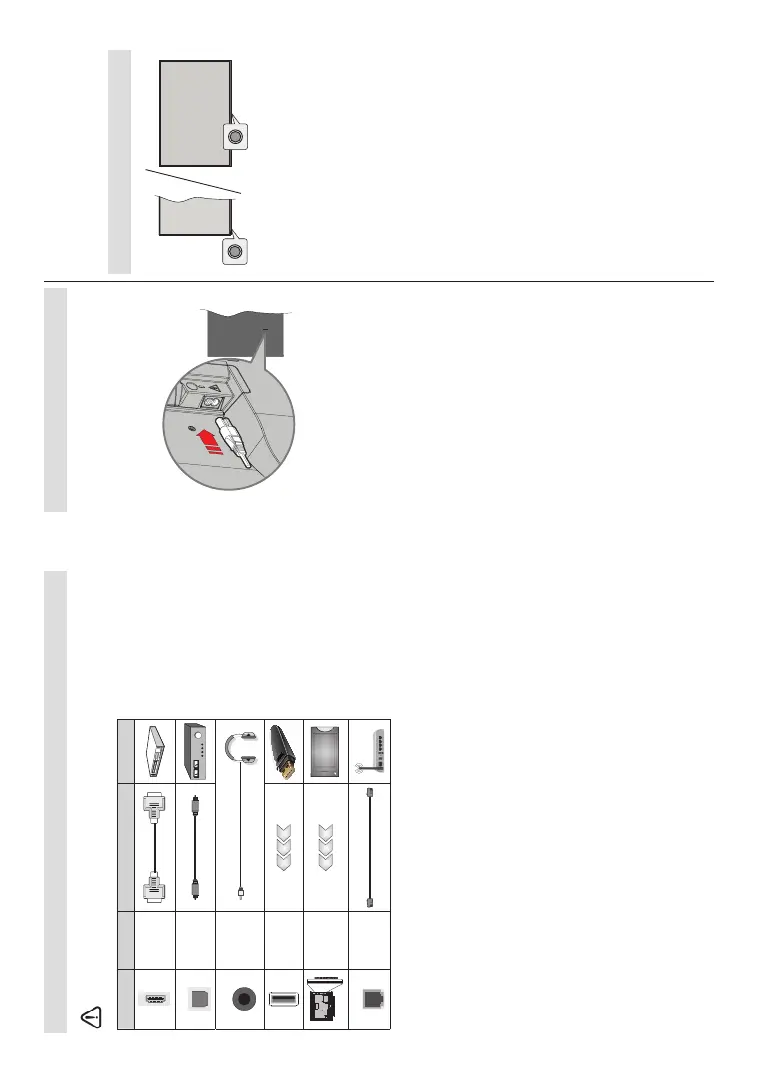
Other Connections
,I\RXZDQWWRFRQQHFWDGHYLFHWRWKH79PDNHVXUHWKDWERWKWKH79DQGWKHGHYLFHDUHWXUQHGRႇEHIRUHPDNLQJ
DQ\FRQQHFWLRQ$IWHUWKHFRQQHFWLRQLVGRQH\RXFDQWXUQRQWKHXQLWVDQGXVHWKHP
Connector Type Cables Device
HDMI
Connection
SPDIF
SPDIF
(Optical Out)
Connection
HEADPHONE
Headphone
Connection
USB
Connection
CI
Connection
CAM
module
LAN
Ethernet
Connection
LAN / Ethernet Cable
When using the wall mounting kit
(contact your dealer to purchase one,
if not supplied), we recommend
that you plug in all cables before
mounting the TV on the wall. Insert
or remove the CI module only when
the TV is SWITCHED OFF. You
should refer to the module instruction
manual for details of the settings.
The USB inputs on the TV support
devices up to 500mA. Connecting
devices that have current value
above 500mA may damage your TV.
When connecting equipment using a
HDMI cable to your TV, to guarantee
VXFLHQWLPPXQLW\DJDLQVWSDUDVLWLF
frequency radiation and trouble-free
WUDQVPLVVLRQ RI KLJK GH¿QLWLRQ VLJ-
nals, such as 4K content, you have
to use a high speed shielded (high
grade) HDMI cable with ferrites.
English - 7 -
Turning On/Off the TV
Connect power
IMPORTANT: The TV set is designed to operate on
220-240V AC, 50 Hz socket.
$IWHUXQSDFNLQJDOORZWKH79VHWWRUHDFKWKHDPELHQW
URRPWHPSHUDWXUHEHIRUH\RXFRQQHFWWKHVHWWRWKH
mains.
3OXJRQH HQG WKH WZRKROHSOXJRI WKH VXSSOLHG
GHWDFKDEOHSRZHUFRUGLQWR WKH SRZHU FRUGLQOHWRQ
WKHUHDUVLGHRIWKH79DVVKRZQDERYH7KHQSOXJ
WKHRWKHUHQGRIWKHSRZHUFRUGLQWRWKHPDLQVVRFNHW
RXWOHW7KH79ZLOOVZLWFKRQDXWRPDWLFDOO\
Note:7KHSRVLWLRQRIWKHSRZHUFRUGLQOHWPD\GL௺HUGHSHQGLQJ
on the model.
To switch on the TV from standby
,IWKH79LVLQ standby mode the standby LED lights
XS7RVZLWFKRQWKH79IURPVWDQGE\PRGHHLWKHU
Press the Standby button on the remote control.
3UHVVWKHFRQWUROEXWWRQRQWKH79
7KH79ZLOOWKHQVZLWFKRQ
To switch the TV into standby
7KH79FDQQRW EH VZLWFKHG LQWR VWDQGE\PRGH YLD
control button. Press and hold the Standby button on
the remote control. 3RZHURႇGLDORJXHZLOODSSHDURQ
the screen. Highlight OKDQGSUHVVWKHOK button. The
79ZLOOVZLWFKLQWRVWDQGE\PRGH
7RVZLWFKRႇWKH79
7RSRZHUGRZQWKH79FRPSOHWHO\XQSOXJWKHSRZHU
cord from the mains socket.
Quick Standby Mode
,QRUGHU WR VZLWFK WKH 79 LQWRTXLFN VWDQGE\ PRGH
either;
Press the Standby button on the remote.
3UHVVDJDLQWRJREDFNWRRSHUDWLQJPRGH
3UHVVWKHFRQWUROEXWWRQRQWKH79
3UHVVWKHFRQWUROEXWWRQDJDLQWRJREDFNWRRSHUDWLQJ
mode.
<RXU79 FRQWLQXHV WR RSHUDWHLQWKH TXLFN VWDQGE\
PRGHVWDWHDVLWUHJXODUO\FKHFNVIRUXSGDWHV7KLVLV
QRWDPDOIXQFWLRQLWPHHWVWKHUHTXLUHPHQWVIRUHQHUJ\
FRQVXPSWLRQ,QRUGHUWRPLQLPLVHHQHUJ\FRQVXPSWLRQ
VZLWFK\RXU79LQWRVWDQGE\PRGHDVH[SODLQHGDERYH
TV Control & Operation
The control button allows you to control the Quick
6WDQGE\2QIXQFWLRQRIWKH79
Note: 7KHSRVLWLRQRIWKHFRQWUROEXWWRQPD\GL௺HUGHSHQGLQJ
on the model.
7RWXUQWKH79Rႇ4XLFN6WDQGE\ Press the control
EXWWRQWRWXUQWKH79LQWRTXLFNVWDQGE\PRGH
7R WXUQWKH 79 Rႇ 6WDQGE\ 7KH 79 FDQQRWEH
switched into standby mode via control button.
To turn on the TV:3UHVVWKHFRQWUROEXWWRQWKH79
will turn on.
Note: Live TV settings menu OSD in Live TV mode cannot be
displayed via the control button.
Operation with the Remote Control
Press the Menu button on your remote control to
GLVSOD\/LYH79VHWWLQJVPHQXZKHQLQ/LYH79PRGH
Press HomeEXWWRQWRGLVSOD\RUUHWXUQWRWKH+RPH
6FUHHQRIWKH$QGURLG798VHWKHGLUHFWLRQDOEXWWRQV
WRPRYHWKHIRFXVSURFHHGDGMXVWVRPHVHWWLQJVDQG
SUHVVOKWRPDNHVHOHFWLRQVLQRUGHUWRPDNHFKDQJHV
VHW\RXU SUHIHUHQFHV HQWHU D VXEPHQX ODXQFKDQ
DSSOLFDWLRQHWF3UHVVBack/Return to return to the
SUHYLRXVPHQXVFUHHQ
Input Selection
Once you have connected external systems to your
79\RXFDQVZLWFKWRGLႇHUHQWLQSXWVRXUFHV3UHVVWKH
Source button on your remote control consecutively
RUXVHWKHGLUHFWLRQDOEXWWRQVDQGWKHQSUHVVWKHOK
EXWWRQWRVZLWFKWRGLႇHUHQWVRXUFHVZKHQLQ/LYH79
mode. Or enter the InputsPHQXRQWKH+RPH6FUHHQ
VHOHFWWKHGHVLUHGVRXUFHIURPWKHOLVWDQGSUHVVOK.
Changing Channels and Volume
<RX FDQ DGMXVW WKHYROXPH E\ XVLQJ WKH Volume
+/-EXWWRQVDQGFKDQJHWKHFKDQQHOLQ/LYH79PRGH
by using the Programme +/- buttons on the remote.
 Loading...