10
Eng/ish
Vertical batch
freezer
Follow these precautions:
— Do not reverse tubes and avoid tight bends and bottlenecks.
— The machine has been built to use WELL or AQUEDUCT water, at a MAXIMUM temperature of + 25...+28°C.
Don't put hotter water (i.e. TOWER TANK water) in your machine if it hasn't got the SPECIAL system to use
it (supplied only if asked): in this case, in the Technical Handbook, Par. Technical Data, it is indicated the right
water temperature to use your machine.
— Unsuitable pipes and joints may cause leaks and cause damage to your workroom and, in case of major leaks
and splashes, to your machine. You can easily find household appliances' pipes (i.e. washing machines') on
the market, which have all the requirements, including rubber holders, as well as being economical.
— If the local water is hard and contains impurities, have a suitable water softener system or a filter fitted at the
top of the inlet pipe.
— Unless otherwise specified in the Technical Handbook, Inlet water pressure must be 1.5 to 6 Bar (optimal
pressure: 3 Bar). If water pressure and quantity are inadequate, the machine will have CONDENSING PROB-
LEMS and will stop. If water pressure is higher, it is necessary to fit a pressure limiting device, appropriately
adjusted, above the delivery pipe, otherwise machine will be DAMAGED or anyway it will stop working.
IMPORTANT: When room temperature is below CC, remove any water from machine in order to
avoid freezing inside the condenser or pipes and causing SERIOUS DAMAGES. Please call the
authorized Assistance Service.
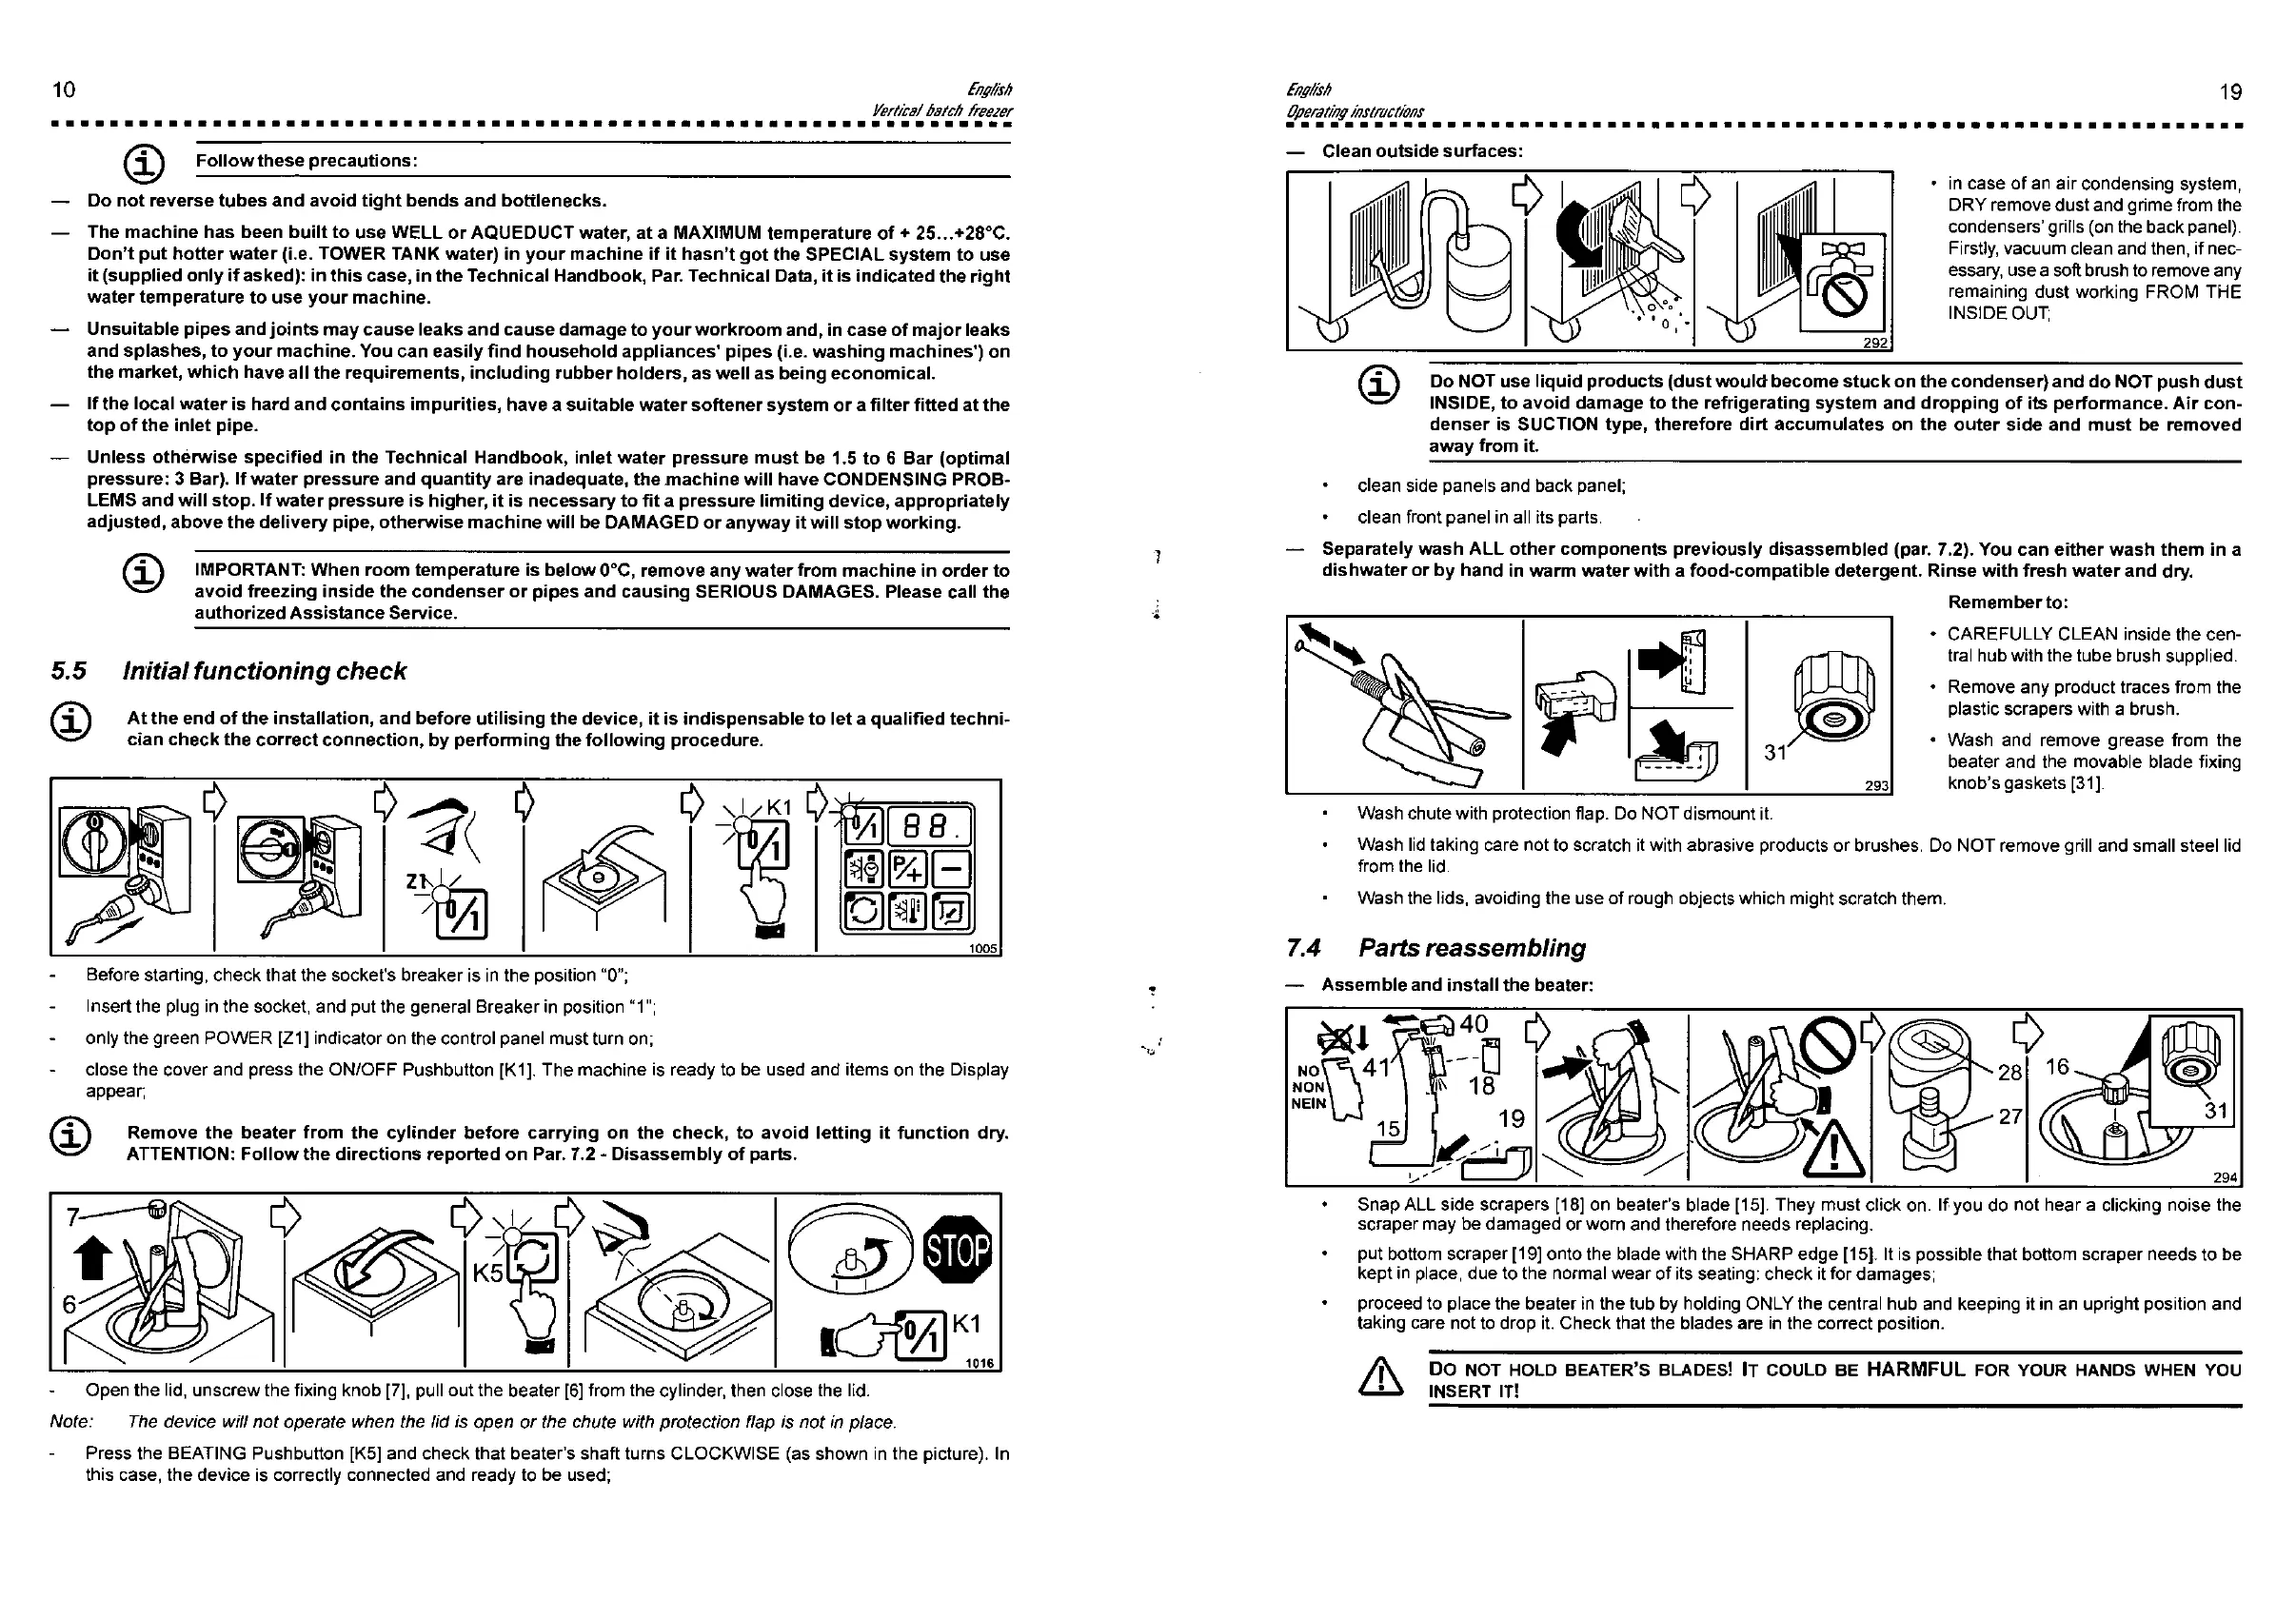
5.5 Initial functioning check
®
At the end of the installation, and before utilising the device, it is indispensable to let a qualified techni-
cian check the correct connection, by performing the following procedure.
Before starting, check that the socket's breaker is in the position "0";
Insert the plug in the socket, and put the general Breaker in position "1";
only the green POWER [Z1] indicator on the control panel must turn on;
close the cover and press the ON/OFF Pushbutton [K1]. The machine is ready to be used and items on the Display
appear;
Remove the beater from the cylinder before carrying on the check, to avoid letting it function dry.
ATTENTION: Follow the directions reported on Par. 7.2 - Disassembly of parts.
Open the lid, unscrew the fixing knob [7], pull out the beater [6] from the cylinder, then close the lid.
Note: The device will not operate when the lid is open or the chute with protection flap is not in place.
Press the BEATING Pushbutton [K5] and check that beater's shaft turns CLOCKWISE (as shown in the picture). In
this case, the device is correctly connected and ready to be used;
Eng/ish
Operating instructions
19
— Clean outside surfaces:
in case of an air condensing system,
DRY remove dust and grime from the
condensers' grills (on the back panel).
Firstly, vacuum clean and then, if nec-
essary, use a soft brush to remove any
remaining dust working FROM THE
INSIDE OUT;
®
Do NOT use liquid products (dust would become stuck on the condenser) and do NOT push dust
INSIDE, to avoid damage to the refrigerating system and dropping of its performance. Air con-
denser is SUCTION type, therefore dirt accumulates on the outer side and must be removed
away from it.
clean side panels and back panel;
clean front panel in all its parts.
Separately wash ALL other components previously disassembled (par. 7.2). You can either wash them in a
dishwater or by hand in warm water with a food-compatible detergent. Rinse with fresh water and dry.
Remember to:
• CAREFULLY CLEAN inside the cen-
tral hub with the tube brush supplied.
• Remove any product traces from the
plastic scrapers with a brush.
• Wash and remove grease from the
beater and the movable blade fixing
knob's gaskets [31].
Wash chute with protection flap. Do NOT dismount it.
Wash lid taking care not to scratch it with abrasive products or brushes. Do NOT remove grill and small steel lid
from the lid.
Wash the lids, avoiding the use of rough objects which might scratch them.
7.4 Parts reassembling
— Assemble and install the beater:
Snap ALL side scrapers [18] on beater's blade [15]. They must click on. If you do not hear a clicking noise the
scraper may be damaged or worn and therefore needs replacing.
put bottom scraper [19] onto the blade with the SHARP edge [15]. It is possible that bottom scraper needs to be
kept in place, due to the normal wear of its seating: check it for damages;
proceed to place the beater in the tub by holding ONLY the central hub and keeping it in an upright position and
taking care not to drop it. Check that the blades are in the correct position.
A
j\ Do NOT HOLD BEATER'S BLADES! IT COULD BE HARMFUL FOR YOUR HANDS WHEN YOU
INSERT IT!
 Loading...