Do you have a question about the TEMPTU AIRbrush Makeup System and is the answer not in the manual?
Stand the AIRcompressor upright and set the Dial to 3 o'clock for initial setup.
Connect one end of the Flex AIRhose to the AIRcompressor Nozzle and the other end to the AIRbrush.
Plug the A/C Adapter into the back of the AIRcompressor and connect it to a power outlet.
Shake the AIRpod well before each use to ensure smooth color application.
Remove the Chrome Cap and Tamper Seal from the AIRpod before use.
On first use, or as needed, pull the Clear Loop while holding the AIRpod Tip up.
Open the Plug for spraying and close it when not in use to prevent drying.
Press the Release Button and push the AIRpod horizontally into the AIRbrush until it clicks into place.
Press the Release Button and pull the AIRpod away from the AIRbrush to detach it.
Press the Power Button on the AIRcompressor to feel air flow from the AIRpod tip.
Set the Dial to 3 o'clock, the optimal setting for flawless foundation application.
Hold AIRbrush like a pencil, 4-6 inches away, pull Trigger gently, and move in small circles.
Stop to check coverage and repeat application steps until desired level is achieved.
The Trigger controls the amount of makeup released; pull back more for more makeup.
Adjust Dial for airflow speed: 12 o'clock for details, 3 o'clock for face, 9 o'clock for body.
Avoid coming too close to the skin to prevent blotchy, wet, and uneven application.
Avoid quick 'stop-and-go' or 'back-and-forth' motions to prevent spotting or streaking.
Avoid pulling the Trigger fully back to prevent heavy, wet makeup overspray.
Maintain a 4-6 inch distance for a soft, feather-light finish.
Keep the AIRbrush moving in small, circular motions for seamless blended application.
Pull the Trigger gently and build coverage in sheer layers for desired finish.
Target imperfections, blend outwards, and build sheer layers for desired coverage.
Start at cheek apples, sweep towards temple, build sheer layers for a flush.
Use blush as a lip stain: pout lips, come in close, pull Trigger lightly, blot lips.
Sweep in 'C' motion from brow bone to cheek bone for red carpet radiance.
Apply to eyelids, inner corners of eyes, décolleté, and shoulders for glowing finish.
Read all instructions before use. Follow basic safety precautions, especially around children.
Do not use while bathing, store away from water, or plug into incorrect outlets. Keep cord from heat.
Close supervision needed for children. Use only as intended. Do not use damaged units. Contact TEMPTU if issues arise.
AIRpod is for external use only. Avoid spraying in eyes. Do not touch pointed pin inside AIRpod tip area.
Do not use abrasive cleaners or put parts in dishwasher. Wipe with a soft, damp cloth or glass cleaner.
TEMPTU warrants the system free from defects for two years from purchase date. Repair or replacement offered.
Implied warranties are limited. Remedies are repair, replacement, or refund. Liability exclusions apply.
Register online or by mail. Include receipt copy and contact info. Ship system at your expense.
The TEMPTU AIRbrush Makeup System is a comprehensive beauty tool designed for applying makeup with a smooth, flawless finish. This system utilizes airbrush technology to deliver a lightweight and even application of various makeup products, including foundation, blush, and highlighter. The core components of the system include an AIRcompressor, an AIRbrush, a Flex AIRhose, and interchangeable AIRpods containing the makeup.
The primary function of the TEMPTU AIRbrush Makeup System is to provide a professional-quality makeup application through airbrushing. Unlike traditional makeup application methods that involve brushes or sponges, this system atomizes liquid makeup into a fine mist, which is then gently sprayed onto the skin. This method allows for buildable coverage, from sheer to full, without creating a heavy or cakey appearance. The system is designed to achieve a natural, radiant look with ease and precision.
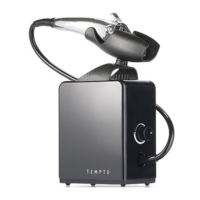
The AIRcompressor serves as the power source, generating a consistent airflow that propels the makeup from the AIRpod through the AIRbrush. It features a Power Button to turn the system on and off, and a Dial to adjust the airflow speed, offering versatility for different application needs. The AIRbrush is the handheld applicator, ergonomically designed to be held like a pencil, allowing for comfortable and controlled use. It incorporates a Trigger mechanism that controls the amount of makeup released, enabling users to fine-tune their application. The Flex AIRhose connects the AIRcompressor to the AIRbrush, ensuring a flexible and unhindered range of motion during use.
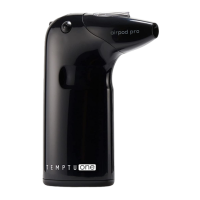
The AIRpods are self-contained cartridges that hold the liquid makeup. These pods are designed for easy attachment and release from the AIRbrush, allowing for quick changes between different shades or types of makeup. Each AIRpod is equipped with a Tamper Seal and a Chrome Cap to maintain product integrity, and a Clear Loop and Plug to ensure proper product flow during use. The AIRpods are engineered to deliver a consistent and even spray, contributing to the system's ability to create a flawless complexion.
The TEMPTU AIRbrush Makeup System is designed for intuitive and user-friendly operation, making professional airbrush makeup accessible to a wide range of users.
Setting up the system is straightforward. First, the AIRcompressor should be placed upright on a flat surface, and its Dial should be turned to the 3 o'clock position, which is the optimal setting for foundation application. Next, one end of the Flex AIRhose is connected to the Nozzle of the AIRcompressor, and the other end is connected to the AIRbrush. Finally, the A/C Adapter is inserted into the back of the AIRcompressor and plugged into a nearby electrical outlet.
Before each use, the AIRpod needs to be prepared. It is crucial to shake the AIRpod well to ensure smooth color application. The Chrome Cap and Tamper Seal must be removed. For first-time use or as needed, the Clear Loop should be pulled while holding the AIRpod Tip up to loosen the product. Lastly, the Plug must be opened before spraying to allow makeup to flow, and closed when not in use to prevent drying or leakage.
Attaching an AIRpod to the AIRbrush is a simple process. The user presses down on the Release Button on the AIRbrush and then pushes the AIRpod horizontally into the AIRbrush until it clicks into place. To release the AIRpod, the Release Button is pressed again, and the AIRpod is pulled away from the AIRbrush.
To begin applying foundation, the Power Button on the AIRcompressor is pressed, which will initiate airflow through the AIRbrush. The Dial should be set to 3 o'clock for optimal foundation application. The AIRbrush is held like a pencil, pointed downward, approximately 4-6 inches away from the face. The user gently pulls back on the Trigger and moves the AIRbrush in small circular motions to apply the foundation. The application is built up in sheer layers, with the user stopping and looking after each pass until the desired level of coverage is achieved. The system emphasizes a "less is more" approach, encouraging users to build coverage gradually for a natural finish.
The Trigger on the AIRbrush provides precise control over the amount of makeup released. Pulling the Trigger back further (MORE) releases more makeup, while pulling it back less (LESS) releases less makeup. This allows for fine-tuning the application and achieving various levels of coverage.
The Dial on the AIRcompressor adjusts the airflow speed, offering versatility for different makeup applications:
The system provides guidelines for achieving a flawless complexion and avoiding common airbrushing mistakes:
To achieve professional results, users are advised to:
The system guides users through creating a signature look:
Proper care and maintenance are essential for ensuring the longevity and optimal performance of the TEMPTU AIRbrush Makeup System.
To keep the AIRbrush Makeup System in optimum condition, it is important to avoid using abrasive cleaners or chemicals. Instead, only use TEMPTU AIRbrush Makeup System cleaning products. The AIRbrush Makeup System should never be put in a dishwasher. To clean the AIRcompressor, never attempt to open it or pour any liquid down the AIRhose or A/C Adapter hole areas. The AIRbrush Makeup System can be easily wiped down with a soft, damp cloth or using a paper towel and standard glass cleaner.
A crucial safety precaution for AIRpods is to avoid touching or bending the pin inside the AIRpod tip. This pin is delicate and essential for proper product flow. AIRpods should be kept away from small children.
Users are advised to read all instructions before use to ensure basic safety precautions are followed. When using electrical products, especially when children are present, additional safety measures should be taken. The AIRbrush Makeup System should not be used while bathing, and should not be placed or stored where it can fall or be pulled into water or a sink. If the AIRbrush Makeup System falls into water, it should be unplugged immediately and not used. It should not be plugged into an incorrect voltage source outlet, and should be kept away from heated surfaces.
The system is not intended for use by children or people with disabilities without supervision. The AIRbrush Makeup System should only be used as described in the User Guide. Do not use attachments not recommended by the manufacturer. If the system is damaged or has a damaged cord or plug, it should not be operated. If it has been dropped or submerged in water, contact TEMPTU customer service for examination and replacement if needed. Do not use where oxygen is being administered. If there are any questions about usage with a pacemaker, consult a physician or pacemaker manufacturer prior to use. If the adapter, cord, or hose is damaged, unplug and contact TEMPTU.
TEMPTU provides a two-year warranty for the AIRbrush Makeup System, ensuring quality and addressing manufacturing defects. The warranty covers repair, replacement, or refund as provided under its terms. To obtain warranty service, users must register their system online or by mail and include a copy of their receipt and contact information with the return package. The warranty limits liability for incidental or consequential damages and specifies that the repair, replacement, or refund is the exclusive remedy. It is important to note that the warranty does not cover damage resulting from misuse, abuse, or unauthorized service or modification.
| Cordless | Yes |
|---|---|
| Type | Airbrush Makeup System |
| Power Source | Rechargeable Battery |
| Air Pressure | Adjustable |
| Usage | Personal / Professional |
| Technology | Airbrush |
| Application | Foundation, Blush, Highlighter |
| Compatibility | Works with TEMPTU airbrush makeup |
| Portability | Yes |