www.tendacn.com
Made in China
SSID: NOVA_XXXX_XX
Password:
SSID: NOVA_XXXX_XX
Password:
Package contents
Networking succeeds. Excellent connection quality.
Method 1: Setup through Tenda WiFi App
1. Download the Tenda WiFi App onto your mobile device by searching for
Tenda WiFi in Google Play or App Store or by scanning the QR code.
Then install the Tenda WiFi App.
2. Connect the mobile phone to the WiFi network of the primary node. The
SSID and password can be found on the bottom label of the device.
3. Run the Tenda WiFi App and follow the onscreen instructions to connect
the device to the internet. After the device is connected to the internet,
its LED indicator lights solid green, and the device has become the
primary node in the network.
Connect the primary node to the internet
Method 2: Setup through web UI
1. Connect the client to the primary node.
Method 1: Connect the wireless client such as mobile phone to the
WiFi network of the the primary node. The SSID and
password can be found on the bottom label of the device.
Method 2: Use an Ethernet cable to connect the computer to the
LAN2 or LAN3/IPTV port of the primary node.
2. Start a browser on the client and enter tendawifi.com in the address
bar to access the web UI, and follow the onscreen instructions to
connect the device to the internet.
Tips
If you cannot log in to the web UI, refer to Q3 in FAQ.
Connect the primary node
Tips
If you do not use the modem for internet access, please skip step 1 and 3.
1. Power off your modem.
2. Use the included Ethernet cable to connect the WAN/LAN1 port to
your modem or the Ethernet jack.
3. Power on your modem.
4. Power on the primary node, and wait until the LED indicator blinks
green.
*Choose one device from the kit to connect to the internet as the primary node in the
network.
1. Place the other devices in the kit within 3 meters from the primary
node to power them on. Wait for about 2 minutes. When the LED
indicators of these devices light solid green, the networking is
successful and these devices become secondary nodes in the
network.
2. Please refer to the following relocation tips to locate the secondary
nodes to a proper position:
• Ensure that the distance between any two nodes is less than 10
meters.
• Keep your nodes away from electronics with strong interference,
such as microwave oven, induction cooker, and refrigerator.
• Place the nodes in a high position with few obstacles.
3. Power on the secondary nodes again till these LED indicators blink
green slowly. The MX6 (3-pack) is taken as an example here.
Extend network
Tips
If the LED indicator of secondary node keeps blinking green slowly for more than 3
minutes, relocate the secondary node and move it closer to the primary node.
Networking succeeds. Fair connection quality.
Networking succeeds. Poor connection quality.
Solid green
4. Observe the LED indicator of the secondary nodes until the LED
indicator lights one of the following colors:
Solid yellow
Solid red
5. If the secondary node's LED indicator lights solid red, relocate it
according to step 2 in III Extend network to get an optimal
connection quality.
Done.
• To access the internet with:
- Wired devices: Connect to the LAN ports of your nodes.
- Wireless devices: Connect to your WiFi network using the SSID and
password you set. (All nodes share the same SSID and password)
• If you configure the nodes using the Tenda WiFi App and you want to
manage the network remotely, tap on the App home page and use
your account to log in.
NOVA_XXXX_XX
Settings Wi-Fi
Wi-Fi
Tenda WiFi
MESH button
Reset button
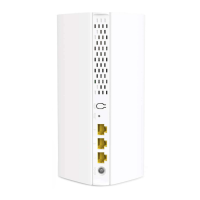
LAN port
Power jack
LAN/IPTV multiplexing port,
LAN port by default
Appearance
WAN/LAN multiplexing port,
WAN port by default
Internet
Gigabit
port
WAN/LAN1
or
Modem (such as
optical modem)
Ethernet jack
Ethernet cable
Power outlet
Ethernet cable
Power outlet
www.tendacn.com
Made in China
SSID: NOVA_XXXX_XX
Password:
SSID: NOVA_XXXX_XX
Password:
NOVA_XXXX_XX
Settings
LED indicator
LED indicator
CHOOSE A NETWORK…
MX6 (3-pack) & EX6 (3-pack)
• Mesh6X x 3
• Power adapters x 3
• Ethernet cable x 1
• Quick installation guide x 1
MX6 (2-pack) & EX6 (2-pack)
• Mesh6X x 2
• Power adapters x 2
• Ethernet cable x 1
• Quick installation guide x 1
Obsah balení
Propojení je úspěšné. Vynikající kvalita připojení
Metoda1: Nastavení pomocí aplikace Tenda WiFi
1. Do svého mobilního zařízení si stáhněte aplikaci Tenda WiFi, naleznete
ji pod názvem Tenda WiFi vobchodě App Store nebo Google Play.
Můžete také naskenovat QR kód. Poté nainstalujte aplikaci Tenda WiFi.
2. Připojte mobilní telefon k síti primárního WiFi uzlu. SSID aheslo jsou
uvedeny na štítku na spodní straně zařízení.
3. Spusťte aplikaci Tenda WiFi a pro připojení k internetu postupujte dle
pokynů na obrazovce. Po připojení zařízení k internetu se jeho LED
kontrolka rozsvítí zeleně. To značí, že se zařízení stalo primárním
uzlem v síti.
Připojení primárního uzlu k internetu
Metoda2: Nastavení prostřednictvím webového uživatelského rozhraní
1. Připojte klienta k primárnímu uzlu.
Metoda1: Připojte bezdrátového klienta, jako je mobilní telefon, k síti WiFi
primárního uzlu. SSID aheslo jsou uvedeny na štítku na spodní
straně zařízení.
Metoda2: K připojení počítače k LAN2 nebo LAN3 / IPTV portu primárního
uzlu použijte ethernetový kabel.
2. Spusťte prohlížeč na klientském zařízení a do adresního řádku zadejte
tendawifi.com. Nyní jste ve webovém uživatelském rozhraní a podle
pokynů na obrazovce připojte zařízení k internetu.
Tipy
Pokud se nemůžete přihlásit kwebovému uživatelskému rozhraní, přečtěte si
otázku1 vOdpovědích na časté dotazy.
Připojení primárního uzlu
Tipy
Pokud nepoužíváte modem pro přístup k internetu, přeskočte krok 1 a 3.
1. Vypněte modem.
2. Pomocí přiloženého ethernetového kabelu připojte WAN / LAN1 port
k modemu nebo ethernetovému konektoru.
3. Modem zapněte.
4. Zapněte primární uzel a počkejte, až kontrolka LED bude blikat zeleně.
* Vyberte jedno zařízení ze sady, které se připojí k internetu jako primární uzel v síti.
1. Umístěte ostatní zařízení ze sady do 3 metrů od primárního uzlu a
zapněte je. Počkejte asi 2 minuty. Když kontrolky LED těchto
zařízení svítí zeleně, propojení je úspěšné a tato zařízení se stávají
sekundárními uzly v síti.
2. Chcete-li najít správnou polohu pro sekundární uzly, podívejte se na
následující tipy pro přemístění:
• Ujistěte se, že vzdálenost mezi dvěma uzly je menší než 10 metrů.
• Udržujte uzly vbezpečné vzdálenosti od elektroniky se silným
rušením, jako jsou mikrovlnné trouby, indukční vařiče achladničky.
• Umístěte uzly do vysoké polohy s málo překážkami.
3. Zapněte sekundární uzly znovu, dokud tyto kontrolky LED neblikají
zeleně a pomalu. Jako příklad je zde uveden model MX6 (trojbalení).
Rozšíření sítě
Tipy
Pokud LED kontrolka sekundárního uzlu stále bliká zeleně po dobu delší než 5 minut,
přemístěte sekundární uzel blíže k primárnímu uzlu.
Propojení je úspěšné. Dostačující kvalita připojení
Propojení je úspěšné. Špatná kvalita připojení.
Nepřerušovaná zelená
4. Pozorujte LED kontrolku uzlu, dokud se nerozsvítí jednou z
následujících barev:
Nepřerušovaná žlutá
Nepřerušovaná červená
5. Pokud LED kontrolka sekundárního uzlu svítí červeně, přemístěte jej
podle kroku 2 v části III. Rozšíření sítě, abyste získali optimální kvalitu
připojení.
Hotovo.
• Přístup na internet:
- Drátová zařízení: Připojte se k LAN portům vašich uzlů.
- Bezdrátová zařízení: Připojte se k síti WiFi pomocí nastaveného
SSID a hesla. (Všechny uzly sdílejí stejné SSID a heslo)
• Pokud uzly nakonfigurujete pomocí aplikace Tenda WiFi a chcete
síť spravovat vzdáleně, klepnutím na vstoupíte na domovskou
stránku aplikace, kde se přihlaste do svého účtu.
MX6 (trojbalení) a EX6 (trojbalení)
• Mesh6X x 3
• Napájecí adaptér x 3
• Ethernetový kabel x 1
• Návod k použit x 1
MX6 (dvojbalení) a EX6 (dvojbalení)
• Mesh6X x 2
• Napájecí adaptér x 2
• Ethernetový kabel x 1
• Návod k použit x 1
Contenuto della
confezione
Il collegamento in rete ha successo. Qualità della
connessione eccellente
Metodo 1: Configurazione tramite Tenda WiFi App
1. Scaricare la Tenda WiFi App sul tuo dispositivo mobile cercando
Tenda WiFi in App Store o Google Play o scansionando il codice
QR. Poi installa l'applicazione Tenda WiFi.
2. Connetti il cellulare alla rete WiFi del nodo primario. L'SSID e la password
si trovano sull'etichetta inferiore del dispositivo.
3. Eseguire l'applicazione Tenda WiFi e seguire le istruzioni sullo schermo
per collegare il dispositivo a Internet. Dopo che il dispositivo è collegato
a internet, il suo indicatore LED si illumina di verde fisso, e il dispositivo
è diventato il nodo primario della rete.
Collegare il nodo primario a Internet
Metodo 2: Configurazione attraverso l'interfaccia web
1. Collegare il client al nodo primario.
Metodo 1: Collegare il client wireless come il telefono cellulare alla rete
WiFi del nodo primario. L'SSID e la password si trovano
sull'etichetta inferiore del dispositivo.
Metodo 2: Utilizzare un cavo Ethernet per collegare il computer alla
porta LAN2 o LAN3/IPTV del nodo primario.
2. Avviare un browser sul client e inserire tendawifi.com nella barra degli
indirizzi per accedere all'interfaccia web e seguire le istruzioni sullo
schermo per collegare il dispositivo a Internet.
Suggerimenti
Se non riesci ad accedere all'interfaccia web, fai riferimento a Q3 in FAQ.
Collegare il nodo primario
Suggerimenti
Se non usate il modem per l'accesso a Internet, saltate il passo 1 e 3.
1. Spegnete il vostro modem.
2. Usa il cavo Ethernet incluso per collegare la porta WAN/LAN1 al tuo
modem o alla presa Ethernet.
3. Accendi il tuo modem.
4. Accendere il nodo primario e attendere che l'indicatore LED lampeggi
in verde.
*Scegli un dispositivo dal kit per connettersi a Internet come nodo primario della rete.
1. Posizionare gli altri dispositivi del kit entro 3 metri dal nodo primario
per accenderli. Attendere circa 2 minuti. Quando gli indicatori LED
di questi dispositivi si illuminano di verde fisso, il collegamento in
rete è riuscito e questi dispositivi diventano nodi secondari della rete.
2. Fare riferimento ai seguenti consigli di ricollocazione per localizzare
i nodi secondari in una posizione corretta:
• Assicurarsi che la distanza tra due nodi sia inferiore a 10 metri.
• Tenere i nodi lontani da apparecchi elettronici con forti interferenze,
come forni a microonde, fornelli a induzione e frigoriferi.
• Posizionare i nodi in una posizione elevata con pochi ostacoli.
3. Accendere nuovamente i nodi secondari fino a quando
questi indicatori LED lampeggiano lentamente in verde. L'MX6
(confezione da 3) è preso come esempio qui.
Estendere la rete
Suggerimenti
Se l'indicatore LED del nodo secondario continua a lampeggiare lentamente in
verde per più di 5 minuti, riposizionare il nodo secondario e spostarlo più vicino al
nodo primario.
Il collegamento in rete ha successo. Qualità di
connessione discreta
Il collegamento in rete ha successo. Qualità di
connessione scarsa.
Verde fisso
4. Osservare l'indicatore LED dei nodi secondari fino a quando
l'indicatore LED si accende di uno dei seguenti colori:
Giallo fisso
Rosso fisso
5. Se l'indicatore LED del nodo secondario è rosso fisso, riposizionalo
secondo il passo 2 in III Estendere la rete per ottenere una qualità di
connessione ottimale.
Fatto.
• Per accedere a Internet con:
- Dispositivi cablati: Collegati alle porte LAN dei tuoi nodi.
- Dispositivi senza fili: Connettiti alla tua rete WiFi usando l'SSID e la
password che hai impostato. (Tutti i nodi condividono lo stesso SSID
e la stessa password)
• Se configuri i nodi usando la Tenda WiFi App e vuoi gestire la rete da
remoto, tocca la home page della App e usa il tuo account per
accedere.
MX6 (confezione da 3) & EX6 (confezione da 3)
• Mesh6X x 3
• Adattatori di alimentazione x 3
• Cavo Ethernet x 1
• Guida rapida all'installazione x 1
MX6 (confezione da 2) & EX6 (confezione da 2)
• Mesh6X x 2
• Adattatori di alimentazione x 2
• Cavo Ethernet x 1
• Guida rapida all'installazione x 1
Contenu du pack
Mise en réseau réussie. Qualité de connexion excellente
Méthode 1: Via l’application Tenda WiFi
1. Téléchargez l’application Tenda WiFi sur votre appareil mobile en
recherchant Tenda WiFi sur App Store ou Google Play, ou en scannant
le code QR ci-joint. Installez ensuite l’application Tenda WiFi.
2. Connectez votre téléphone portable au réseau Wi-Fi du nœud primaire.
Le SSID et le mot de passe se trouvent sur l’étiquette au dos de l’appareil.
3. Lancez l’application Tenda WiFi et suivez les instructions à l’écran pour
connecter l’appareil à Internet. Une fois l’appareil connecté à Internet, le
voyant LED s’allumera fixement en vert, et l’appareil deviendra le nœud
primaire du réseau.
Connecter le nœud primaire à Internet
Méthode 2: Via l’interface utilisateur Web
1. Connectez le client au nœud primaire.
Méthode 1: Connectez un client sans fil tel qu’un smartphone au réseau
Wi-Fi du nœud primaire. Le SSID et le mot de passe se
trouvent sur l’étiquette au dos de l’appareil.
Méthode 2: Utilisez un câble Ethernet pour connecter un ordinateur au
port LAN2 ou LAN3/IPTV du nœud primaire.
2. Ouvrez un navigateur sur le client et saisissez tendawifi.com dans la
barre d’adresse pour accéder à l’interface utilisateur Web, puis suivez
les instructions à l’écran pour connecter l’appareil à Internet.
Astuces
Si vous ne parvenez pas à vous connecter à l’interface utilisateur Web, référez-vous à la
Q3 de la FAQ.
Connecter le nœud primaire
Astuces
Si vous n’utilisez pas de modem comme source d’accès à Internet, ignorez les étapes
1 et 3.
1. Éteignez votre modem.
2. Utilisez le câble Ethernet fourni pour connecter le port WAN/LAN1 à
votre modem ou à une prise Ethernet.
3. Allumer votre modem.
4. Allumez le nœud primaire et attendez que le voyant LED clignote en vert.
*Choisissez un appareil du kit qui sera connecté à Internet en tant que nœud primaire.
1. Placez les autres appareils du kit à moins de 3 mètres du nœud
primaire pour les allumer. Attendez environ 2 minutes. Une fois les
voyants LED de ces appareils allumés fixement en vert, la mise en
réseau aura réussi et ces appareils deviendront des nœuds
secondaires du réseau.
2. Veuillez vous référer aux conseils suivants pour positionner les
nœuds secondaires dans un endroit adéquat:
• Assurez-vous que la distance entre deux nœuds soit de moins
de 10 mètres.
• Gardez les nœuds à l’écart d’appareils électroniques produisant
de fortes interférences, tels que les four à micro-ondes, les
cuisinières à induction et les réfrigérateurs.
• Placez les nœuds en hauteur dans un endroit dégagé.
3. Rallumez les nœuds secondaires et attendez que les voyants LED
clignotent lentement en vert. Le MX6 (3-pack) est pris ici à titre
d’exemple.
Étendre le réseau
Astuces
Si le voyant LED d’un nœud secondaire continue à clignoter lentement en vert après
plus de 5 minutes, rapprochez-le du nœud primaire.
Mise en réseau réussie. Qualité de connexion moyenne
Mise en réseau réussie. Qualité de connexion médiocre.
Vert fixe
4. Observez les voyants LED des nœuds secondaires jusqu’à ce qu’ils
s’allument en l’une des couleurs suivantes:
Jaune fixe
Rouge fixe
5. Si le voyant LED d’un nœud secondaire s’allume fixement en rouge,
repositionnez-le en vous référant à l’étape 2 dans III Étendre le réseau
afin d’obtenir une qualité de connexion optimale.
Terminé.
• Pour accéder à Internet avec:
- Un appareil câblé: Connectez l’appareil au port LAN d’un nœud.
- Un appareil sans fil: Connectez l’appareil au réseau Wi-Fi en
utilisant le SSID et le mot de passe que vous avez configurés.
(Tous les nœuds partagent le même SSID et mot de passe)
• Si vous configurez les nœuds à l’aide de l’application Tenda WiFi et
souhaitez configurer le réseau à distance, cliquez sur sur la page
d’accueil de l’application et connectez-vous à votre compte.
MX6 (3-pack) & EX6 (3-pack)
• Mesh6X x 3
• Adaptateurs secteur x 3
• Câble Ethernet x 1
• Guide d’installation rapide x 1
MX6 (2-pack) & EX6 (2-pack)
• Mesh6X x 2
• Adaptateurs secteur x 2
• Câble Ethernet x 1
• Guide d’installation rapide x 1
Contenido del paquete
Conexión exitosa. Conexión excelente
Método 1: Instalación vía la App Tenda WiFi
1. Descargue la App Tenda WiFi en su dispositivo móvil. Para ello, localice
Tenda WiFi en App Store o Google Play o escanee el código QR. I. Luego
instale la App Tenda WiFi.
2. Conecte el teléfono móvil a la red WiFi del nodo primario. Encontrará el
SSID y la contraseña predeterminados en la etiqueta de la parte inferior
del dispositivo.
3. Ejecute la App Tenda WiFi y siga las instrucciones en la pantalla para
conectar el dispositivo al internet. Después de que el dispositivo se
conecte al internet, el indicador LED se iluminará de verde fijo, y el
dispositivo será el nodo primario en la red.
Conecte el nodo primario al internet
Método 2: Instalación vía web UI
1. Conecte el cliente al nodo primario.
Método 1: Conecte el cliente inalámbrico tal como teléfono móvil a la
red WiFi del nodo primario. Encontrará el SSID y la contraseña
predeterminados en la etiqueta de la parte inferior del dispositivo.
Método 2: Utilice un cable Ethernet para conectar el ordenador al puerto
LAN2 o LAN3/IPTV del nodo primario.
2. Inicie un navegador en el cliente e introduzca tendawifi.com en la barra de
dirección para acceder a la web UI, y siga las instrucciones en la pantalla
para conectar el dispositivo al internet.
Consejos
Si no puede iniciar sesión en la web UI del enrutador, consulte la pregunta Q3 en Preguntas
frecuentes.
Conecte el nodo primario
Consejos
Si no usa el módem para acceso a internet, salte el paso 1 y 3, por favor.
1. Apague el módem.
2. Use el cable Ethernet incluido para conectar el puerto WAN/LAN1 a
su módem o el conector Ethernet.
3. Encienda el módem.
4. Encienda el nodo primario, y espere hasta que el indicador LED
parpadee verde.
*Seleccione un dispositivo del kit para conectarlo al internet como el nodo primario en
la red.
1. Coloque otros dispositivos en el kit dentro de 3 metros del nodo
primario y enciéndalos. Espere aproximadamente 2 segundos.
Cuando los indicadores LED de estos dispositivos se iluminan de
verde fijo, la conexión ha sido exitosa y estos dispositivos serán
nodos secundarios en la red.
2. Por favor, consulte los siguientes consejos de relocalización para
colocar los nodos secundarios en una posición adecuada:
• Asegúrese de que la distancia entre dos nodos cualquiera sean
menos de 10 metros.
• Mantenga sus nodos alejados de los aparatos electrónicos con
una fuerte interferencia, tales como un microondas, cocina de
inducción y refrigerador.
• Coloque los nodos en una posición alta con pocos obstáculos.
3. Encienda los nodos secundarios de nuevo hasta que los indicadores
LED parpadeen verde lentamente. Aquí el MX6 (3-caja) se toma
como ejemplo para ilustrar.
Extender la red
Consejos
Si el indicador LED del nodo secundario sigue parpadeando lentamente durante
más de 5 minutos, recoloque el nodo secundario y acérquelo al nodo primario.
Conexión exitosa. Conexión de calidad regular
Conexión exitosa. Mala conexión.
Verde fijo
4. Observe el indicador LED de los nodos secundarios hasta que se
ilumine en uno de los siguientes colores:
Amarillo fijo
Rojo fijo
5. Si el indicador LED del nodo secundario se ilumina de rojo fijo,
recolóquelo siguiendo el paso 2 en III Extender la red para obtener
una conexión óptima.
Finalizado.
• Para acceder al internet con:
- Dispositivos alámbricos: Conecte los dispositivos alámbricos a los
puertos LAN de sus nodos.
- Dispositivos inalámbricos: Conecte los dispositivos inalámbricos a
su red WiFi usando el SSID y la contraseña que usted configuró.
(Todos los nodos comparten los mismos SSID y contraseña)
• Si configura los nodos usando la App Tenda WiFi y quiere gestionar
su red de manera remota, toque la en página de inicio de la App e
inicie la sesión con su cuenta.
MX6 (3-caja) & EX6 (3-caja)
• Mesh6X x 3
• Adaptador de corriente x 3
• Cable Ethernet x 1
• Guía de instalación rápida x 1
MX6 (2-caja) & EX6 (2-caja)
• Mesh6X x 2
• Adaptador de corriente x 2
• Cable Ethernet x 1
• Guía de instalación rápida x 1
Lieferumfang
Die Verbindung war erfolgreich. Die Verbindungsqualität
ist ausgezeichnet
Methode 1: Einrichtung über die Tenda WiFi App
1. Laden Sie die Tenda WiFi App auf Ihr Mobilgerät herunter, indem Sie im
App Store oder Google Play nach Tenda WiFi suchen oder den QR Code
scannen. Installieren Sie dann die Tenda WiFi App.
2. Verbinden Sie Ihr Smartphone mit dem WLAN-Netzwerk der primären
Mesh-Station. Die SSID (WLAN-Name) und das Passwort finden Sie auf
der Unterseite des Geräts auf einem Sticker.
3. Starten Sie die Tenda WiFi App und folgen Sie den Anweisungen auf dem
Bildschirm, um das Gerät mit dem Internet zu verbinden. Nachdem das
Gerät mit dem Internet verbunden ist, leuchtet die LED-Anzeige
dauerhaft grün und das Gerät ist zur primären Mesh-Station im Netzwerk
geworden.
Verbinden Sie die primäre Station mit dem Internet
Methode 2: Einrichtung über das Webinterface
1. Verbinden Sie einen Client mit der primären Mesh-Station.
Methode 1: Verbinden Sie ein kabelloses Gerät wie z. B. ein Smartphone,
mit dem WLAN-Netzwerk der primären Mesh-Station. Die
SSID und das Passwort finden Sie auf der Unterseite des
Geräts auf einem Sticker.
Methode 2: Verwenden Sie ein Ethernet-LAN-Kabel, um einen Computer
mit dem LAN2 oder LAN3/IPTV Anschluss der primären
Mesh-Station zu verbinden..
2. Starten Sie einen Browser auf dem Client (z.B. Smartphone) und geben
Sie tendawifi.com in die Adressleiste ein, um auf die
Web-Benutzeroberfläche zuzugreifen. Folgen Sie den Anweisungen auf
dem Bildschirm, um das Gerät mit dem Internet zu verbinden.
Tipps
Wenn Sie sich nicht im Webinterface anmelden können, lesen Sie Q3 in FAQ.
Verbinden Sie den primären Knoten
Tipps
Wenn Sie das Modem nicht für den Internetzugang verwenden, überspringen Sie bitte
Schritt 1 und 3.
1. Schalten Sie Ihr Modem aus.
2. Verwenden Sie das mitgelieferte Ethernet-Kabel, um den WAN/LAN1
Anschluss mit Ihrem Modem oder dem Ethernet-Port zu verbinden.
3. Starten Sie Ihr Modem.
4. Schalten Sie die primäre Mesh-Station ein und warten Sie, bis die
LED-Anzeige grün blinkt.
*Wählen Sie aus dem Set ein Gerät aus, um es als primäre Mesh-Station im Netzwerk
mit dem Internet zu verbinden.
1. Platzieren Sie die anderen Stationen aus dem Set innerhalb
von 3 Metern zur primären Mesh-Station und warten Sie ca. 2
Minuten. Wenn die LED-Anzeigen der Stationen anfängt
dauerhaft grün zu leuchten, ist die Vernetzung erfolgreich und
die Geräte werden zu sekundären Mesh-Stationen im Netzwerk.
2. Bitte beachten Sie folgenden Tipps zum Standortwechsel, um
die sekundären Mesh-Stationen an einer geeigneten Position zu
platzieren:
• Stellen Sie sicher, dass der Abstand zwischen zwei beliebigen
Mesh-Stationen weniger als 10 Meter beträgt.
• Halten Sie die Mesh-Stationen von elektronischen Geräten mit
starken Störungen fern, wie z.B. Mikrowellen, Induktionsherd
oder Kühlschrank.
• Platzieren Sie die Mesh-Stationen an einer erhöhten Position mit
wenigen Hindernissen.
3. Schalten Sie die sekundären Mesh-Stationen wieder ein, bis die
LED-Anzeigen langsam grün blinken. Als Beispiel wird ein MX6
(3er-Pack) verwendet.
Netzwerk erweitern
Tipps
Wenn die LED-Anzeige der sekundären Mesh-Station länger als 5 Minuten langsam
grün blinkt, verschieben Sie die Station und positionieren Sie diese näher an der
Hauptstation.
Die Verbindung war erfolgreich. Die Verbindungsqualität
ist aber nur mittelmäßig
Die Verbindung war erfolgreich. Die Verbindungsqualität
ist schlecht
Grün leuchtend
4. Beobachten Sie die LED-Anzeige der sekundären Mesh-Stationen,
bis eine der folgenden Farben aufleuchtet:
Gelb leuchtend
Rot leuchtend
5. Wenn die LED-Anzeige der sekundären Mesh-Station dauerhaft rot
leuchtet, positionieren Sie die Station gemäß Schritt 2 "III Netzwerk
erweitern" neu, um eine optimale Verbindungsqualität zu erreichen.
Erledigt.
• Für den Internetzugriff mit:
- Kabelgebundene Geräte: Verbinden Sie sich mit den LAN-Anschluss
einer Mesh-Station
- Kabellose Geräte: Verbinden Sie sich mit Ihrem WLAN- Netzwerk
anhand der von Ihnen festgelegten SSID (WLAN-Name) und dem
Passwort. (Alle Mesh-Stationen haben die gleiche SSID und das
gleiche Passwort)
• Wenn Sie die Mesh-Stationen mit der Tenda WiFi App konfigurieren
und das Netzwerk aus der Ferne verwalten möchten, tippen Sie auf
die Startseite der App und melden Sie sich mit Ihrem Konto an.
MX6 (3er-Pack) & EX6 (3er-Pack)
• 3 x Mesh6X
• 3 x Netzteil
• 1 x Ethernet-Kabel
• 1 x Schnellstartanleitung
MX6 (2er-Pack) & EX6 (2er-Pack)
• 2 x Mesh6X
• 2 x Netzteil
• 1 x Ethernet-Kabel
• 1 x Schnellstartanleitung
Italiano
Français
Čeština
Español
Deutsch
English
Csomag tartalma
A hálózati csatlakozás sikeres. Kiváló minőségű kapcsolat
1. módszer: Beállítás a Tenda WiFi App segítségével
1. Töltse le a Tenda WiFi Appot a mobil eszközére a Tenda WiFi való
kereséssel az App Store vagy a Google Play vagy a QR kód leolvasásával.
Ezután installálja a Tenda WiFi Appot.
2. Csatlakoztassa mobiltelefonját az elsődleges csomópont WiFi
hálózatához. Az SSID és a jelszó megtalálható az eszközön lévő alsó
címkén.
3. Indítsa el a Tenda WiFi Appot és kövesse a képernyőn megjelenő
utasításokat a készülék internetre való csatlakoztatásához. Miután a
készülék csatlakozott az internethez, a LED kijelző folyamatosan zölden
világít, és az eszköz a hálózaton elsődleges csomóponttá vált.
Az elsődleges csomópont csatlakoztatása az internethez
2. módszer: Beállítás webes felhasználó felületen
1. Csatlakoztassa a klienst az elsődleges csomóponthoz.
1. módszer: Csatlakoztassa a vezeték nélküli klienst, például
mobiltelefont az elsődleges csomópont WiFi hálózatához.
Az SSID és a jelszó megtalálható az eszközön lévő alsó címkén.
2. módszer: Használjon egy Ethernet kábelt, hogy a számítógépet az
elsődleges csomópont LAN2 vagy LAN3/IPTV portjához
csatlakoztassa.
2. Indítson el egy böngészőt a kliensen és írja be a tendawifi.com címet a
címsorba, hogy elérje a webes felhasználói felületet, majd kövesse a
képernyőn megjelenő utasításokat az eszköz internethez történő
csatlakoztatásához.
Tippek
Ha nem tud bejelentkezni a webes felhasználói felületre, akkor olvassa el a Q3
részt a GYIK.
Elsődleges csomópont csatlakoztatás
Tippek
Ha nem modemet használ az internet eléréshez, hagyja ki az 1 és 3 lépést
1. Kapcsolja ki a modemjét.
2. A mellékelt Ethernet kábellel csatlakoztassa a WAN/LAN1 portot a
modeméhez vagy az Ethernet jack-csatlakozóhoz.
3. Kapcsolja be a modemét.
4. Kapcsolja be az elsődleges csomópontot és várjon, amíg a LED kijelző
nem kezd el zölden villogni.
*Válasszon egy eszközt a készletből, hogy elsődleges hálózati csomópontként
csatlakozzon az internethez.
1. Helyezze a többi eszközt a készletből az elsődleges csomópont
körüli 3 méteres körbe, hogy bekapcsolja őket. Várjon nagyjából két
percet. Amikor ezen eszközök LED-kijelzői folyamatosan zölden
világítanak, a hálózati kapcsolódás sikeres, és ezek az eszközök
másodlagos csomópontokká válnak a hálózatban.
2. Kérjük, tanulmányozza át a következő elhelyezési javaslatokat,
hogy a másodlagos csomópontokat megfelelő helyre helyezze:
• Győződjön meg róla, hogy a távolság bármely két csomópont
között 10 méternél kisebb.
• A csomópontokat tartsa távol erős interferenciával rendelkező
elektronikus készülékektől, például mikrohullámú sütőtől,
indukciós főzőlaptól és hűtőszekrénytől.
• Helyezze a csomópontokat magasra kevés akadály közé.
3. Kapcsolja be ismét a másodlagos csomópontokat addig, amíg a
LED-kijelzők nem kezdenek el lassan zölden villogni. Az MX6
(3 csomag) példaként szolgál most.
Hálózat kiterjesztése
Tippek
IHa a másodlagos csomópont LED-kijelzője több mint 5 percig lassan zölden villog,
akkor helyezze át a másodlagos csomópontot és helyezze közelebb az elsődleges
csomóponthoz.
A hálózati csatlakozás sikeres. Megfelelő kapcsolati minőség
A hálózati csatlakozás sikeres. Rossz kapcsolati minőség.
Folyamatos zöld
4. Figyelje a másodlagos csomópontok LED-kijelzőjét addig, amíg a
LED-kijelző a következő színek egyikében nem világít:
Folyamatos sárga
Folyamatos piros
5. Ha a másodlagos csomópont LED-kijelzője folyamatosan piros
színnel világít, akkkor helyezze át a III Hálózat bővítése szekció 2.
lépése szerint az optimális kapcsolatminőség elérése érdekében.
Kész.
• Az internet elérése:
- Vezetékes eszközök: Csatlakozzon a csomópontjai LAN portjaihoz.
- Vezeték nélküli eszközök: Csatlakozzon a WiFi hálózatához a
beállított SSID és jelszó használatával. (Minden csomópontnak
ugyanaz az SSID –je és jelszava)
• Ha a Tenda WiFi App segítségével konfigurálja be a csomópontokat
és távolról szeretné kezelni a hálózatot, érintse meg az App
főoldalát, és használja a fiókját a bejelentkezéshez.
MX6 (3 csomag) & EX6 (3 csomag)
• 3 db Mesh6X
• 3 db Hálózati adapter
• 1 db Ethernet kábel
• 1 db Gyors telepítési útmutató
MX6 (2 csomag) & EX6 (2 csomag)
• 2 db Mesh6X
• 2 db Hálózati adapter
• 1 db Ethernet kábel
• 1 db Gyors telepítési útmutató
Magyar
 Loading...