EasyManua.ls Logo

Tenmars TM-380 - User Manual

Tenmars TM-380
20 pages
Print Icon
To Next Page IconTo Next Page
Loading...
Multi IAQ Monitor
TM-380
User’s Manual
HB2TM3800000
Question and Answer IconNeed help?

Do you have a question about the Tenmars TM-380 and is the answer not in the manual?

Overview

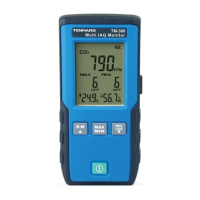
The TENMARS Multi IAQ Monitor TM-380 is an air quality meter designed to measure and display various indoor air quality parameters. It is ideal for monitoring indoor air quality in a variety of environments.

Function Description

The device provides real-time measurements of:

  • CO2 (Carbon Dioxide)
  • PM2.5 (Particulate Matter 2.5)
  • PM10 (Particulate Matter 10)
  • Temperature
  • Humidity

It features:

  • Maximum/Minimum/Average value display: Allows users to view the highest, lowest, and average readings for the measured parameters.
  • Auto-power on/off function: Helps conserve battery life.
  • Adjustment and calibration function: For CO2, temperature, and humidity.
  • CO2/PM2.5/PM10 red backlight alarm: The LCD backlight turns red and related measurement items flash when a set alarm value is reached.
  • Manual record and auto-record: Users can manually save data or set the device to automatically record measurements.
  • Key sound: Provides audible feedback for operations.
  • Overload indication (OL): Alerts the user if a measurement exceeds the device's range.

Important Technical Specifications

General:

  • Dimensions: 150mm (L) x 65mm (W) x 22mm (H)
  • Weight: 190 g
  • Display size: 52mm (L) x 40mm (W)
  • Operating temperature and humidity: 0°C ~ +50°C, <80%RH (no condensation)
  • Storage temperature and humidity: 0°C ~ +60°C, <70%RH (no condensation)
  • Operating altitude: up to 2000M
  • Operating environment: Indoor use; Pollution degree 2
  • EMC: EN61326-1:CISPR 11:Group 1, Class B

Power:

  • Battery: 3.7V 2000mAh rechargeable lithium battery
  • Transformer for charging: 1A/5V
  • Battery life: Approximately 6 hours of continuous use
  • External power supply: 5V micro USB interface

Measurement Parameters:

PM2.5:

  • Sensor: Laser particulate matter sensor
  • Measuring range: 0-500 µg/m³
  • Accuracy: ±8µg for <=50µg/m³, ±10% of reading value for >50µg/m³
  • Resolution: 1
  • Reaction time: <10 seconds

PM10:

  • Sensor: Laser particulate matter sensor
  • Measuring range: 0-500 µg/m³
  • Accuracy: ±10µg for <=50µg/m³, ±15% of reading value for >50µg/m³
  • Resolution: 1
  • Reaction time: <10 seconds

CO2:

  • Sensor: Non-Dispersion Infrared (NDIR)
  • Measuring range: 400 to 9999ppm
  • Accuracy: ±70ppm ±3% of readings (for 400-2000ppm)
  • Resolution: ±1ppm
  • Reaction time: 90% during about 2 minutes

Temperature:

  • Sensor: Bandgap temperature sensor
  • Effective range: -10°C~50°C / 14°F~122°F
  • Accuracy: ±1.0°C/±1.8°F (Non-charging and 30 minutes after charging)
  • Resolution: 0.1°C / 0.1F (0~35°C / 32°F~95°F); 1°C / 1°F (Above 100°C /°F or below -10°C /°F)
  • Reaction time: About 1 second

Humidity:

  • Sensor: Capacitive humidity sensor
  • Effective range: 1-99%
  • Accuracy: ±5.0%RH (10~90%); ±8.0%RH (<10%, >90%) no condensation, at 25°C
  • Resolution: 0.1%
  • Reaction time: About 4 seconds

Alarm Settings:

  • CO2 alarm setting: Default 1000PPM
  • PM2.5 alarm setting: Default 35µg/m³
  • PM10 alarm setting: Default 75µg/m³

Recording:

  • Manual and automatic recording: 20 logs
  • Auto-recording time interval settings: 5 seconds, 10 seconds, 5 minutes, 10 minutes, 20 minutes, 30 minutes, 60 minutes (default 5 seconds)
  • Sampling time: 2.5 seconds (5 types, 0.5 seconds for each)

Usage Features

Power On/Off:

  • Press the power button to turn the device on or off.

Auto Power Off:

  • In power-on status, press and hold the power button for more than 2 seconds to disable or resume the auto power off function.
  • When auto power off is activated, a clock icon appears, and the device will automatically turn off after 30 minutes.

Backlight Mode:

  • Press the "right-side button" to turn on or off the backlight.
  • When the red backlight for alarm is on, this button is invalid.
  • The backlight mode is turned off automatically after 15 seconds.

MAX/MIN/AVG and MAN MIN:

  • Press the MAX MIN button to enter this function. The MAX value is shown on the screen and it displays the maximum value.
  • Press the MAX MIN button repeatedly to select the function of MIN/AVG/MAX MIN/MAX and update the displayed value.
  • When selecting the MAX MIN function, it displays the current measured value.

REC Manual Record:

  • Press the REC button to save one data log. A "REC" icon and the log number appear on the LCD for one second.
  • For example, if the log number is 10, it will increase by 1 when pressing the REC button every time.
  • When reaching the maximum log number (20), "FULL" appears.

LOG Auto-Recording Function:

  • Press and hold the REC button for more than 2 seconds to start the auto-recording function. A "LOG" icon appears on the LCD, and auto-recording starts.
  • If the power is insufficient during auto-recording, a battery icon appears, and auto-recording will be forcibly stopped.
  • When reaching the maximum log number (20), "FULL" appears.
  • Press and hold the REC button again for more than 2 seconds to exit the auto-recording function.

Read Data Recorded in Memory:

  • Press the R-M button to enter the memory-reading mode. A "R-M" icon and the log number appear on the LCD for one second. The record is then displayed.
  • Read the data recorded in the memory with the R-M or REC buttons.
  • Press and hold the R-M button to exit this mode.

°C or °F Units:

  • At shutdown status, press and hold the R-M button, then press the power button to turn on the meter.
  • After the software version appears, release the R-M button.
  • Repeat the above steps to switch the unit.

Clear Memory:

  • At the shutdown status, press and hold the MAX MIN button and then press the power button to turn on the meter.
  • After the software version appears successively on the LCD, release the MAX MIN button to clear the memory.

Turn On/Off Key Sound:

  • The sound is defaulted as on and is displayed by a speaker icon.
  • At the shutdown status, press and hold the REC button and then press the power button to turn on the meter.
  • After the software version appears, release the REC button. If the speaker icon disappears, the key sound is off.
  • Repeat the above step to turn on the key sound.

Resume Factory Settings:

  • At the shutdown status, press and hold the "right-side button" and then press the power button.
  • After the software version appears successively on the LCD, release the "right-side button" to complete the process of resuming to the factory settings and clearing the memory.
  • This will set auto-shutdown to OFF, key sound to On, calibration value to 0, CO2 Abc to OFF, and clear memory.

Function Settings:

  • Press the "right-side button" for more than 2 seconds to enter the setting mode.
  • Press the "right-side button" repeatedly to enter setting functions 1 through 8 in sequence.
    • SET 1. Time interval setting: Select interval from 5s to 60min.
    • SET 2. CO2 alarm setting: Adjust CO2 alarm value.
    • SET 3. PM2.5 alarm setting: Adjust PM2.5 alarm value.
    • SET 4. PM10 alarm setting: Adjust PM10 alarm value.
    • SET 5. CO2 Abc self-calibration mode: Factory calibration use only.
    • SET 6. CO2 manual calibration: Directly increase or decrease the displayed value of CO2.
    • SET 7. Temperature calibration: Directly increase or decrease the temperature value.
    • SET 8. Humidity calibration: Directly increase or decrease the humidity value.

Maintenance Features

Battery Management:

  • The battery-low indicator (empty battery icon) indicates the battery is low; please charge it in time.
  • The battery-low indicator (flashing empty battery icon) indicates the battery is critically low, and the power will be turned off after 5 seconds.
  • Charging indication: The battery indicator will sequentially vary as it charges from right to left and shows a full battery icon when fully charged.
  • When the external power supply is connected, the auto-power off is disabled, and the white backlight is always on.

Cleaning:

  • If dirty, wipe with a soft cloth, such as a glasses cloth.
  • Do not clean with chemical solvents.

Repair:

  • If a fault occurs, the meter should only be sent to authorized service suppliers or returned to the original factory for maintenance.

Environmental Considerations:

  • High-humidity environments: If used in a high-humidity environment, place the meter in a low-humidity environment for 24 hours after use.
  • Product disposal: The device and its accessories should be subject to separate collection and correct disposal to avoid environmental pollution. Do not throw it away directly.

Tenmars TM-380 Specifications

General IconGeneral
BrandTenmars
ModelTM-380
CategoryMonitor
LanguageEnglish