10 11
DE
Montage- und Bedienungsanleitung
Geprüft und zugelassen nach:
Geprüft nach 15A (Österreich)
CE EN 13240
BImSchV 1+2
NS 3058
Luftreinhalte-Verordnung der Schweiz
Festbrennsto verordnung der Städte München, Regensburg, Aachen und Düsseldorf
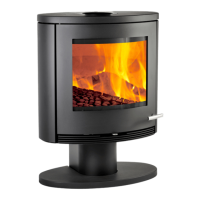
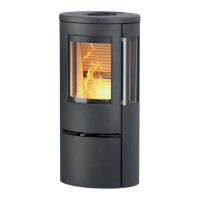
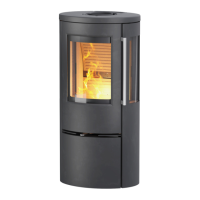
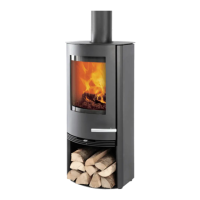
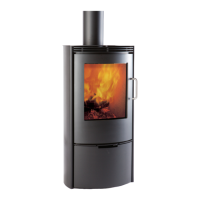
Wir gratulieren Ihnen zu Ihrem neuen Kaminofen und danken Ihnen, dass Sie sich für einen Ofen
von TermaTech entschieden haben. Wir wünschen Ihnen viele gemütliche und wohlig warme
Stunden mit Ihrem neuen Kaminofen!
Vor der Inbetriebnahme des Ofens lesen Sie bitte diese Montage- und Bedienungsanleitung
sorgfältig durch, um sich mit den gesetzlichen Bestimmungen und den P ege- und Wartungsan-
leitungen vertraut zu machen. Auf diese Weise kann gewährleistet werden, dass der Ofen optimal
funktioniert und Sie viele Jahre lang von Ihrer Investition pro tieren können.
Zusammen mit Ihrem Ofen wurde diese Anleitung mitgeliefert.
Aufstellhinweise………………………………… Seite 11
Heizanleitung …………………………………… Seite 13
Wartung & P ege………………………………. Seite 14
Garantie & Reklamationsrecht................. Seite 15
Wichtige Tipps & Ratschläge… …………… Seite 16
Betriebsstörungen..……………....…………… Seite 16
Technische Daten………..………...………….. Seite 17
Montageanleitung TT22HST..................... Seite 57
AUFSTELLHINWEISE
(Montageanleitung TT22HST - Seite 57)
Der Kaminofen ist anschlussfertig montiert, wenn Sie Oben Abgang wünschen.
Oben Abgang:
Entfernen Sie die Runde Stahlplatte aus der Stahl-Einlege-Platte. Danach können die Ver-
bindungsrohre auf den Abgangsstutzen montiert werden.
Hinten Abgang:
Entfernen Sie die die Stahl-Einlege-Platte. Schrauben Sie den Abgangsstutzen ab. Hinten entfer-
nen Sie die 2 hinteren runden Stahlteile von der Rückwandplatte und von der mittleren Strahls-
chutzplatte (diese können sie ausbrechen). Danach schrauben Sie die innere runde Abdeckplatte
ab und montieren diese oben, wo der Abgangsstutzen montiert war. Somit haben Sie den Oben
Abgang geschlossen. Hinten schrauben Sie den Abgangsstutzen fest. Danach können Sie die Ver-
bindungsrohre montieren.
Der Abgangsstutzen muss mit einem Verbindungsstück an den bestehenden Hausschornstein an-
geschlossen werden bzw. an einem neuen Schornstein. Das Verbindungsstück soll möglichst kurz,
geradlinig, waagerecht oder steigend sein. Verbindungen sind abzudichten.
Der TT22 ist eine Zeitbrand-Feuerstätte
Nationale und Europäische Normen, örtliche und baurechtliche Vorschriften sowie feuerpoli-
zeiliche Bestimmungen sind einzuhalten. Informieren Sie daher vorher Ihren Bezirksschornste-
infegermeister. Es ist sicherzustellen, dass die für die Verbrennung benötigte Luftmenge ausrei-
chend ist. Hierauf ist besonders bei dichtschließenden Fenstern und Türen zu achten.
Die Schornsteinberechnung erfolgt nach DIN EN 13384-1 bzw. DIN EN 13384-2 mit dem dieser
Anleitung zugefügten Wertetrippel.
Prüfen Sie vor dem aufstellen, ob die Tragfähigkeit der Unterkonstruktion dem Gewicht Ihres Ka-
minofens standhält. Bei unzureichender Tragfähigkeit müssen geeignete Maßnahmen (z.B. Platte
zur Lastverteilung) getro en werden, um diese zu erreichen.
Allgemeine Sicherheitshinweise
Durch den Abbrand von Brennmaterial wird Wärmeenergie frei, die zu einer starken Erhitzung der
Ydeevnedeklaration
TT22-CPR-2013-Version 3
Produkt:
Produkttype/anvendelse: Rumopvarmer fyret med fast brændsel uden varmtvands tilslutning
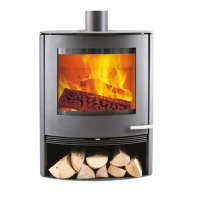
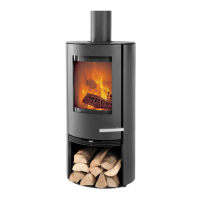
Type: TT22: S01-640/641, TT22S: S01-642/643, TT22H: S01-644/645,
TT22HS: S01-646/647, TT22R: S01-648/649 TT22HST: S01-650/651
TT22RP: S01-654, TT22RPS: S01-656
Brændsel: Træ
Produktions nr. Se mærkeplade bag på ovnen
Producent:
Fabrikant: TermaTech A/S E-mail: info@termatech.com
Gunnar Clausens Vej 36 Web: www.termatech.com
8260 Viby J Tel.: +45 8742 0035
Danmark
Certificering og lovkrav:
AVCP system: System 3
Europa standard: DS/EN 13240:2001 + A2:2004
Certificering:
Teknologisk Institut, notificeret organ nr. 1235, har udført bestemmelse af
produkttypen og deklareret ydeevne på grundlag af typeprøvning og udstedt
testrapport nr. TT22 TI 300-ELAB-1778-EN + 300-ELAB-1778-EN-Rev-1.
Deklareret ydeevne:
Undertegnede er ansvarlig for fremstilling og overensstemmelse med den deklarerede ydeevne.
Viby 7.3.2013 Søren Toft______________________________
Harmoniseret teknisk
standard
CE/DS/DIN/EN
13240:2001+ A2:2004
Afstand til brændbart materiale
Til bagvæg: min. 150 / 50 mm
Til Sidevæg: min. 450 mm
Til hjørne 45°: min. 150 mm
Andre afstande – se installationsvejledning
Emission fra forbrændingen
NOx = 101 mg/m³
OGC = 95 mgC/Nm³
NPD (Ingen ydeevne fastlagt)
NPD (Ingen ydeevne fastlagt)
Risiko for at gløder kan falde ud
Emission af farlige stoffer