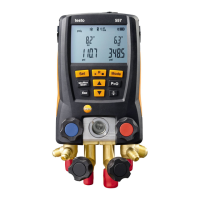
testo 557 Digital Manifold
with Bluetooth/App
Quick Start Guide
Temperature port on each side
2 line, backlit LCD display
Control keys
Pressure zeroing
Arrow keys
Escape
3 x 1/4” SAE connections
Show Min/Max/Mean values
Valve knobs
measurement mode. Please make sure to repeat step 2 to turn the
Tfac back to ON before starting normal testing again.
Vacuum / Evacuation
1. Insert the external vaccuum probe into the top
socket. (Pic. 16).
2. Turn on the testo 557
3. Press the [Mode] button twice to get to the
vacuum /evacuation mode (Pic. 17).
4. Attach the external vacuum probe to the system.
5. Start the evacuation.
Warranty
The testo 557 has a two year warranty. If registered, the warranty is extended to 5 years.
Pic. 17
5/8” SAE evacuation port
Leak Test
T
he temperature compensated leak test is used to indicate leaks in
an AC
/R or heat pump system.
1. P lug in the temperature probe into the high side of the
instrument.
2. P ress the set button 6 times to reach the Tfac setting. Press the
UP arrow to cycle this setting to OFF. Press SET to select this setting
3. Z ero the pressure sensors.
4. Connect the testo 557 to the system.
5. P ress the [Mode] button once to get to the leak test mode
(Pic. 14).
6. N ow press the [R, Start/Stop] button to start the test. (Pic. 15).
7. T he test duration depends on the system size.
8. P ress [R, Start/Stop] again to stop the test.
9. T he results will be displayed.
10. Press the [Mode] button twice to return to the normal
Pic. 15
Pic. 14
Power On/Off
Backlight
Pic. 16
The testo 557 now comes standard with Bluetooth.
1. First, turn on the testo Refrigeration App on your smart
device.
2. Once the app is running, turn on the testo 557.
3. Press and hold the UP and DOWN arrow simultaneously to
activate Bluetooth.
4. The Bluetooth icon will flash to the left of the battery display
icon and remain on once bluetooth is activated.
5. The app will now show your 557 as an available device.
(Pic 18)
6. Select your instrument in the app to pair your
557.
Bluetooth Activation
Pic. 18