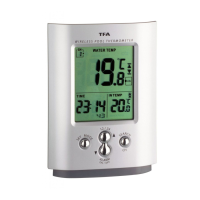
MIAMI – Wireless pool thermometer
MIAMI – Wireless pool thermometer
1716
7.3.3 Maximum/Minimum function
• Press “MAX/MIN” button to show the maximum (MAX) temperature of the indoor
sensor and the selected outdoor transmitter. Press “MAX/MIN” button again to show
minimum (MIN) values.
• Hold “MAX/MIN” button for 3 seconds to clear the recorded maximum and minimum
reading.
7.3.4 Temperature alert
• Press “ALERT” button to set the temperature alert function on or off. ( appears on
the LCD if this function is on).
• Hold “ALERT” button for 3 seconds to enter the Alert setting mode. Indoor tempera-
ture flashes. Press “▲” or “▼“ button to select indoor or outdoor temperature and the
requested channel for the temperature alert. Press ”ALERT” button to confirm the set-
tings. Press “▲” or “▼“ button to set the upper temperature limit (upwards arrow
is flashing). Press ”ALERT” button to confirm the settings. Press “▲” or “▼“ button to
set the lower temperature limit (downwards arrow is flashing).
• When passing or falling below the selected temperature limit an alarm signal will
sound for 5 seconds and the temperature display begins to flash. The alarm signal
keeps on beeping every minute as long as the temperature is higher/lower than the
preset value (5 times maximum) or the ALERT button is pressed.
• Attention: Is the temperature within the preset limits the display stops flashing.
8. Transmitter
• After starting up the transmitter will automatically transmit the temperature values to
the display unit.
• Press “°C/°F” button on the transmitter to change the temperature unit on the sensor
display from °C to °F.
• Press “TX” button on the transmitter to transmit temperature to the weather station
manually (e.g. for testing or in case of loss of transmitter signal). The basic unit gives a
“beep” sound if it received the temperature.
8.1 Additional transmitters
• The unit is expandable up to 3 outdoor transmitters (item no. 1x 30.3160 / 30.3139),
also for the control of outdoor temperature and remote rooms, e.g. children’s room,
wine-cellar
• For having more than one external transmitter, select different channels for each sen-
sor by the “CH 1-2-3” switch. The new transmitter will be received automatically by
the display unit. The pool sensor is firmly adjusted to channel 1.
• The instrument will quit the setting mode, if there is no button used within 5 seconds
period.
• Holding “▲“ or “▼“ button, you will enter fast mode.
7.1 Setting of clock and calendar
• Hold “MODE” button for 3 seconds. The hour digit is flashing. Press “▲” or “▼” but-
tons to adjust hours. Using “MODE” button you can switch to setting minutes, sec-
onds, year, month/day sequence, month, day, time zone and day-of-week language.
• In “month/day sequence” the two different date displays can be selected: Month/date
(American version) or date/month (European version).
• Day-of-week language: English (EN), German (GE), French (FR), Spanish (ES), Italian
(IT), Dutch (NE), Danish (DA).
• Choose 12 HR or 24 HR system by pressing the “▲ (12/24)” button.
7.1.1 Indication of date
• Press “MODE” button to show the date.
7.2 Alarm clock function
• Select your desired alarm by pressing “MODE” button again:
1. Alarm 1
2. Alarm 2
• Set the alarm time in the desired alarm mode. Hold “MODE” button for 3 seconds. The
hour digits are flashing. Press “▲” or “▼“ button to adjust the time. Confirm with
“MODE” button. Set minutes in the same way.
• To activate or deactivate the alarm function press “▼ ALARM ON/OFF” in the respec-
tive alarm mode. “ON” or “OFF” appears on the display.
• Once the alarm starts to ring, you can stop the alarm by pressing any button.
7.3. Thermometer
7.3.1 Change °C/°F
• Press “▼ ALARM ON/OFF“ button to select temperature display in Celsius mode or
Fahrenheit mode.
7.3.2 Trend pointer
• The trend pointer displayed on the LCD indicates if the water temperature (channel 1)
is increasing, steady or decreasing.
 Loading...