2120
Digital alarm clock with USB charging function
• Protect it from moisture.
• Do not apply excessive force when connecting a USB cable. The USB plug fits only one way into the USB port.
5. Elements
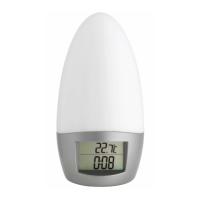
A: Display (Fig. 1):
A 1: Time A 2: AM/PM
A 3: Alarm symbol A 4: Alarm time
A 5: Snooze symbol A 6: Indoor temperature
A 7: Charging symbol port 1+2
B: Buttons (Fig. 1-3):
B 1: SNOOZE/LIGHT button / dial B 2: ALARM button
B 3: °C/°F button B 4: 12H/24H button
B 5: Volume control wheel B 6: SET/LOCK switch
C: Housing (Fig. 1-4):
C 1: USB Port 1 C 2: USB Port 2
C 3: Temperature sensor C 4: Speaker
C 5: Power adapter jack C 6: Battery compartment
Digital alarm clock with USB charging function
6. Getting started
• Remove the protective film from the display.
• Insert the power adapter pin into the device jack and connect the plug to a wall socket. Important! Make sure that your
household voltage is no more than 240V! Otherwise your device may be damaged.
• 00:00 and the indoor temperature appear on the display.
6.1 Insert the batteries
• The batteries will operate as a backup power source in case of power failure.
• For a permanent backlight, to use the charging function and to conserve battery power, use the supplied power adapter.
• Open the battery compartment at the bottom of the device.
• Insert three new AAA 1,5 V batteries into the battery compartment. Make sure the polarity is correct.
• Close the battery compartment again.
7. Operation
7.1 Backlight
• Attention: Continuous illuminated backlight only works when using the power adapter.
• Press the SNOOZE/LIGHT dial and you can select between four levels of brightness.
• To temporarily activate the backlight, press any button (in battery operation only).
TFA_No. 60.2017_anl_02_17 15.02.2017 16:33 Uhr Seite 11