Do you have a question about the thomann Harley Benton JA and is the answer not in the manual?
Design the headstock shape, ensure clearance for tuning pegs, and deburr the edge.
Prepare, paint, and cure the body and neck, ensuring a dust-free environment.
Insert and hand-tighten machine heads, aligning tuning pegs perpendicular to the headstock.
Secure string retainers in headstock holes, ensuring they can move freely.
Fit the neck into the body cutout and secure it using the mounting plate and screws.
Bolt the pre-assembled pickguard and pickups to the body, ensuring proper wiring.
Place the bridge and tailpiece onto the mounting bolts on the body.
Thread strings, tune, adjust neck relief, string action, and intonation for optimal playability.
Screw the strap pins into the pre-drilled holes on the guitar body.
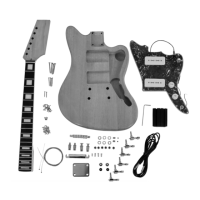
This document is a user manual for the Harley Benton Electric Guitar Kit JA, a do-it-yourself kit designed for assembling an electric guitar. The manual provides comprehensive instructions for building the guitar, from preparing the wooden components to stringing and making final adjustments.
The primary function of this product is to allow individuals to assemble their own electric guitar. This kit provides all the necessary wooden parts, hardware, and electrical components, offering a hands-on experience in understanding the construction and mechanics of an electric guitar. The process involves several stages, each detailed to ensure a successful build.
The assembly process begins with preparing the wooden components. The first step involves cutting out the headstock to a desired shape. Users are advised to use a suitable saw and ensure sufficient clearance around the peg holes for stability, referencing the retaining rings of the tuner mechanics. After shaping, the cut edges should be deburred with sandpaper or a file.
Next, the body and neck need to be painted. The guitar body is made of solid wood, sealed and prepared for various lacquer coatings. Users can choose from a wide range of finishes available at DIY, timber, or automotive outlets. Before painting, it's crucial to check the fit of the neck to the body joint. If the neck is too tight, it can be reworked with a sharp chisel or sandpaper, keeping in mind that lacquer will make the fit slightly tighter. All surfaces must be clean and free of dirt and dust before painting. Painting should be done in a well-ventilated, dust-free environment. It's recommended to test the chosen color and technique on a separate piece of wood first. The painting process involves applying layers, starting with the edges, then the front and back. Any surface irregularities should be corrected with fine sandpaper (e.g., 800+) after the paint has dried. For full coverage, three or more layers are suggested. After painting, the body should be hung to dry in a dry, dust-free, and sunlight-protected area for two to three days until fully cured. Finally, the body can be polished or burnished to achieve the desired finish, taking care not to buff too vigorously.
The guitar neck comes sealed with a thin layer of matt lacquer and is ready to use. However, if a colored or clear lacquer is desired, the fingerboard and frets must be carefully masked off before painting. Similar to the body, the neck surfaces must be clean and dust-free, and painting should occur in a well-ventilated, dust-free environment. A good quality clear or slightly tinted wood paint is recommended. The process involves applying thin, even layers to the front and headstock edges, allowing each layer to dry, and repeating two or three times. Surface irregularities should be corrected with fine sandpaper. Once the headstock is dry, the neck can be placed on the fingerboard to paint the back of the neck. After two to three days of curing, the neck can be polished or burnished.
Following painting, the hardware assembly begins. The machine heads are mounted from the rear side of the headstock into the bores, ensuring the tuning pegs are perpendicular to the headstock's top. They are then hand-tightened with supplied screws, washers, and nuts from the front. A wrench is used for final tightening of the nuts, and then the screws on the rear side are secured.
The two string retainers are secured on the front of the headstock in the holes next to the machine heads. The string retainer with the larger spacer should be placed in the hole closer to the saddle. These retainers are designed to move freely and are only fixed by string tension.
Mounting the guitar neck involves placing the body on a soft-padded work surface to prevent damage. The neck is fitted into the neck cutout; if necessary, a chisel or sandpaper can be used for minor adjustments to ensure a tight fit without excessive clearance. The guitar is then turned over, and the mounting plate is positioned over the four screw holes on the back. The four supplied long wood screws are driven through the mounting plate into the body and neck to create a firm connection.
The pickguard and pick-ups are then installed. The pots, switches, and output socket are pre-assembled on the pickguard and only need to be grounded. The string-earthing cable (stripped, without connectors) is threaded through a channel from the back hole into the bridge mounting hole, ensuring sufficient contact with the metal surface when the bridge is fitted to reduce noise. The mounting bolts for the bridge and tailpiece are hammered into the body using a rubber mallet, ensuring contact with the grounding cable. The bridge and tailpiece mounting bolts are then screwed into their brackets. The pickguard is placed on the front of the body, ensuring all wiring is neatly tucked into the recess, and then screwed to the body with the provided screws. The supplied inserts are placed into the recess of the bridge pick-up, and the pick-ups are screwed into place. Springs are then inserted onto the pick-up screws. Finally, the pick-ups are inserted into their recesses and screwed to the body, making sure the wiring is not obstructed or visible.
Stringing the guitar involves threading the strings through the tailpiece, over the bridge, and into the holes of the machine heads. The string ends are wrapped a few times around the pegs and hand-tightened. It's important to ensure each string is in its correct saddle position and string retainer. All strings are then tuned to the correct pitch using a tuner or pitch pipe. The string tension will initially drop, requiring several retuning sessions until the strings stabilize. Protruding string ends are then shortened with a wire cutter.
The manual includes instructions for adjusting neck relief, string action, and pick-ups, which are crucial for maintaining playability and sound quality.
The neck is equipped with a steel truss rod for individual neck relief adjustment. After tuning, the neck relief is checked by pressing the low E string at the first and twelfth frets and observing its proximity to the fingerboard at the sixth fret. Buzzing indicates insufficient relief. To adjust, turning the truss rod clockwise increases tension, making the neck straighter (or convex), bringing the string closer to the fingerboard for easier grip but potentially causing more background noise. Turning it counter-clockwise decreases tension, allowing the neck to curve concave, moving the string away from the fingerboard, making it harder to grip but reducing noise. Adjustments should be made in quarter-turn increments, followed by retuning and rechecking until the desired relief is achieved.
String action is adjusted using two screws on the right and left of the bridge, and individual string saddles. Lower string action makes the strings easier to grip but can cause slight background noise.
Octave intonation is checked after setting string action. All strings are tuned to pitch. The first string is touched just above the twelfth fret and hit. The resulting overtone (harmonic) at the 12th fret should match the pitch of the string fretted at the 12th fret. If the pitches differ, the bridge piece for that string is moved forward (if the tone is too low) or backward (if too high). Incremental changes are made until the notes match. Alternatively, an instrument tuner can be used to ensure the 12th fret note is one octave higher than the open string.
Finally, the strap pins are screwed into the pre-drilled holes in the body.
The manual also includes safety instructions, such as keeping plastic bags and small parts away from children to prevent choking hazards, and caution regarding sharp edges during assembly. Environmental protection guidelines are provided for the disposal of packaging materials and the old device, adhering to the European Waste Electrical and Electronic Equipment Directive (WEEE).
| Material | Wood |
|---|---|
| Color | Black |
| Folding | No |
| Weight | 5.5 kg |
| Product Type | Gig Bag |
| Compatibility | Electric Guitars |