Do you have a question about the Thule BIG MOUTH 599XTR and is the answer not in the manual?
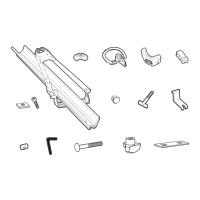
Component A: Wheel tray for mounting.
Component B: The main upright carrier structure.
Component C: Adapter for road bikes.
Component D: Strap to secure the wheel.
Component E: Cap for the carrier ends.
Component F: Lever for securing the bike.
Component G: Plug for the lock mechanism.
Component H: T-bolt for fastening.
Component I: Clamp for mounting.
Component J: Barrel nut for assembly.
Component K: Hex key for adjustments.
Component L: Bolt for carriage assembly.
Component M: Knob with three wings for tightening.
Component N: Plate used with washers.
Component O: Nut with a square profile.
Component P: Standard M6 x 8 bolt.
Loosen and slide down tube holder assembly to opposite end of tray.
Position holder plate 12" from the tray end and re-tighten.
Drop carriage bolts into washer plate.
Slide bolts/plate into channel under wheel tray.
Slide strap into tray channel and buckle on same side as lock.
Flex tab up and slide end cap on.
Install barrel nut into cam handle.
Install I-clamp into mounting plate.
Fasten carrier to bar using t-bolt, ensuring firm pressure when closing.
Attach tray with washer plate and knobs, tightening firmly.
Center bike downtube in the middle of the jaws.
Release handle, push slider down, engage handle to secure downtube.
Slide on adapter for road bikes; invert or remove for mountain bikes.
Remove lock plug and install the lock cylinder.
| Category | Automobile Accessories |
|---|---|
| Type | Bike Rack |
| Model | BIG MOUTH 599XTR |
| Brand | Thule |
| Mounting | Roof |
| Capacity | 1 bike |
| Lockable | Yes |